Introduction
This document describes how a software developer can develop a new application from the core components of the KNSG Framework. A good understanding of the Architecture of KNSG is required to make this tutorial more useful. See KNSG Architecture Version 1.0 for details of the framework architecture.
Purpose
The purpose of this document is to take a developer through the process of creating a new application with the KNSG Framework.
Setup Development Environment
For setting up the development environment, see Setup KNSG Development Environment, which will guide you through the process of setting up Eclipse with the necessary plug-ins, including those for PTPFlow and the KNSG Framework.
Create New RCP Application
Launch Eclipse
Now that the development environment is setup, launch Eclipse and choose a workspace to start building your new application. If you went through the development setup tutorial in the last section, you already have a workspace, knsg_workspace, where you downloaded the KNSG Framework. For this tutorial, we will assume you are using the knsg_workspace. Otherwise, you will need to create a new workspace and download the KNSG Framework plugins specified in the development setup tutorial before continuing.
RCP Plugin
The first task we need to accomplish is to create an RCP Plugin that can launch the KNSG Framework core plugins. This will give us a good starting point for our new application. To create an RCP Plugin, do the following:
- Go to File-> New -> Project
- In the dialog that comes up, expand Plug-in Development and choose Plug-in Project and Click Next. See image below:

- In the dialog that comes up, for project name, enter: edu.illinois.ncsa.knsg.tutorial.rcp. Click Next. See image below:

- In the dialog that comes up, change the Name field to Tutorial RCP, for the Activator field, change this to: edu.illinois.ncsa.knsg.tutorial.rcp.osgi.Activator. Finally, where it says Rich Client Application, select yes. Click Next. See image below:

- In the dialog that comes up, where it says Available Templates: choose the Hello RCP template and click Next. See image below:

- In the dialog that comes up, change the Application window title to Tutorial RCP and click Finish. See image below:

After clicking Finish, your workspace should look similar to the one below:

The mouse pointer is pointing at the new RCP Plugin we created. To launch this very basic RCP Application, click the Launch and Eclipse application link in the Testing section. You should see your application launch with a screen similar to the one below:

Right now all we have is a skeleton application with Eclipse plug-ins providing basic functionality to an application named Tutorial RCP. In the next section, we'll go into how to add the KNSG Framework parts to our new application. You can go ahead and close the Tutorial RCP by clicking on the X button to close the window.
New Product Application
In this section, we will accomplish the following tasks:
- Create and Define a New Product
- Define New Feature
- Edit Product File
- Define Application Perspective
- Launch our New Product
- Customize Look and Feel
Create and Define a New Product
A product file allows us define whether our application is composed of plug-ins or features (groups of plug-ins) and control the general appearance of our application. The product allows us to specify the application icon, splash screen, application title bar, launch icon, etc. Features allow us to define a set of plug-ins that belong to a common group (e.g. the edu.illinois.ncsa.knsg.feature contains all the features that make up the KNSG framework). It simplifies managing groups of plug-ins. In order to launch our new application from features, we need to create a new Eclipse Product file so we can specify which features to include. To create a new product file in our RCP plug-in, do the following:
- Right click on edu.illinois.ncsa.knsg.tutorial.rcp and select New > Product Configuration
- Make sure edu.illinois.ncsa.knsg.tutorial.rcp remains selected and where it says File name: enter tutorial.product. Where it says Initialize the file content, select the Use a launch configuration option and make sure the selection is edu.illinois.ncsa.knsg.tutorial.rcp.application. Click Finish.
You should now have a product file and Eclipse should have opened it for you automatically. In the Product Definition section, click the New... button and do the following:
- In the wizard page that opens up, find the Product Definition section and where it says Product Name:, enter Tutorial RCP
- In the same wizard page, find the Product Application section and where it says Application, choose edu.illinois.ncsa.knsg.tutorial.rcp.application
- Click Finish.
Your product file should look similar to the one in the image below:

Note: I have minimized a few of my workspace views to highlight the product file and decrease the image size.
Now that we have a product file, we need to define which features it depends on. Both PTPFlow and the KNSG Framework have already defined their features; however, the RCP Plug-in we created does not belong to a feature yet so we must create one for it since products can only depend on either features or plug-ins. We will learn how to create a feature and add our plug-in to it in the next section.
Define New Feature
Eclipse products can only depend on plug-ins or features so we must create a new feature for our plug-in, otherwise our application won't include our feature when it tries to launch. Our RCP Plug-in controls the layout of our application, including which views are part of the main perspective, how the views are laid out, the size of the main application window, etc making it a critical piece of our new application. So, to create a new feature, do the following:
- Go to File > New Project. Under Plug-in Development, select Feature Project. Click Next.
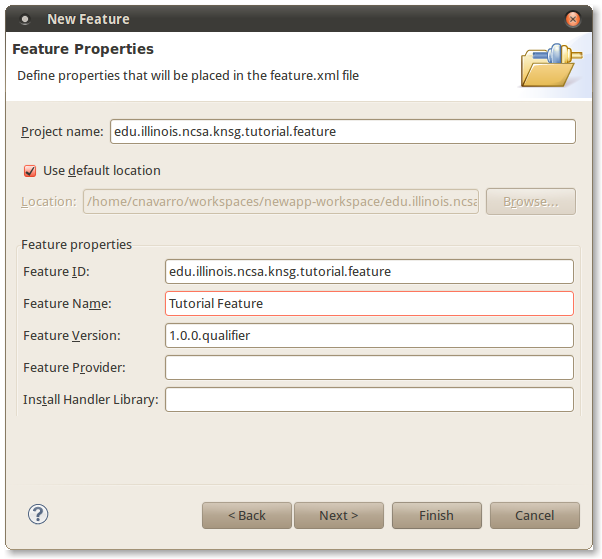
- Where it says Project Name enter edu.illinois.ncsa.knsg.tutorial.feature
- Where it says Feature Name enter Tutorial Feature. Click Next. See image below:
- The screen you should now see will let us specify an initial set of plug-ins that our new feature should include. Find our RCP plug-in edu.illinois.ncsa.knsg.tutorial.rcp in the list and check the box next to it to add it. Click Finish. See image below:

Now that we have all of the features required for our new application, in the next section we will learn about how to add these features to our new product file.
Edit Product File
To add features to our product file, do the following:
- If the product file is not already open, double click on it (tutorial.product) to open it in an editor view.
- Click on the Overview tab of the product file and find the section labelled The product configuration is based on: and select features.
- Next, click on the Dependencies tab of the product file and add the following features with the Add... button
- ncsa.rcp.feature
- ncsa.services.ptpflow.rmi.feature
- edu.illinois.ncsa.knsg.feature
- ncsa.eclipse.help.feature
- edu.illinois.ncsa.knsg.tutorial.feature
- Save the product file by using ctrl+s
Define Application Perspective
Now that we have included the features required for our RCP Application, we must define which views we want to include from the framework and PTPFlow in our Perspective.java class. The Perspective class defines the layout of the application and the default views that will open when the application first starts. To give our plug-in access to the views defined by PTPFlow and KNSG, we must update our RCP Plug-ins Dependencies. To edit the dependencies, do the following:
- Go to our RCP Plug-in, edu.illinois.ncsa.knsg.tutorial.rcp and expand the META-INF folder.
- Locate the MANIFEST.MF file and double click on it to open it in an editor.
- Next, click on the Dependencies tab, find the Required Plug-ins section and click the Add... button.
- add ncsa.eclipse.ptpflow.ui
- add edu.illinois.ncsa.knsg.ui
- Save the MANIFEST.MF file by using ctrl+s
Now that we have the plug-ins containing the views we want to add to our perspective, we must open the Perspective.java class. You can find this class inside the source folder of edu.illinois.ncsa.knsg.tutorial.rcp. Double click on the file to open it in an editor. You will notice that the file is empty except for a single blank method called createInitialLayout. Update this class with the following code:
import ncsa.eclipse.ptpflow.manager.views.PTPFlowRegistryView;
import ncsa.eclipse.ptpflow.manager.views.PTPFlowBasicConfigurationView;
import ncsa.eclipse.pwe.views.PweSummaryView;

import org.eclipse.ui.IFolderLayout;
import org.eclipse.ui.IPageLayout;
import org.eclipse.ui.IPerspectiveFactory;

import edu.illinois.ncsa.knsg.ui.views.KNSGScenariosView;
import edu.illinois.ncsa.knsg.ui.views.MetadataView;
import edu.illinois.ncsa.knsg.ui.views.RepositoryView;

public class Perspective implements IPerspectiveFactory {

    // Initial layout of the perspective, user can rearrange/resize after application launches
    public void createInitialLayout(IPageLayout layout) {

        // Don't show the Editor area, allows the application to utilize more of the workbench space
        layout.setEditorAreaVisible(true);

        // ID of View to Add, Location on the Page, Ratio of available area to use,  Reference Part to associate the view
        layout.addView(RepositoryView.ID, IPageLayout.BOTTOM, 0.2f, layout.getEditorArea());
        layout.addView(KNSGScenariosView.ID, IPageLayout.LEFT, 0.2f, layout.getEditorArea());

        // Creates a folder, bottom right, and the views it should contain
        IFolderLayout folder = layout.createFolder("services", IPageLayout.RIGHT, 0.2f, RepositoryView.ID);
        folder.addView(PTPFlowRegistryView.ID);
        folder.addView(MetadataView.ID);

        // Creates a folder, top right, and the views it should contain
        folder = layout.createFolder("workflow-manager", IPageLayout.RIGHT, 0.8f, layout.getEditorArea());
        folder.addView(PweSummaryView.ID);
        folder.addView(PTPFlowBasicConfigurationView.ID);
    }
}
After editing the file, use ctrl+s to save the file. For information about the KNSG framework views (MetadataView, ScenarioView and the RepositoryView), see the KNSG architecture document here.
One other file we will want to edit is the ApplicationWorkbenchWindowAdvisor.java file in our RCP Plug-in. Update your file so it matches the one below and then use ctrl+s to save the file.
    public ApplicationWorkbenchWindowAdvisor(IWorkbenchWindowConfigurer configurer) {
        super(configurer);
    }

    public ActionBarAdvisor createActionBarAdvisor(IActionBarConfigurer configurer) {
        return new ApplicationActionBarAdvisor(configurer);
    }

    public void preWindowOpen() {
        // Get the workbench window configuration
        IWorkbenchWindowConfigurer configurer = getWindowConfigurer();

        // Set the initial size (resolution) of the workbench window
        configurer.setInitialSize(new Point(800, 600));

        // Specifies whether the application has a coolbar (type of toolbar) at the top of the application (can be horizontal or vertical)
        configurer.setShowCoolBar(false);

        // Reserved space at the bottom of the application window to show status information
        configurer.setShowStatusLine(true);

        // Sets whether the underlying workbench window has a progress indicator
        configurer.setShowProgressIndicator(true);

        // Workbench window title
        configurer.setTitle("Tutorial RCP");
    }
The above changes will add a status line to our application so we can see status messages and allow progress indicators to show the progress of jobs.
Finally, we need to edit the ApplicationWorkbenchAdvisor.java class so that our application saves its current state. Find the ApplicationWorkbenchWindowAdvisor.java class inside our RCP Plug-in and add the following method to that class:
public IWorkbenchConfigurer getWorkbenchConfigurer() {
    // Get the workbench configuration
    IWorkbenchConfigurer configurer = super.getWorkbenchConfigurer();

    // Tells the workbench to save state when the application closes and restore it when reopened
    configurer.setSaveAndRestore(true);

    return configurer;
}
Launch our New Product
Now that our perspective is defined and we have all required plug-ins, let's launch our RCP Application now and see what it looks like.
- Locate the tutorial.product file and open it by double clicking on it.
- Click on the Overview tab and find the section labelled Testing.
- Click on Launch an Eclipse application. You should see an image similar to the one below:

Customize Look and Feel
You will notice that the tabs in our application lack the smooth curves that the views have in the Eclipse IDE. To remedy this, we need to create a plugin_customization.ini file with a few variables. To do so, do the following:
- Right click on our RCP Plug-in and select New > File.
- In the dialog that pops up, find where it says File name: and enter plugin_customization.ini and Click Finish. See the image below:

- The file should open in an editor, add the following lines and then use ctrl+s to save the file.
plugin_customization.ini
org.eclipse.ui/SHOW_TRADITIONAL_STYLE_TABS=false
org.eclipse.ui/SHOW_PROGRESS_ON_STARTUP=false
org.eclipse.ui/SHOW_MEMORY_MONITOR=true
org.eclipse.ui/DOCK_PERSPECTIVE_BAR=top_right
org.eclipse.ui/SHOW_SYSTEM_JOBS=true
If you relaunch the application, you should notice the tabs have changed to smooth curve lines as well as a memory usage indicator in the lower left corner of the application window.
Adding a New Workflow
In this section, we are going to create our application specific pieces that will build upon the KNSG Framework. The following is a list of what we will accomplish in this section:
- Create New UI Plug-in
- Create New Workflow
- Create New Application Wizard and Wizard Pages
- Execute New Workflow
Our goal is to create a workflow that will request an input from the user (a number) which we will use to compute the factorial. We will submit the workflow using KNSG/PTPFlow and then retrieve the result file that will include the numbers that are part of the factorial along with the answer.
Create New UI Plug-in
We will create a new plug-in similar to the way we created our new feature. To create a new plug-in, do the following:
- Go to File > New > Project
- In the wizard that opens, Find Plug-in Development, expand the folder and select Plug-in Project. Click Next.
- In the page that displays, look for the Project name: field and enter edu.illinois.ncsa.knsg.tutorial.ui. Click Next.
- In the page that displays, enter the following information:
- In the Name: field enter Tutorial UI.
- Find the Options section and locate the Activator: field and enter edu.illinois.ncsa.knsg.tutorial.ui.osgi.Activator.
- Where it says This plug-in will make contributions to the UI, make sure the box is checked.
- Finally, where it says Rich Client Application, make sure No is selected. Click Finish.
We now have a UI plug-in where we will contribute UI components for our new application. Don't forget, we also need to add this new plug-in to our tutorial.feature file. If you haven't already done so, add the plug-in to the feature now, then go to the next section to see the workflow we'll be creating.
Create New Workflow
Below is the workflow that we will execute. For more information about the parts of the workflow, go here
<workflow-builder name="knsg-tutorial" experimentId="knsgTutorialWorkflow" eventLevel="DEBUG">
  <!-- <global-resource>grid-abe.ncsa.teragrid.org</global-resource> -->
  <global-resource></global-resource>
  <scheduling>
    <profile name="batch">
      <property name="submissionType">
        <value>batch</value>
      </property>
    </profile>
  </scheduling>
  <execution>
     <profile name="inputs">
     	 <property name="RESULT_LOC">
     	 	<value></value>
     	 </property>
     	 <property name="EXECUTABLE">
     	 	<value></value>
     	 </property>
         <property name="FACTORIAL">
         <value></value>
         </property>

     </profile>
  </execution>
  <graph>
    <execute name="compute">
      <scheduler-constraints>batch</scheduler-constraints>
      <execute-profiles>inputs</execute-profiles>
      <payload>compute</payload>
    </execute>
  </graph>
  <scripts>
    <payload name="compute" type="elf">
      <elf>
        <serial-scripts>
          <ogrescript>
            <!-- Debug Statement
            <echo message="Result location = file:${RESULT_LOC}/${service.job.name} result directory is file:${runtime.dir}/result, copy target is file:${RESULT_LOC}/${service.job.name}"/> -->
            <simple-process execution-dir="${runtime.dir}">
              <command-line>${EXECUTABLE} -factorial ${FACTORIAL}</command-line>
            </simple-process>
            <mkdir>
            	<uri>file:${RESULT_LOC}/${service.job.name}</uri>
            </mkdir>
            <copy sourceDir="file:${runtime.dir}/result" target="file:${RESULT_LOC}/${service.job.name}"/>
          </ogrescript>
        </serial-scripts>
      </elf>
    </payload>
  </scripts>
</workflow-builder>
You can also download the workflow file here. In the next section, we will create the new analysis wizard and the pages to allow the user to provide inputs to the workflow.
Create New Application Wizard and Wizard Pages
Now that we have an HPC Workflow we want to run, we need to register it with the framework and create the UI for setting up the configurable parts of the workflow. In our case, we will be letting the user specify the location of the executable, the location to store the results and the factorial to compute. For more information on the architecture of the analysis wizard and wizard pages, go here
First, let's create a directory in our plug-in to store the new workflow.
- Go to edu.illinois.ncsa.knsg.tutorial.ui and right click on the plug-in
- From the popup menu, select New > Folder
- For Folder name: enter workflow and click Finish.
Download the above workflow xml file (knsg-tutorial.xml) to your computer and the copy and paste the file into the directory we just created. Before we continue, we need to modify our UI plug-in so that when we build our application, the workflow gets included in the export. To make sure the workflow is exported, do the following:
- Find the edu.illinois.ncsa.knsg.tutorial.ui plug-in and open the MANIFEST.MF
- Click on the Build tab and find the section labeled Binary Build
- Make sure the box next to the workflow directory is checked and save the file.
Now that we have the workflow file in your plug-in, we need to create the wizard that will setup our workflow for execution.
- Open the MANIFEST.MF for our UI plug-in.
- Click on the Dependencies tab and Add... the following dependencies
- edu.illinois.ncsa.knsg.ui
- edu.illinois.ncsa.knsg
- ncsa.tools.events
- ncsa.eclipse.ptpflow
- ncsa.eclipse.ptpflow.ui
- ncsa.eclipse.core.ui
- ncsa.services.ptpflow.rmi.client
- org.apache.log4j
- ncsa.tools.common
- org.dom4j
- ncsa.tools.security
- ncsa.tools.security.gss
- ncsa.services.ptpflow.interface
- org.globus.jglobus
- ncsa.tools.common.eclipse
- ncsa.tools.trebuchet.core
- org.apache.commons
- ncsa.tools.rmi
- ncsa.tools.rmi.gss
- Next, click on the Extensions tab and click the Add... button. Select the edu.illinois.ncsa.knsg.ui.analysisWizards extension point and click Finish.
- Detail information about this extension point can find here
You should see an element added to the extension point with blank inputs. Fill in the following information:
- For id: enter edu.illinois.ncsa.knsg.tutorial.ui.wizard.factorial.FactorialWorkflowWizard
- For name: enter Factorial
- For tag: enter knsgTutorialWorkflow (Note that this must match the experimentId specified in the workflow)
- For workflow: browse for the workflow file we just added to our plug-in.
- For class: enter edu.illinois.ncsa.knsg.tutorial.ui.wizard.factorial.FactorialWorkflowWizard
See the image below for what your extension should look like:

To create the wizard class we just specified, click on the class link and Eclipse will bring up a wizard page to create the new class. The class link is highlighted by the mouse in the above image.
In the wizard that comes up, you can leave all of the default values and click Finish.
In the wizard class, enter the following information.
import java.util.Iterator;
import java.util.Map;

import ncsa.eclipse.ptpflow.PtpflowUIPlugin;
import ncsa.eclipse.ptpflow.builder.models.WorkflowBuilderModel;
import ncsa.eclipse.rmi.IRmiClientViewPart;
import ncsa.eclipse.rmi.wizards.RMIClientRefreshPage;
import ncsa.services.ptpflow.WorkflowDetails;
import ncsa.services.ptpflow.WorkflowDetails.JobInfo;
import ncsa.services.ptpflow.WorkflowInfo;
import ncsa.services.ptpflow.rmres.HostInfo;
import ncsa.services.ptpflow.rmres.NodeInfo;
import ncsa.services.ptpflow.workflow.Workflow;
import ncsa.services.ptpflow.workflow.utils.WorkflowBuilder;
import ncsa.tools.common.exceptions.DeserializationException;
import ncsa.tools.common.types.Profile;
import ncsa.tools.common.util.XmlUtils;
import ncsa.tools.events.types.ParsedLocalEventKey;

import org.apache.commons.lang.StringUtils;
import org.eclipse.core.runtime.IProgressMonitor;
import org.eclipse.core.runtime.IStatus;
import org.eclipse.core.runtime.Status;
import org.eclipse.core.runtime.jobs.Job;
import org.eclipse.swt.widgets.Display;
import org.eclipse.swt.widgets.Shell;
import org.eclipse.ui.IViewPart;
import org.eclipse.ui.IWorkbenchWindow;
import org.eclipse.ui.PartInitException;
import org.eclipse.ui.PlatformUI;

import edu.illinois.ncsa.knsg.tutorial.ui.osgi.Activator;
import edu.illinois.ncsa.knsg.ui.util.JobUtils;
import edu.illinois.ncsa.knsg.ui.wizards.analysis.AnalysisWizard;
import edu.illinois.ncsa.knsg.ui.wizards.host.SelectGlobalResourcePage;

public class FactorialWorkflowWizard extends AnalysisWizard {

    private final org.apache.log4j.Logger logger = org.apache.log4j.Logger.getLogger(this.getClass());

    // Defines the name of the output file(s) to expect from the workflow, used for output retrieval
    private static String[] resultFiles = new String[] { "factorial.txt" };

    // View in charge of the RMI Clients, will be used by the rmiClientPage to determine which RMI to use launching jobs
    protected IRmiClientViewPart view;

    // Allows the user select an RMI Client responsible for submitting the workflow
    protected RMIClientRefreshPage rmiClientPage;

    // Allows the user to select the global resource (e.g. Abe) to launch the workflow on
    protected SelectGlobalResourcePage globalResourcePage;

    // User Interface that allows the user to specify inputs to the workflow
    protected FactorialInputPage factorialPage;

    public FactorialWorkflowWizard() {
        initialize();
    }

    // Add the pages that are part of this wizard
    public void addPages() {
        setWindowTitle("Factorial Workflow");

        rmiClientPage = new RMIClientRefreshPage(Activator.getDefault(), view);
        addPage(rmiClientPage);

        globalResourcePage = new SelectGlobalResourcePage(Activator.getDefault(), "Global Resource");
        addPage(globalResourcePage);

        factorialPage = new FactorialInputPage(Activator.getDefault(), "Input Parameters");
        addPage(factorialPage);
    }

    /**
     * This insures that the views providing information to the UI are refreshed
     * with the latest values
     */
    private void initialize() {
        IWorkbenchWindow window = PlatformUI.getWorkbench().getActiveWorkbenchWindow();

        view = (IRmiClientViewPart) window.getActivePage().findView("ncsa.eclipse.pwe.views.PweSummaryView");

        if (view == null) {
            try {
                view = (IRmiClientViewPart) window.getActivePage().showView("ncsa.eclipse.pwe.views.PweSummaryView");
            } catch (PartInitException e) {
                logger.error("Error opening Workflow Overview view", e);
            }
        }

        // If this view isn't opened, a registry service Map is not built, so we
        // check to see that it was opened, or open it
        IViewPart registryView = window.getActivePage().findView("ncsa.eclipse.ptpflow.manager.views.PTPFlowRegistryView");
        if (registryView == null) {
            try {
                registryView = window.getActivePage().showView("ncsa.eclipse.ptpflow.manager.views.PTPFlowRegistryView");
            } catch (PartInitException e) {
                logger.error("Error opening the RMI registry view", e);
            }
        }
    }

    // Returns the output files to expect
    public String[] getOutputs() {
        return resultFiles;
    }

    // Subclasses provide operations to run when the wizard is finished
    public boolean performFinish() {

        // Saves the users inputs for the client selection page
        rmiClientPage.saveSettings();

        // Obtain the URI of the RMI Client to submit workflow to
        final String url = StringUtils.stripToNull(rmiClientPage.getValue(IRmiClientViewPart.CONTACT_URI));

        // Obtain the positive integer the user wants to compute factorial for
        final String positiveInteger = factorialPage.getFactorial();

        // Obtain the location of the factorial executable
        final String executableLocation = factorialPage.getExecutableLocation();

        // Obtain the location the user wants the results written to
        final String resultBaseLocation = factorialPage.getResultLocation();

        // Get the global resource to run the workflow on
        String selectedHost = globalResourcePage.getSelectedHost();
        HostInfo hostInfo = retrieveHostInfo(selectedHost);
        NodeInfo nodeInfo = retrieveNodeInfo(hostInfo);

        // Global resource node identifier
        final String globalResource = nodeInfo.getNodeId();
        final Shell shell = PlatformUI.getWorkbench().getActiveWorkbenchWindow().getShell();
        Job job = new Job("Execute Analysis") {

            public IStatus run(IProgressMonitor monitor) {
                monitor.beginTask("Execute Analysis", 100);

                Display.getDefault().syncExec(new Runnable() {

                    public void run() {
                        try {
                            // Sets the Workflow Overview view to be pointing at the RMI Service selected
                            view.refreshClient(url);
                        } catch (Throwable e) {
                            logger.error("Error refreshing URI", e);
                        }
                        view.refresh();
                    }

                });

                String uri = PtpflowUIPlugin.getPWEServiceURI();
                monitor.worked(10);

                // Get the workflow model and set the parameters the user is allowed to tweak
                WorkflowBuilderModel model = factorialPage.getModel();
                WorkflowBuilder builder = model.getWorkflowBuilder();

                if (builder == null)
                    return Status.CANCEL_STATUS;

                builder.setGlobalResources(globalResource);

                Profile profile = builder.getExecuteProfile("inputs");

                // Sets the factorial to compute
                profile.getProperty("FACTORIAL").setValue(positiveInteger);
                // Sets the executable location on the remote machine
                profile.getProperty("EXECUTABLE").setValue(executableLocation);
                // set the location to store results
                profile.getProperty("RESULT_LOC").setValue(resultBaseLocation);

                monitor.worked(70);

                scenario.addWorkflow(model);

                // Submit the workflow
                return JobUtils.submitWorkflow(shell, builder, uri, monitor);
            }
        };
        job.setUser(true);
        job.schedule();

        return true;
    }

    // Helper method to retrieve node information
    protected NodeInfo retrieveNodeInfo(HostInfo hostInfo) {
        Map map = hostInfo.getNodeInfo();
        Iterator iterator = map.keySet().iterator();

        // We assume the first node is the head node for job submission
        NodeInfo nodeInfo = (NodeInfo) map.get(iterator.next());

        return nodeInfo;
    }

    // Helper method to retrieve host information
    protected HostInfo retrieveHostInfo(String selectedHost) {
        HostInfo hostInfo = new HostInfo();
        try {
            String hostXML = PtpflowUIPlugin.getHostInfoClient().retrieveHostInfo(selectedHost);
            XmlUtils.deserializeUserFacingBean(hostXML, hostInfo);
        } catch (DeserializationException e) {
            e.printStackTrace();
        } catch (Throwable e) {
            e.printStackTrace();
        }

        return hostInfo;
    }

    // Used for retrieving results, tells the KNSG framework the path(s) to the result files
    public String[] internalGetResultPath(WorkflowDetails workflowDetails, ParsedLocalEventKey eventKey) {
        WorkflowInfo workflowInfo = workflowDetails.getWfInfo();
        Profile profile = null;
        try {
            String xml = PtpflowUIPlugin.getClient().getWorkflowAsXml(workflowInfo.getWorkflowId());
            Workflow workflow = new Workflow(xml);
            profile = (Profile) workflow.getExecuteProfiles().get("inputs");
        } catch (Throwable e) {
            // TODO Auto-generated catch block
            e.printStackTrace();
        }
        String resultLoc = profile.getProperty("RESULT_LOC").getValue();
        JobInfo jobInfo = (JobInfo) workflowDetails.getJobInfo().get(0);
        String[] path = new String[1];
        String pathSep = "/";
        String workflowName = eventKey.getPropertyValue(ParsedLocalEventKey.TAG_WORKFLOW);
        String[] workflowNameParts = workflowName.split("-");
        String workflowId = workflowNameParts[workflowNameParts.length - 1];
        if (!resultLoc.endsWith("/")) {
            path[0] = resultLoc + pathSep;
        }

        path[0] += jobInfo.getNode() + "_" + workflowId + pathSep + "result/";

        return path;
    }
}
Everything should resolve except for the FactorialInputPage since we have not created it yet. To create it, do the following:
- First, click on the first X at the top of the class and select Create class FactorialInputPage
- Where it says Superclass:, click the browse button and find HelpPage. Click Finish.
You should have skeleton code for the FactorialInputPage, update it with the following:
import java.io.IOException;
import java.net.URL;

import org.dom4j.DocumentException;
import org.eclipse.core.runtime.Platform;
import org.eclipse.swt.widgets.Composite;
import org.eclipse.swt.widgets.Text;
import org.eclipse.ui.plugin.AbstractUIPlugin;
import org.osgi.framework.Bundle;

import edu.illinois.ncsa.knsg.tutorial.ui.osgi.Activator;
import edu.illinois.ncsa.knsg.ui.descriptors.KNSGAnalysisDescriptor;
import edu.illinois.ncsa.knsg.ui.wizards.analysis.AnalysisWizard;

import ncsa.eclipse.core.ui.utils.EclipseUtils;
import ncsa.eclipse.core.ui.wizards.HelpPage;
import ncsa.eclipse.ptpflow.builder.models.WorkflowBuilderModel;
import ncsa.tools.common.eclipse.descriptors.exceptions.UnknownExtensionException;
import ncsa.tools.common.eclipse.descriptors.types.BaseDescriptorHelper;
import ncsa.tools.common.util.XmlUtils;

public class FactorialInputPage extends HelpPage {

    private final org.apache.log4j.Logger logger = org.apache.log4j.Logger.getLogger(this.getClass());
    // The workflow model this page is setting up
    private WorkflowBuilderModel model;
    // Set the remote location of the result files
    private Text resultLocation;
    // Set the remote location of the factorial executable
    private Text executableLoc;
    // Set the number to compute the factorial
    private Text factorial;

    public FactorialInputPage(AbstractUIPlugin plugin, String pageName) {
        super(plugin, pageName);
    }

    public void createControl(Composite parent) {
        // Get the model associated with the wizard
        initializeModel();

        // Setup the User Interface
        Composite container = EclipseUtils.createFormishContainer(parent);

        // Creates a text field labeled Integer
        factorial = EclipseUtils.createLabelledText(container, "Integer", null);
        factorial.setToolTipText("Specify the integer to compute the factorial for");

        // Create a text field labeled Factorial Executable
        executableLoc = EclipseUtils.createLabelledText(container, "Factorial Executable", null);
        executableLoc.setToolTipText("Specify the remote location of the factorial executable");

        // Create a text field labeled Result Location
        resultLocation = EclipseUtils.createLabelledText(container, "Result Location:", null);
        resultLocation.setToolTipText("Specify the remote location on the HPC machine (e.g. your home directory), to store job results");

        setControl(container);
    }

    private void initializeModel() {
        try {
            String tag = BaseDescriptorHelper.getTagForClass(this.getWizard().getClass().getName(), AnalysisWizard.EXT_PT);
            KNSGAnalysisDescriptor descriptor = (KNSGAnalysisDescriptor) BaseDescriptorHelper.getDescriptor(tag,
                    AnalysisWizard.EXT_PT, KNSGAnalysisDescriptor.class);

            model = new WorkflowBuilderModel();
            String workflow = descriptor.getWorkflow();

            Bundle bundle = Platform.getBundle(Activator.PLUGIN_ID);
            URL entry = bundle.getEntry(workflow);

            model.initializeFromElement(XmlUtils.dom4jElementFromStream(entry.openStream()));

        } catch (UnknownExtensionException e) {
            logger.error(e);
        } catch (DocumentException e) {
            logger.error(e);
        } catch (IOException e) {
            logger.error(e);
        }
    }

    public String getFactorial() {
        return factorial.getText().trim();
    }

    public String getResultLocation() {
        return resultLocation.getText().trim();
    }

    public String getExecutableLocation() {
        return executableLoc.getText().trim();
    }

    public WorkflowBuilderModel getModel() {

        return model;
    }

    protected void dialogModified() {

    }
}
Execute New Workflow
Now that we have the workflow all setup, we need to put the factorial executable somewhere on the remote machine we intend to execute. You can download the factorial executable here. After downloading the file, you will need to transfer it to the remote machine using a file transfer software package such as WinSCP or SSH. I recommend putting the file in your home directory.
After transferring the file, we need to export our product file because PTPFlow reads some information from a feature.xml file that is not available through the workspace. To export your product, do the following:
- First, open the tutorial.product file
- Click on the Overview tab and find the section called Exporting
- In the Exporting section, click Eclipse Product export wizard
- In the wizard that comes up, find the Destination section and browse for a directory to build the product in (e.g. /home/foo/tutorial). Click Finish. See the image below:

After the product exports, go to /home/foo/tutorial and go into the eclipse directory. There should be an executable called eclipse in there, double click on it to launch it.
After the application launches, we need to obtain a MyProxy certificate. To do so, do the following:
- Go to Security > MyProxy Login
- For Username enter your Teragrid username
- For Password enter your Teragrid password
- Click the Login button.
Now that we have our certificate for running jobs, let's create a new scenario:
- Go to File > New Scenario
- When the wizard opens, for Name enter Factorial Scenario and click Finish.
Now that we have a scenario, we need to add our remote service to launch jobs. To add our remote service, do the following:
- Right click on Factorial Scenario and select Add Service
- In the wizard that opens, enter the following information:
- For Resource Name enter Vertex
- For RmiContact(URI) enter rmi://vertex.ncsa.uiuc.edu:1099/ptpflow
- For RmiPortRange enter 51001,52000
- For GridFTPPortRange enter 50000,51000
- Click Finish
You should now have a Service included in your Scenario. The next step is to launch our new application. To do this, do the following
- Right click on Factorial Scenario and select Execute Workflow
- In the wizard that comes up, where it says Workflow Analyses select Factorial and click Next.
- In the page that displays, where it says RmiContact(URI) select rmi://vertex.ncsa.uiuc.edu:1099/ptpflow and click Next.
- In the page that displays, where it says Global Resource select abe and click Next.
- This last page is where we set up our analysis. Enter the following information
- Where it says Integer enter a positive integer such as 10.
- Where it says Factorial Executable, enter the path to your executable (e.g. /u/ac/cnavarro/factorial/factorial.out)
- Where it says Result Location, enter the path to store the results (e.g. /u/ac/cnavarro/factorial-results) See the image below.

- Click Finish to launch the workflow.
- When the workflow is submitted to the remote machine, you will see an image similar to the one below confirming the submission. Press OK

To see the status of our job, we can now go to the Workflow Overview view, click on your username and click the Show button. Once the job state says WF_DONE, we can retrieve our results by doing the following:
- Select the Job in the Workflow Overview view, right click on it and select Retrieve Results. Your results should show up in a few moments and be added to your scenario.