Work Completed
- Signed up for Eclipse e4 webinar for August 18, 2009 and August 26, 2009.
- Downloaded Eclipse e4 v0.9 RC2 and started working with some of the available demos to learn about the new features.
- Compiled MAEviz in e4, but have not been able to get it to successfully launch with the compatibility layer. I decided it would be better to work with a smaller RCP application and get that working before moving on to getting MAEviz running. I have posted questions to the newsgroup about getting legacy RCP applications to work with the new e4 and hope to accomplish that this week.
- Prepared slides covering Short Term Shelter Needs and Short Term Shelter Supplies for Bernie's Costa Rica visit.
Work Planned
- I plan to investigate the new Eclipse e4 v0.9 RC2 release so I can learn about what is coming in the next generation of Eclipse. I also plan to try and get a legacy RCP application working so that I can test MAEviz in Eclipse e4.
- Prepare presentation slides about MAEviz social science algorithms for Bernie's Costa Rica visit.
Comments
This week went as planned. I expect to continue working with Eclipse e4 to gain a better understanding of where Eclipse is going and how we can potentially benefit from the new directions.
Eclipse e4
Eclipse e4 is the next generation of the Eclipse Platform. The project has 3 main objectives:
- Simplify the Eclipse programming model: This simplification will result in reduced development and maintenance costs and enable a larger developer community to leverage the platform in their own Eclipse-based applications. In my opinion, this is great because the learning curve for eclipse has always been very steep
- Enable the platform for use on emerging web-based runtime technologies: This move will ensure that the platform remains a compelling and viable application framework in a rapidly changing web technology landscape, and it will allow e4-based applications to leverage web technologies, while remaining insulated from specific technology choices that may quickly become obsolete.
- Broaden participation in development of the platform: This community driven effort reduces the risks associated with building on a platform largely funded from a single source. Having a large and diverse group of commercial backers, will ensure the platform remains vibrant and viable over the long term.
Eclipse e4 Demos
I plan to get some of the Eclipse e4 demos working. I will put comments here and possibly some code if I add to them. I tried the e4 photo demo, it is very cool to see how things are changing, gone is the application.java class and it is replaced by a more declarative Application.xmi.
My First Eclipse e4 Application
Much of the beginning of this is pulled from here and it meant to supplement it as we extend the functionality discussed in that blog post. We will go further and add menu items with actions. There are a few prerequisites. The first is you will need to have the latest version of Java installed, which you can get here. The second is you will need Eclipse e4 version 0.9, which you can get here. The final requirement is a general understanding of Eclipse. This is not intended as an introduction to Eclipse in general, but more how to use the next generation alpha version of the tools to create a basic next generation application.
You will need to install as you have done previous versions. Once this is complete, start Eclipse.
As of version 0.9 of Eclipse, there is no wizard to help create the basic parts of a new application so we will have to do some of this manually.
To create a new plugin project, do the following:
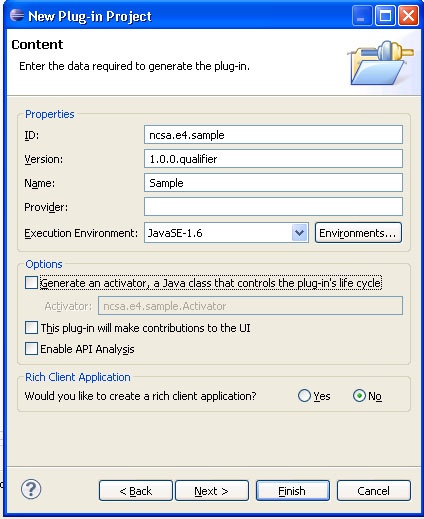
- Go to top level menu and select File > New. From the wizard that comes up, select Plug-in Project and click Next.
- For Project name, enter something like ncsa.e4.sample. Everything else on the wizard page can remain as default. Click Next.
- Uncheck the box Generate an Activator. Also, do not check the box This Plug-in will make contributions to the UI nor should you select the radio button that you would like to create an eclipse rich client application. Simply click Finish. See the image of the new plugin project wizard below.
We will need to modify the dependencies for this plugin so go to the Dependencies tab of the Manifest and add the following dependencies:
- org.eclipse.ui
- org.eclipse.core.runtime
- org.eclipse.e4.ui.workbench
- org.eclipse.e4.ui.workbench.renderers.swt
- org.eclipse.e4.ui.workbench.renderers.swt.contribution
- org.eclipse.e4.ui.workbench.swt
- org.eclipse.e4.ui.services
- org.eclipse.e4.core.services
After doing this, go to the Extensions tab in the Manifest and click the Add... button. Add the org.eclipse.e4.workbench.parts and org.eclipse.core.runtime.products extension points. The org.eclipse.e4.workbench.parts is a new extension point in e4 for defining view parts. This replaces the Views and Editors from the 3.x branch of Eclipse. The second extension point is where we will define our product. A new parameter has been created called applicationXMI which is a parameter to the model of our UI. We'll discuss that in more detail later.
Unfortunately, the UI is not in place to add extensions so at this point we will need to manipulate the plugin.xml file directly. Go the the plugin.xml tab, which should have been added once we added those extension points, and enter the following:
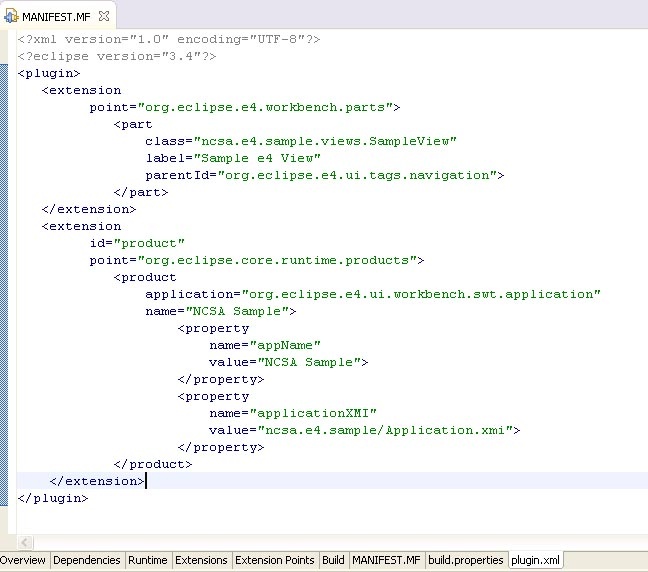
Next, let's create the view we specified in the plugin.xml file called SampleView in the package ncsa.e4.sample.views. When creating SampleView, make sure it implements the org.eclipse.e4.core.services.IDisposable interface.
public SampleView(Composite parent, final IEclipseContext outputContext)
{
    Text text = new Text( parent, SWT.NONE );
    text.setText( "Hello World" );
    GridLayoutFactory.fillDefaults().generateLayout( parent );
}

public void dispose()
{
}
Next, we need to create the modeled UI and specify the parts in the aforementioned Application.xmi file. Create a new File in ncsa.e4.sample/Application.xmi, making sure you provide it with the extension xmi. After creating the file, Eclipse might open it with an error message. In the window it opened it in, click on the Open with Text Editor button and add the following content:
<?xml version="1.0" encoding="ASCII"?>
<application:MApplication xmi:version="2.0" xmlns:xmi="http://www.omg.org/XMI" xmlns:xsi="http://www.w3.org/2001/XMLSchema-instance" xmlns:application="http://www.eclipse.org/ui/2008/Application">
  <windows name="Main" x="100" y="100" width="500" height="320">
    <children policy="VerticalComposite">
      <children xsi:type="application:MSashForm" policy="HorizontalSash">
        <children xsi:type="application:MStack">
          <children xsi:type="application:MContributedPart" id="SampleView" iconURI="" name="Sample View" tooltip="My Sample View" URI="platform:/plugin/ncsa.e4.sample/ncsa.e4.sample.views.SampleView"/>
        </children>
        <weights>100</weights>
      </children>
    </children>
  </windows>
</application:MApplication>
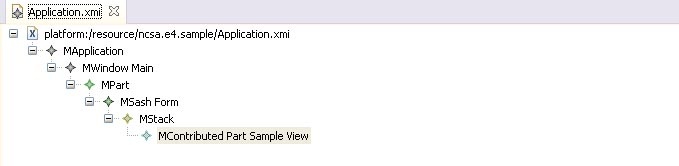
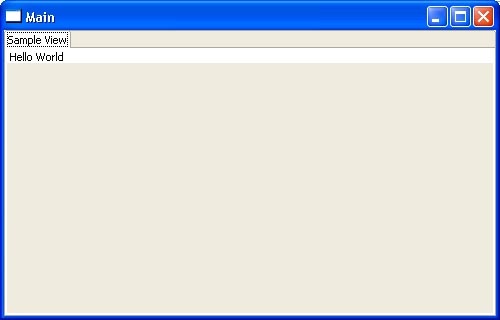
After saving the file and closing it, if you cannot reopen it you probably have a syntax error. You will need to right click on the file and use Open With > Text Editor, or you may have to go edit the file by hand. This seems to be an Eclipse bug of some sort since no xml editor seems to want to open the file. If the text editor will not open the file, close and restart Eclipse seems to fix the issue. When in doubt, close and restart Eclipse is a good way to go. After you have successfully edited the file, you should be able to use Open With > Sample Reflective Ecore Model Editor and see something similar to the image below:
Now that we have a modeled UI, we need to create a product file to launch our simple application. To do this, go to File > New > Other and under Plug-in Development select Product Configuration. Click Next. Where it says File name, enter something like Sample.product. Where it says Initialize the file content select the radio button that says Create a configuration file with basic settings. Click Finish.
Enter the following information in the product file that opens:
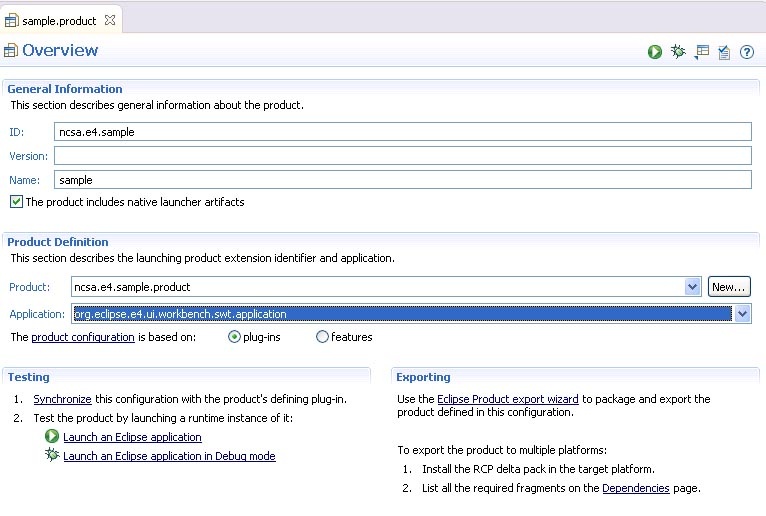
After entering the above information, click on the Dependencies tab and add:
- org.eclipse.e4.ui.workbench
- ncsa.e4.sample
Finally, click the Add Required Plug-ins button. You should now be able to go back to the Overview tab and click the link Launch an Eclipse application and see something similar to the following:
This application isn't much to look at yet and lacks a Exit menu option. First, let's create an exit handler.
package ncsa.e4.sample.handlers;

import org.eclipse.e4.workbench.ui.IWorkbench;

public void execute( IWorkbench workbench )
{
    workbench.close();
}
Now, we need to edit the Application.xmi to add a File menu and our Exit menu item. Currently, there is no way to contribute commands and menu options from the commands framework without bringing in the entire legacy workbench. This will be added in the future so for now, we must edit the model. See below for the changes:
<?xml version="1.0" encoding="ASCII"?>
<application:MApplication xmi:version="2.0" xmlns:xmi="http://www.omg.org/XMI" xmlns:xsi="http://www.w3.org/2001/XMLSchema-instance"
  xmlns:application="http://www.eclipse.org/ui/2008/Application">

  <windows name="Main" x="100" y="100" width="500" height="320">
    <menu>
      <items xsi:type="application:MMenuItem" name="File">
        <menu>
	  <items xsi:type="application:MMenuItem" name="Exit" command="//@command.0" />
        </menu>
      </items>
    </menu>
    <children policy="VerticalComposite">
      <children xsi:type="application:MSashForm" policy="HorizontalSash">
	<children xsi:type="application:MStack">
	  <children xsi:type="application:MContributedPart" id="SampleView" iconURI="" name="Sample View" tooltip="My Sample View"
            URI="platform:/plugin /ncsa.e4.sample/ncsa.e4.sample.views.SampleView"/>
	</children>
	<weights>100</weights>
      </children>
    </children>
    <handlers id="" URI="platform:/plugin/ncsa.e4.sample/ncsa.e4.sample.handlers.ExitHandler" persistedState="" command="//@command.0" />
  </windows>
  <command id="application.exit" name="Exit"/>
</application:MApplication>
After saving the changes, re-launch the application and you should now have a File menu with an Exit option.
Before moving on to the next section regarding CSS styling, let's add a SWT Button to our view so we can demonstrate a few of the CSS options for styling SWT widgets.
CSS Styling
The first thing we need to do is let the application know we want to use CSS to control the look and feel of the application. To do this, go back to the manifest and click on the Extensions tab. In the same place where we added the applicationXMI property, add another property called applicationCSS with the value platform:/plugin/ncsa.e4.sample/css/UIStyle.css. After creating the property, create a new File called UIStyle.css and add the following content to it:
Text {
    font: Verdana 16px;
    color: blue;
    background-color: rgb(255,255,255) rgb(0,0,0);
}

Button {
    font: Verdana 8px;
}

#SampleView {     background-color: gradient radial #575757 #101010 60%;

}
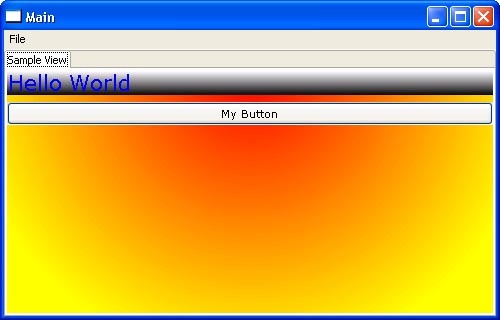
You will notice we gave the SampleView an id="SampleView" in the Application.xmi file. This allows us to style the view using the above style sheet, with a reference to the views id. You should see a view similar to the one below:
Eclipse 3.5 Application in Eclipse e4
The next step for me is to try and get some legacy RCP application code working on the e4 compatibility platform. From there I will try to get MAEviz working. It seemed more logical to start with something small and learn from my mistakes before I try to get a large application like MAEviz to work in e4.
MAEviz in Eclipse e4
I'm trying to get MAEviz to launch with the e4 compatibility platform to see where it comes up short and if there are any bugs/features I can submit to the e4 project. For my reference, I am listing the plugins I had to download to get MAEviz to launch. I'm hopeful that MAEviz will launch once I fix all the missing plugins, even if all the features don't quite work as expected.
- org.apache.commons.lang
Work Completed
- Read Eclipse (e4) whitepaper, a very interesting paper on the next major Eclipse release.
- Read the Data Catalog Wiki to follow the latest discussions.
- Finished updating the Eclipse 3.5 reference page. I went through the new and noteworthy features of Eclipse 3.5 and tried most of them out to make sure the instructions were complete, fixing any steps that were missing or assumed you knew.
Work Planned
- Finish Eclipse 3.5 wiki Reference page, try and test the new and noteworthy features of the galileo release
- Track the updates to the Data Catalog
Comments
I took a personal day on Monday July 20, 2009. This week went as planned. Eclipse e4 v0.9 is released so if nothing else comes up, I plan to check it out and see where the development is at.
Work Completed
- I've been updating the Eclipse 3.5 reference wiki on my exploration of the various new features listed in the new and noteworthy section of the eclipse update reference and checking to make sure all steps are accurate and adding them to the wiki with screenshots they've made available so we have it as a future reference.
- Testing MAEviz in Eclipse 3.5 to make sure that everything still works as expected.
- Following updates to the data catalog
Work Planned
- Update Eclipse 3.5 Developer Reference wiki with tips on new features available in various parts of the IDE (e.g. Java editor, Team Synchronization, etc).
- Make sure MAEviz still functions as expected in Eclipse 3.5
Comments
This week I am taking personal days on Monday July 13 and Friday July 17, 2009. I will continue next week updating the wiki, testing the new and noteworthy features and testing MAEviz functionality with Eclipse 3.5
Work Completed
- Started evaluating Eclipse 3.5 (Galileo) and created a developer reference. I also included Rob's notes on how to add some of the subversion plugins in headless mode.
- Added another tutorial on MAEviz advanced features (Interdependent Network Analysis). All steps are included and what datasets I used from the MAEviz Public Repository.
- Started adding a section on the Network Loss Analysis. This work will continue next week.
- Discussed paper topics with Shawn and Jong for e-Science.
- Answered part of Liang's question about the MAEviz Bridge Damage Analysis and an output message he was seeing about bridge spans being greater than 10.
Work Planned
- Evaluate Eclipse 3.5 (Galileo) and make notes on the developer reference wiki.
- Add Tutorial on Interdependent Network Analysis
- Add Tutorial on Network Loss Analysis
Comments
This week went as planned. I will be taking personal days on July 9 and July 10. I intend to continue working with Eclipse 3.5 next week and will make more notes about what I find.
This page has moved to the developers reference section located at Eclipse 3.5
Work Completed
- Went through NBSR analysis steps and documented them in the bridge tutorial. I ran into some issues and have sent Jong some questions, but he will probably be slower to respond since he is on leave.
- Finished Annual Review
Work Planned
- Finish Annual Review
- Add sections on Network Based Seismic Retrofit (NBSR) to bridge tutorial
Comments
- This week went as planned. I took a personal day on Thursday July 1st and July 2nd was a holiday. Until we are ready to move forward with the data catalog, I will continue to document some of the more advanced analyses in MAEviz in the appropriate tutorial(s).