Introduction
This tutorial is intended to help users run the eAIRS RCP application. This guide will use the sample data and eAIRS CFD workflow analysis to introduce the user to the most common features of the software. Since the software is still in early development stages, we are only distributing zip files containing the required files. Before distributing release clients, binary installation files will be created to guide the user through installing the application and providing shortcuts for launching the software.
System Requirements
The eAIRS RCP application can run on any platform that is supported by Eclipse, which is all major platforms. The RCP application simply has to be built for the platform that the user intends to run on. The initial builds being offered are Windows, Linux and Mac OSX (32 bit and 64 bit). The main purpose of the RCP application is to provide an easy to use interface for initiating and managing HPC jobs so the system requirements are minimal. The next section will talk in more detail about the system requirements for the RMI service that manages the execution of jobs. Some of requirements for the RMI Service can and will be eliminated in future releases.
Running PTPFlow RMI Service
- The RMI Service is currently limited to Unix-based operating systems until the shell scripts can be converted to the equivalent windows batch files.
- The RmiContact URI must be a valid Hostname or IP Address. This is required so that the machine executing the workflow can contact the RMI Service with status updates and provide those updates to the clients.
- The RMI Service needs ports 51001 through 52000 open on the machine the service is running on.
- The RMI Service needs ports 50000 through 51000 open for grid ftp.
Launching Jobs
Although eAIRS RCP is designed to launch jobs on any defined HPC machine, the execution is currently limited to grid-abe.ncsa.teragrid.org since Abe has ELF installed on it. ELF is required for launching the HPC jobs for eAIRS RCP. Because Abe is the only machine with ELF, the user will need an account on Abe to use the software. This limitation is easily overcome if another machine has ELF installed on it. As part of the deliverable of this software, ELF will be deployed on machines at KISTI.
Installing eAIRS
Another requirement is that the eAIRS CFD executable should be installed on Abe in your home directory. The current version of the workflow allows you to specify the path to the executable in the User Interface, as you will see later, so you can place the unzipped files anywhere you have permissions.
Installing and Launching eAIRS RCP (Desktop Client)
Find your operating system and click the download link to download eAIRS. To install eAIRS, simply unzip downloaded file somewhere on your machine. To launch the application, do the following:
For Windows and Linux:
- First, go to the location you unzipped the file and find open the directory called eAIRS.
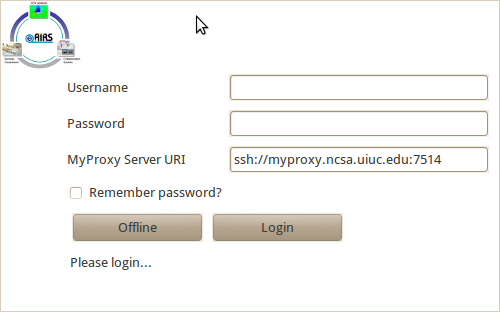
- You should see an executable call eAIRS, double click on it to launch the RCP application.
- After a few moments, you should see a splash screen display that is requesting you to log in. You can choose to work offline or you can specify your MyProxy username, password and the MyProxy Server URI to log into. See the image below:
For Mac:
- First, go to the location you unzipped the file and find open the directory called eAIRS.
- Next, go into the directory eAIRS.app > Contents > MacOS. You should see a file called eAIRS, double clikc on it to launch the RCP application.
- After a few moments, you should see a splash screen display that is requesting you to log in. You can choose to work offline or you can specify your MyProxy username, password and the MyProxy Server URI to log into. See the image above from the Windows/Linux launch instructions:
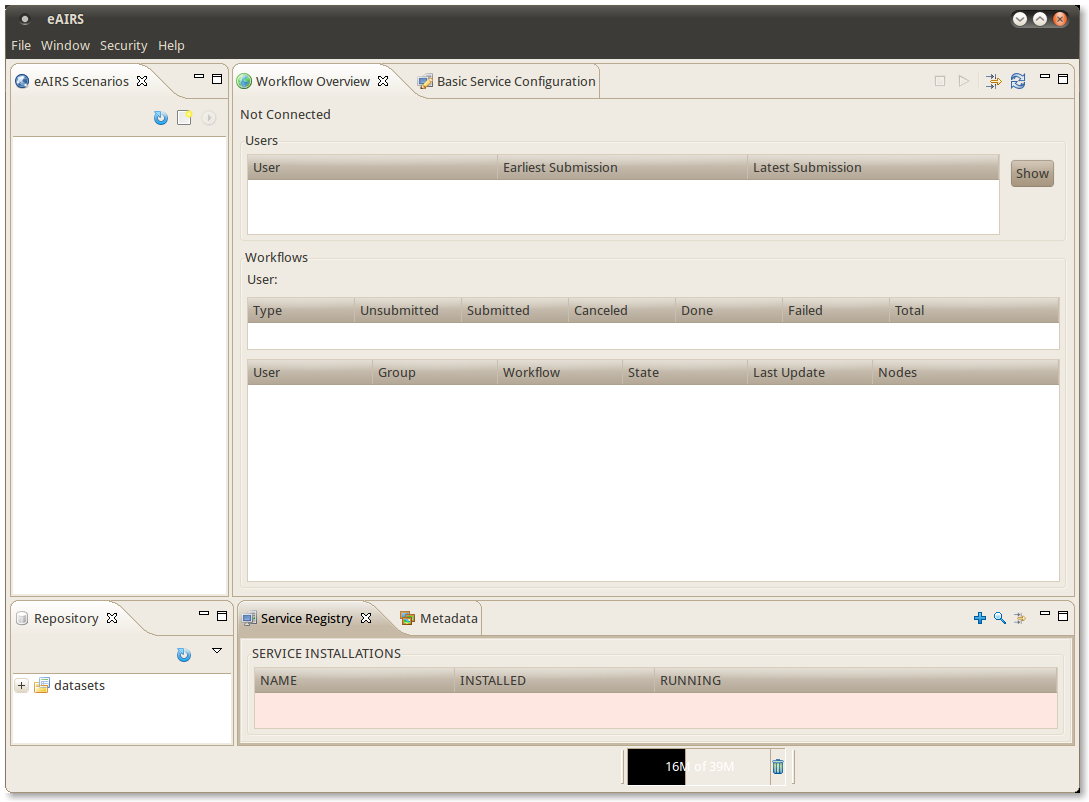
When logging into the application, you can check the box to save your password for next time if you are choosing to log in. After making your selection, you should see the main application screen similar to the one below.
Application Views
This section will provide a brief explanation of each view seen when the application first starts.
Scenarios View
The eAIRS Scenarios view allows users to create new scenarios, add data to the scenario and execute workflows on the data contained in the scenario. To create a new scenario, do the following:
- Go to File -> New Scenario
- Specify a name for the new scenario, e.g. CFD Scenario, and click Finish. Your Scenarios view should now contain a scenario with the name CFD Scenario similar to the image below:
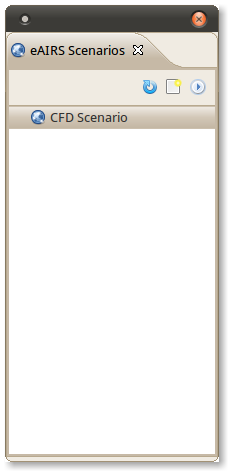
You can also use the new scenario icon (  ) to bring up the same menu. Well see more of this view later as we add data from the repository and execute a workflow.
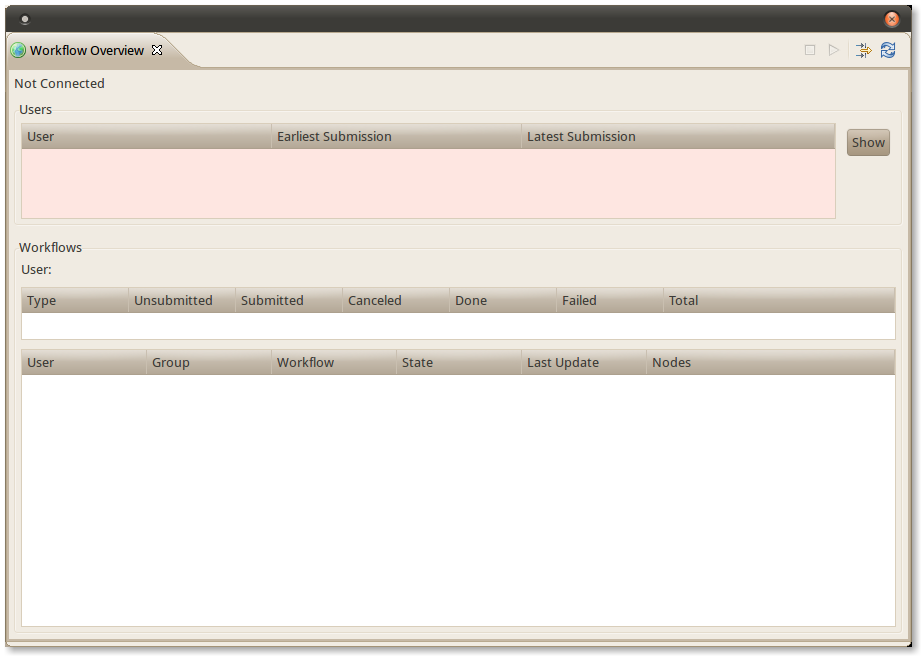
Workflow Overview
This view is where you can access information about your running workflows by connecting to an RMI Service endpoint. We haven't defined any RMI Services (see Service Registry View) so we cannot connect to an RMI service. Once we have defined a service, you can connect to it by clicking on the
 icon and selecting your RMI service. We'll go through this later after we have defined an RMI Service.
Basic and Advanced Service Configuration Views
The Basic Service Configuration view and the Advanced Service Configuration view are two PTPFlow views that allow users to tweak the settings used to launch your own RMI Service. Most users will not need to work with these views because as part of the final release, we will be setting up a remote RMI Service that is pre-configured. For this tutorial, we assume that the user will use or test RMI Service called Vertex, a pre-configured RMI Service that users can connect to using a few simple settings. The rest of this section is for administrators who are interested in knowing more about these two views and what content they have.
For those who cannot use our test RMI Service (explained later), continue reading to learn about what settings you must tweak before launching your RMI Service. The settings we will need to change are under the *Advanced Service Configuration_ view. To open it, do the following:
- Go to Window > Show View
- Find the folder PTPFlow Manager and expand it. Select Advanced Service Configuration and click OK. You should see a view similar to the one below:
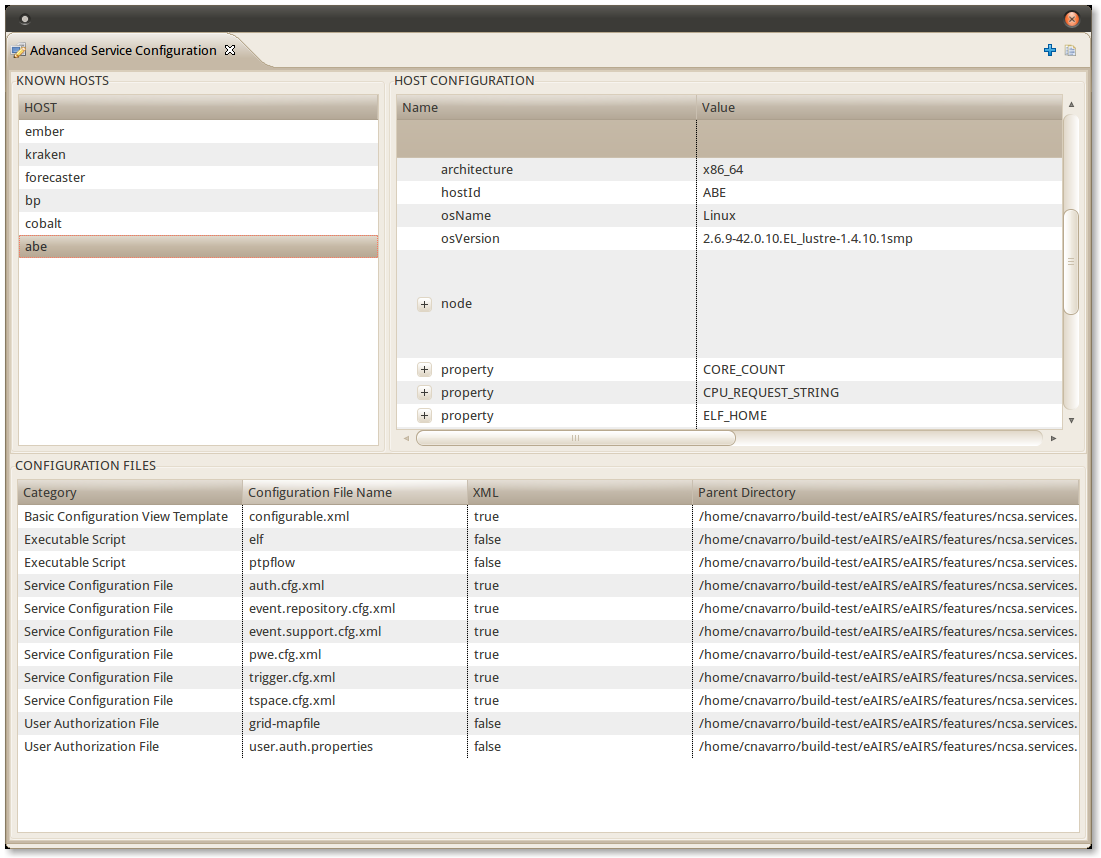
The first change we need to make is to the file user.auth.properties. Locate the file the CONFIGURATION FILES panel and double click on it to open it in an editor. You will need to add your username to this file. For example, if your username is foo, add:
foo=ADMIN
- Save the file either by closing it or ctrl+s
- Next, double click on the grid-mapfile. You will need to add the DN's (domain names) to this file. For example:
"/C=US/O=National Center for Supercomputing Applications/CN=FirstName LastName" foo
"/C=US/O=National Center for Supercomputing Applications/OU=People/CN=FirstName LastName" foo
The first entry is used if the user with username "foo" logs in to the NCSA MyProxy using their Kerberos password; otherwise, the NCSA CA would be applicable (the one with OU=people). FirstName would be replaced with foo's real first name and LastName would be replaced with foo's last name. After making the changes, save the file by closing it or ctrl+s.
- Next, we need to edit the KNOWN HOSTS. We are assuming that the workflow will be launched on the machine called Abe; however, the edits for Abe are applicable to other hosts. Double click on abe under KNOWN HOSTS. You should see the HOST CONFIGURATION panel populate with Abe's properties.
- Click on the + next to host and scroll down until you see user. For each user that is defined on the host, there will be an entry. If you don't see your information there, right click on host and select Add User
- Enter your username. After doing that, scroll down and find the user you created, right click on that user and select Set User Home
- Enter your userhome on the machine, e.g. /u/ac/foo. Right click again on the user and select Set User Name On Host
- Enter your username for the host.
For now, we are assuming that this workflow will run on NCSA Abe so the rest of the default parameters should be ok. In the future, there will be a tutorial on how to edit more of this view when trying to add new machines.
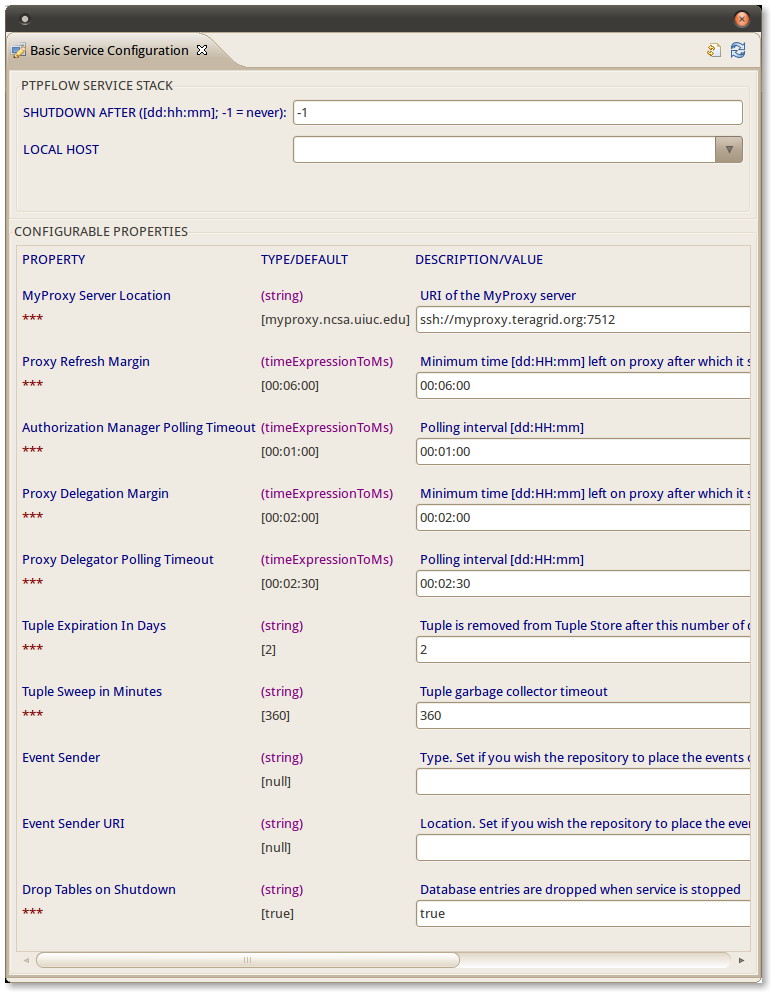
The other service configuration view, Basic Service Configuration can be found below. This view allows users to change various parameters such as the MyProxy server URI, refresh time, etc. Most users will not need to make any changes to this view. For administrators who want to know more about this view, see PTPFlow's documentation.
Repository View
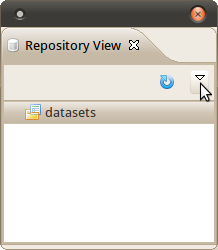
The repository view shows all imported datasets that can be used in workflows that are available with the software (more on that in the developer documentation). Two sample datasets have been included for the eAIRS CFD Workflow and can be automatically imported by clicking on the triangle in the Repository view and selecting Install Sample Data. In the image below, the view menu (triangle) is being pointed at by the mouse cursor.
After clicking on Install Sample Data, the sample data will be installed in a few moments. Once it finishes, click on the + symbol next to dataset to see the two installed datasets. To add a dataset to the scenario we created, click on the dataset in the repository view and drag it to your scenario. Do this for both datasets that we installed and your scenarios view should look similar to the image below:
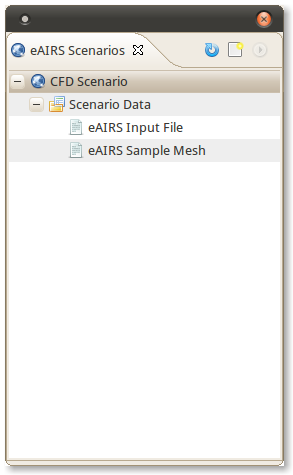
You could also use shift+click to select both datasets and drag them to your Scenario.
Note: These sample datasets are intended for the eAIRS executable that can produce VTK result files. They will not work with the other executable that does not produce VTK files.
Service Registry View
This view is the advanced view for defining an RMI Service that will be used to launch jobs on a supercomputer. For the final release of the software, we will document and setup a standalone RMI Service for KISTI users so they can just point their client at the RMI Service. The details provided below are for setting up your own RMI Service to use.
The current RMI service is limited to Unix-based operating systems so the RMI service must be launched on a Linux machine, Mac or other Unix-based computer. For this tutorial, we will assume that the machine running the RCP application is Unix based and can run the RMI service. To add a service, click the  icon in the view.
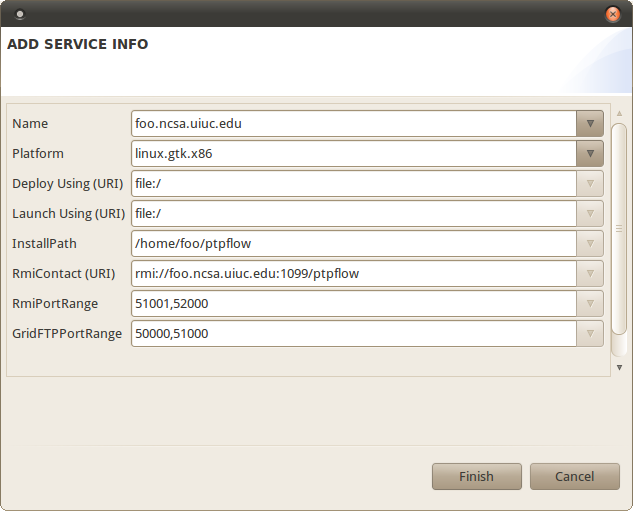
- Where it says Name, in the dropdown menu select the name of your machine (it should be automatically populated with valid entries, including your machine). After selecting your machine, all of the entries should be populated with valid entries. If you want, you can edit the InstallPath to be a different location, the default is user_home/ptpflow, e.g. /home/foo/ptpflow. You should have a dialog box similar to the one in the image below, except the your entries will be for your particular machine.
- After editing the entries you want to change, click Finish. You should see the service added to the Service Registry view. Next, select the service in the view and right click on it. From the popup menu, select Install At Location. This will take a few moments to install the RMI service plugins.
- Next, right click on the service again and select Launch Service. After a few moments, the service should start and you should see the informational dialog that says the "Service is now up".
Metadata View
This view will display metadata associated with a dataset by clicking on a dataset in either the Repository view or the Scenario's view. Add a tag to a dataset and then click on it while viewing the Metadata view to see your new tag. For example, if you click on "eAIRS Input File" in the Repository view, your Metadata view should look similar to the one below:
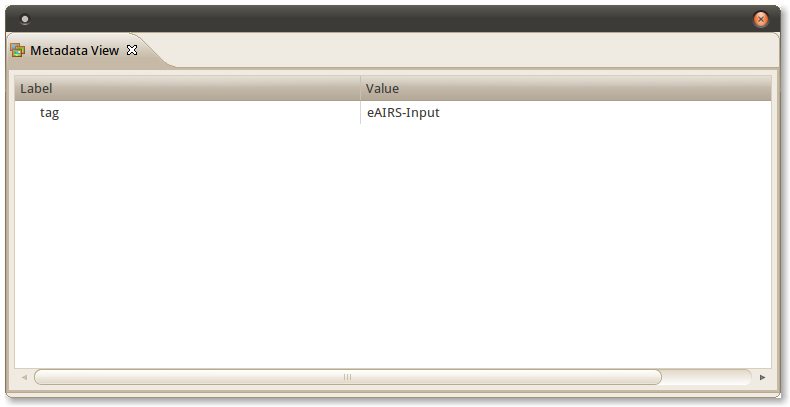
The tag for this dataset will be used to verify that an input is valid for a field in the eAIRS analysis wizard.
Preferences
This section discusses some of the preferences that can be set in the Preference menu of eAIRS.
eAIRS Preferences
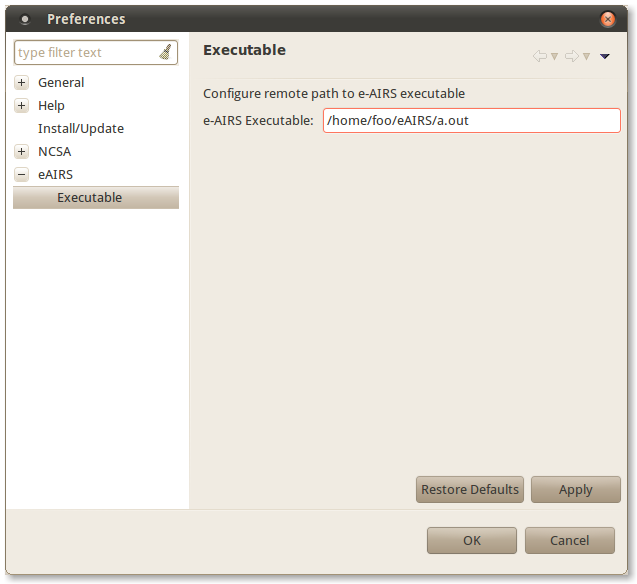
For the eAIRS application, users can optionally set a preference that specifies the location of the eAIRS executable used in the workflow analyses. By setting this option, the analysis field will populate automatically from the preference. Users can still change the field to a different location, if desired. To set the preference, do the following:
- Go to Window > Preferences
- Expand eAIRS and select Executable
- Where it says e-AIRS Executable, specify the location of your executable. For example, if the executable is a.out and it is located in /home/foo/eAIRS, then specify the path as /home/foo/eAIRS/a.out and click Apply. Then click OK. See the image below.
Execute CFD Single Run Workflow
For this tutorial example, we will assume that the user can use our standalone RMI Service. The only difference between this tutorial and the final release to KISTI will be the replacement of our RMI Service with their standalone RMI Service. So, the first step is to add our RMI Service at vertex.ncsa.uiuc.edu
Add Vertex RMI Service
- Right click on the scenario we created (CFD Scenario) and select (
 ) Add Service from the popup menu. You should now see a screen similar to the one below:
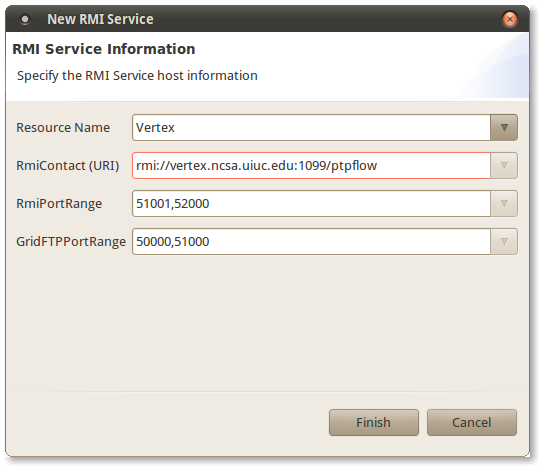
Enter Vertex for the name of the service, rmi://vertex.ncsa.uiuc.edu:1099/ptpflow for RmiContact(URI), 51001,52000 for RmiPortRange and 50000,51000 for GridFTPPortRange. After entering this information, click Finish. You should see the name of the service next to the icon in your scenarios view.
Now that we have an RMI service, it's time to connect to it so we can launch our eAIRS CFD workflow.
Connect to RMI Service
- Go back to the Workflow Overview view and click on the icon. Where it says RmiContact(URI), select either the Vertex service we just added or the RMI service you just created (e.g. rmi://foo.ncsa.uiuc.edu:1099/ptpflow). See the image below:

- Click Finish to connect to the service.
Execute Analysis
CFD Single Run Workflow
- To execute our analysis, select the scenario we created and then click on the
 icon. You should see a dialog similar to the one below:
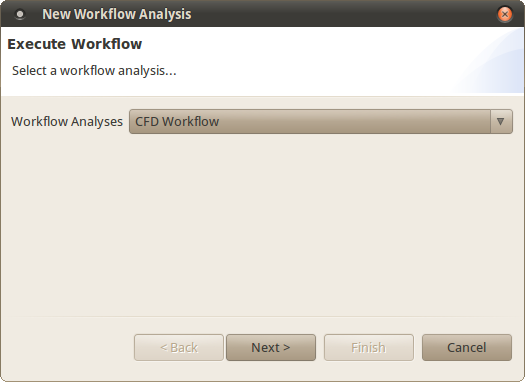
- From the dropdown menu next to Workflow Analyses select CFD Workflow and click Next.
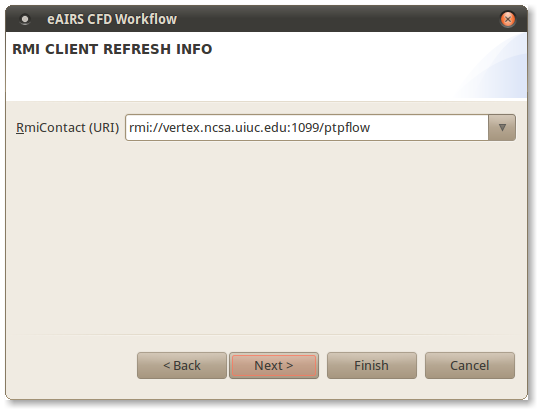
- If you haven't already specified an RMI service, you will see a screen similar to the one below. Select the service to connect to and click Next.
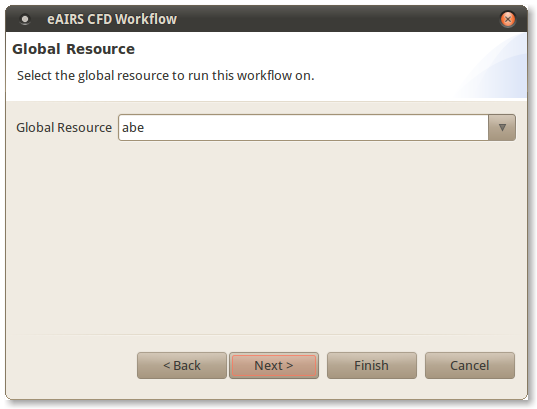
- You should see a screen similar to the one below. Select abe as your global resource to run the job on and click Next.
- You should see an input screen for the CFD workflow similar to the one below.
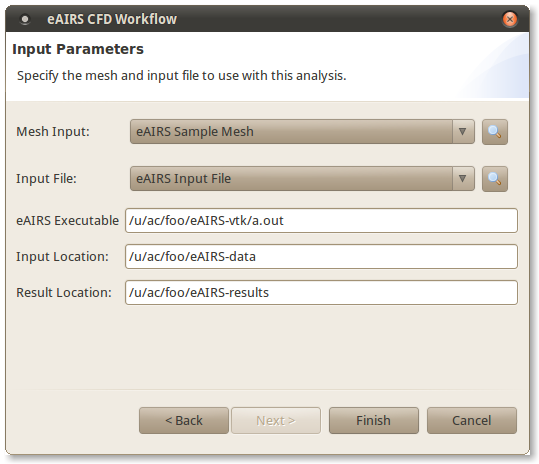
- For Mesh Input, select the dataset that we added to our scenario called eAIRS Sample Mesh.
- For Input File, select the dataset that we added to our scenario called eAIRS Input File. Alternatively, you can see this section for how to create your own input file.
- For eAIRS Executable, enter the path to the eAIRS executable on the global resource you selected in the previous screen. This should be the complete path, including the executable name.
- For Input Location, specify a location on the remote machine (in our case Abe) to send the data for execution. For example, if you specify /u/ac/foo/eAIRS-data, we will create a directory called eAIRS-data inside your home directory /u/ac/foo to store the input data for the workflow.
- For Result Location, specify a location on the remote machine (again, Abe or a network drive that the machine can access) to store the workflow results. For example, if you specify /u/ac/foo/eAIRS-results, a directory called eAIRS-results will be created in the home directory of foo. After specifying the input values, click Finish to execute the workflow.
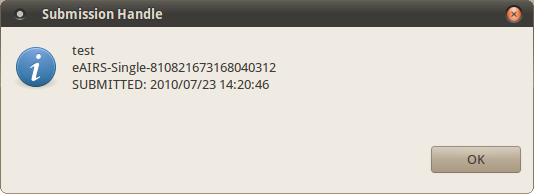
Once the workflow is submitted, you will see a confirmation similar to the one below:
Workflow Monitoring
If you click the Refresh  icon in the Workflow Overview view, you should see a view similar to the one below:
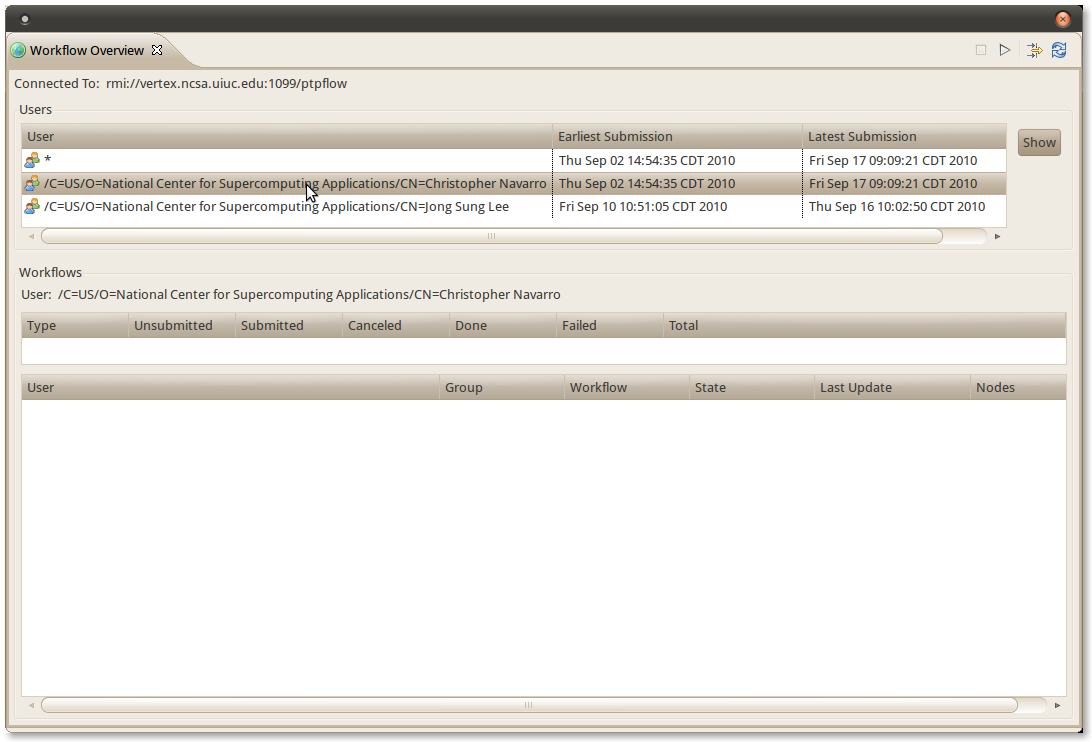
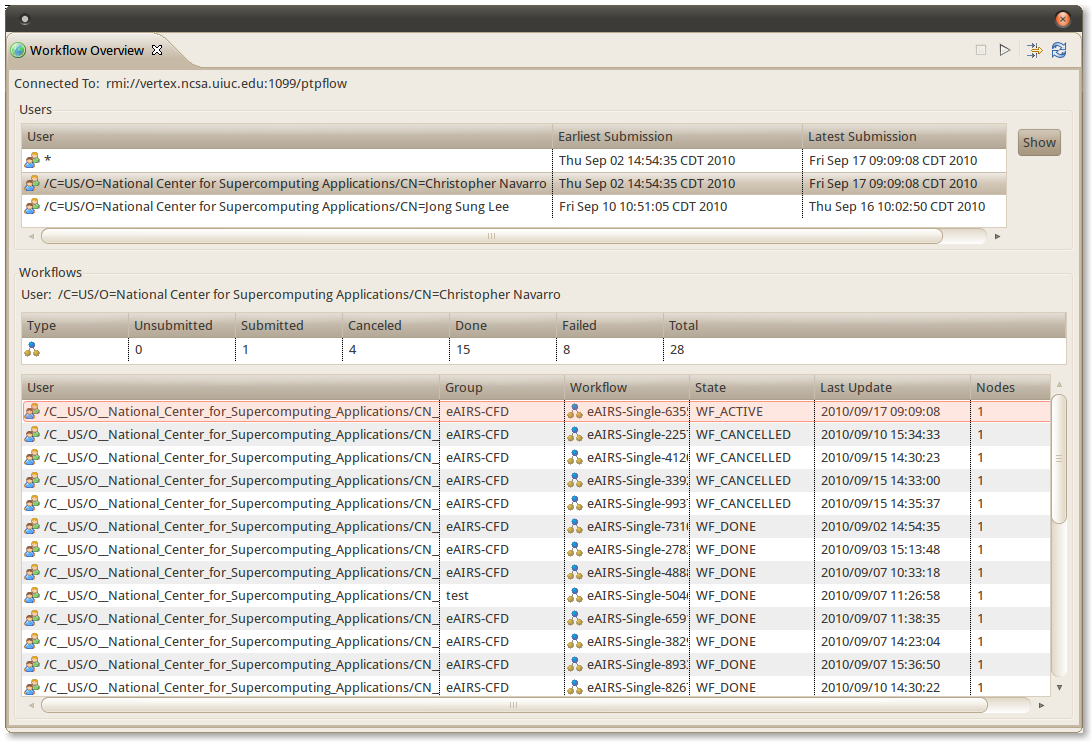
If you double click on your username (see the mouse cursor in the above view) or click the Show button, you should receive some information about the workflow similar to the image below:
If you right click on your workflow (see the mouse cursor position in the above image), you should have some options such as Graph Details, Monitor Workflow Events, etc. If you click on Monitor Workflow Events, a new view called Event Monitor should open. Click on the Connect icon and Click Finish to accept the default options. You should see some events similar to the ones below:
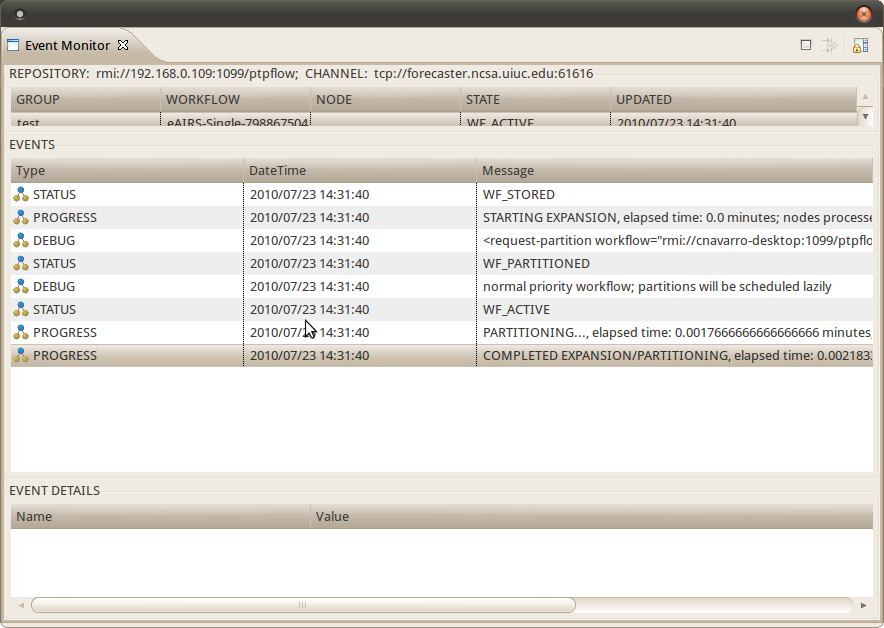
The PTPFlow views offer many options for obtaining various details about your workflow and more of these will be detailed later in other tutorials and in some short videos that will provide more information about how to access the various features of PTPFlow.
Retrieving Results
After your workflow finishes, make sure your scenario is selected in the Scenarios View and then go back to the Workflow Overview view and right click on your workflow job. You should see an option called ( ![]() ) Retrieve Results, select it. This will download the results for the workflow to your repository and add them to your Scenario. Each result file will be tagged "result". Depending on the speed of your connection, this might take a few minutes to complete.
) Retrieve Results, select it. This will download the results for the workflow to your repository and add them to your Scenario. Each result file will be tagged "result". Depending on the speed of your connection, this might take a few minutes to complete.
View VTK Results
If you have Paraview installed on your machine, go to your Scenarios View and do the following:
- Find the
 Results folder for your scenario and expand it.
 - Find the result file called "result.vtk-jobid" where job-id will be the job's ID and select it (see sample screenshot below).
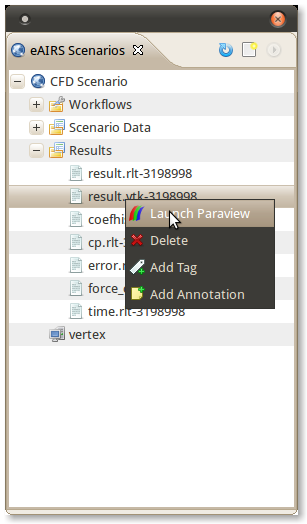
- Right click on the file and select
 Launch Paraview.
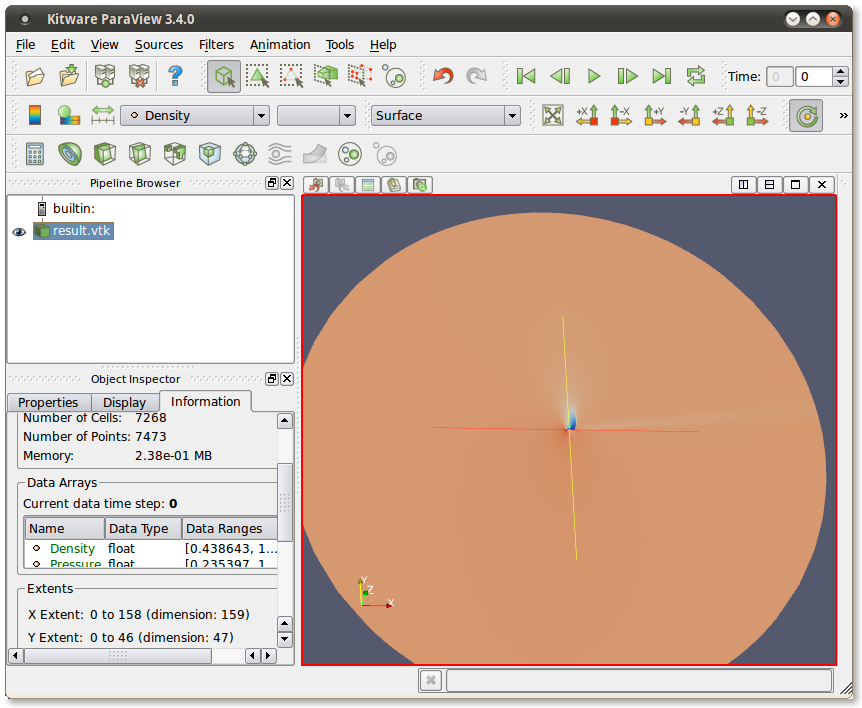
Paraview should open and you should see an image similar to the one below:
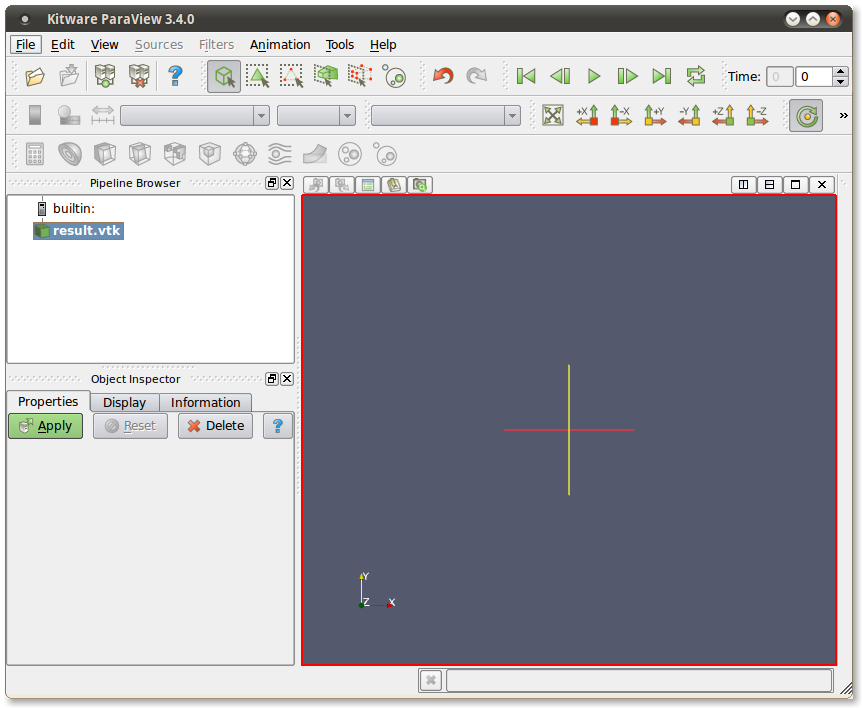
To view the results, press the "Apply" button and you should now see a screen like the one below:
Execute Parameterized CFD Workflow
This is similar to the Single run workflow, except the user can specify multiple input files and meshes.
Execute Analysis
CFD Parameterized Workflow
- To execute the parameterized workflow analysis, select the scenario we created and then click on the icon. You should see a dialog similar to the one below:
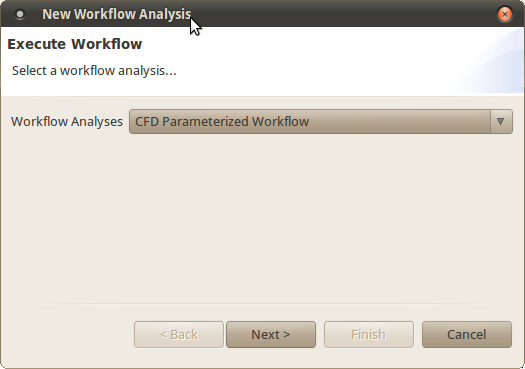
- From the dropdown menu next to Workflow Analyses select CFD Parameterized Workflow and click Next.
- If you haven't already specified an RMI service, you will see a screen similar to the one below. Select the service to connect to and click Next.
- You should see a screen similar to the one below. Select abe as your global resource to run the job on and click Next.
- You should see an input screen for the CFD Parameterized workflow similar to the one below:
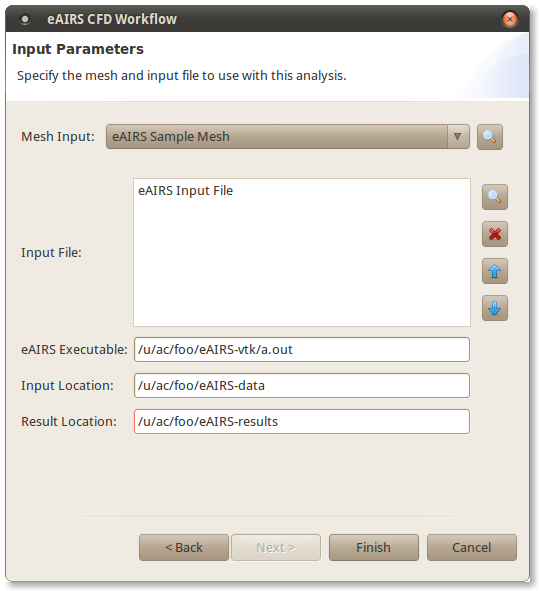
- For Mesh Input, select the mesh that will be used for each parameterized run. We provide as sample data eAIRS Sample Mesh which you can use or you can import another mesh file to specify your own mesh.
- For Input File, select the dataset(s) to use as the input file for each parameterized run. We provide as sample data eAIRS Input File which you can use or you can import another input file(s) to use with your selected mesh. Alternatively, you can see this section for how to create your own input file.
- For eAIRS Executable, enter the path to the eAIRS executable on the global resource you selected in the previous screen. This should be the complete path, including the executable name.
- For Input Location, specify a location on the remote machine (in our case Abe) to send the data for execution. For example, if you specify /u/ac/foo/eAIRS-data, we will create a directory called eAIRS-data inside your home directory /u/ac/foo to store the input data for the workflow.
- For Result Location, specify a location on the remote machine (again, Abe or a network drive that the machine can access) to store the workflow results. For example, if you specify /u/ac/foo/eAIRS-results, a directory called eAIRS-results will be created in the home directory of foo. After specifying the input values, click Finish to execute the workflow.
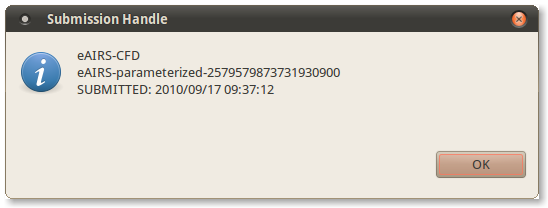
Once the workflow is submitted, you will see a confirmation similar to the one below:
Create Input File
This section discusses how you can create your own input files to use with eAIRS. There are two options, you can either create your own input file outside of eAIRS RCP and import the file into the repository or you can use eAIRS RCP to help you create new input files. The next section discusses the latter.
Create New Input with eAIRS RCP
To create a new input file with eAIRS RCP, do the following:
- Go to File > New
- Expand eAIRS and select eAIRS Input File. Click Next. You should see an image similar to the one below:
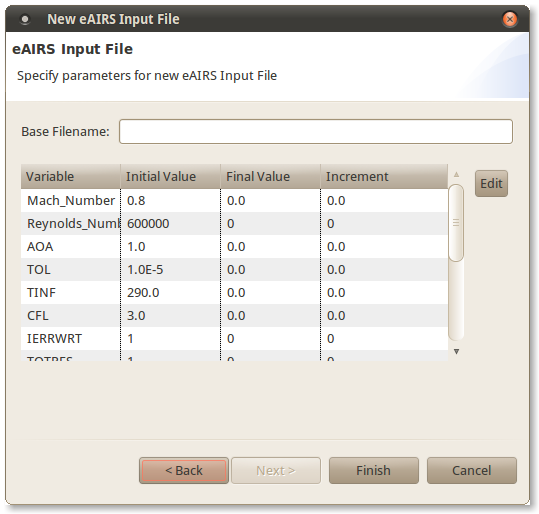
- Where it says Base Filename, enter a base name for your input file (e.g. MyInput). The name of each file created will begin with MyInput.
- To edit a field, for example Mach Number, select Mach Number and click Edit. You should see a screen similar to the one below:
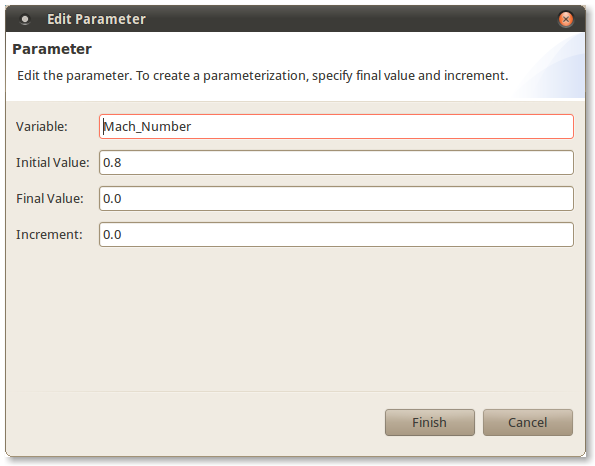 # Where it says *Initial Value specify 0.5
- Where it says Final Value specify 1.0
- Where it says Increment, specify 0.25
- Click Finish. Leave the rest of the values unchanged and click Finish
This should have created 3 new files in your Repository called MyInput_0, MyInput_1, MyInput_2. You might have to click the  icon to update the Repository. To create a single file, follow the previous steps, but only specify initial values for each variable.
Note: be careful specifying too many parameterizations since the number of files can grow quite large. For example, using 3 different mach numbers, 10 different Reynolds numbers and 3 different Angles of Attack will generate 90 input files.
Dataset Tags and Annotations
How to Tag a Dataset
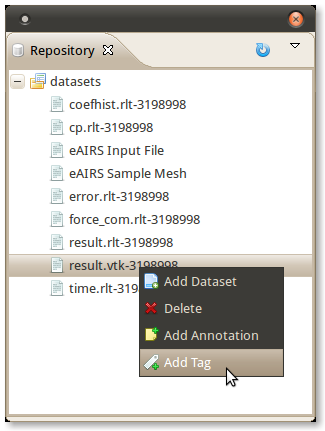
To tag a dataset, do the following:
- Go to the Repository view and expand datasets
- Select a dataset, right click on it and select
 Add Tag. See the image below:
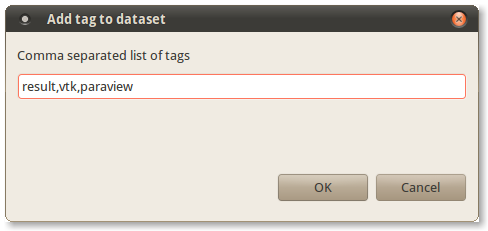
- In the dialog box that opens, enter each tag separated by a comma and click OK. See the image below for an example.
To see your new tags, open the Metadata view and click on the dataset if it is not already selected.
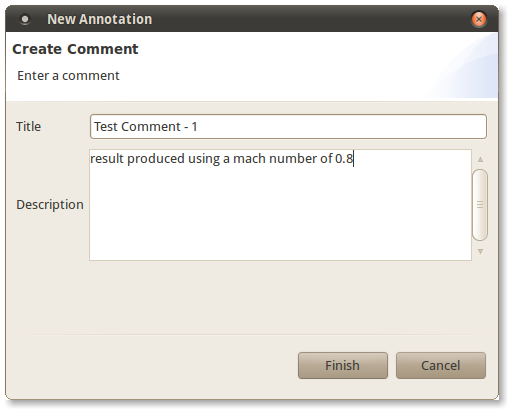
How to Annotate a Dataset
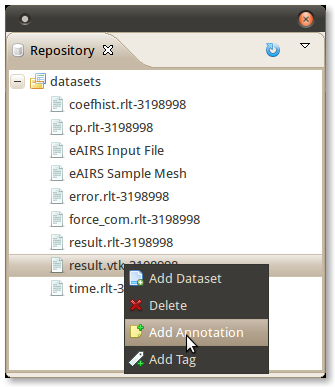
To add a comment to a dataset, do the following:
- Go to the Repository view and expand the datasets
- Select a dataset, right click on it and select
 Add Annotation. See the image below.
- In the dialog box that opens, enter a title and description. See an example below: