Overview
This page will build on the example that is presented in the Bridge Fragility page. Now that we have a bridge fragility curve, we need to tell MAEviz how to map bridge fragilities to bridges. What we will learn in this section is:
- How to create a bridge fragility mapping file
- How to ingest a bridge fragility mapping file
Create Fragility Mapping
This section will require a very basic understanding of XML and is something that we can help the user with putting together if you contact us by email. The basic concept behind the fragility mapping is to tell MAEviz which bridge fragilities should be used with which bridges. The mapping file allows you to use a specific set of rules to map fragilities to buildings (e.g. if a bridge has a classification of type MSC_Concrete use fragility curve with ID 1). The more bridge attributes you have in your bridge dataset, the more complex mapping you can make. For our case, we will keep this simple and only use the bridge class attribute in our mapping.
Using the example below, we'll go through the various parts of the fragility mapping.
<match-filter-map>
  <property-match>
    <success-value>
      <map>
        <entry key="Non-Retrofit Fragility ID Code" value="1"/>
        <entry key="Restrainer Cables Retrofit Fragility ID Code" value=""/>
        <entry key="Shear Key Retrofit Fragility ID Code" value=""/>
        <entry key="Steel Jacket Retrofit Fragility ID Code" value=""/>
        <entry key="Elastomeric Bearing Retrofit Fragility ID Code" value=""/>
        <entry key="Seat Extender Retrofit Fragility ID Code" value=""/>
      </map>
    </success-value>
    <filter>
      <statement>
        <rule>String class EQUALS MSC_Concrete</rule>
      </statement>
    </filter>
  </property-match>
</match-filter-map>
Between the <map> </map> tags is where the fragility identifiers are specified. Where it says key is for MAEviz internal use and that must match exactly because the "Non-Retrofit Fragility ID Code" tells MAEviz this is the as-built fragility for the bridge. The second part where it says value is a fragility ID in your fragility dataset (e.g. 1), this must match match a fragility in your fragility dataset.
In the next section of the example above you will see <rule> </rule> tags between <statement> </statement> tags. These are the rules to determine if the fragility with ID of 1 should be used for a particular bridge. If you look at the first rule where it says:
<rule>String class EQUALS MSC_Concrete</rule>
there are four parts: data type, field name, inequality and field value. In this case, String is the data type, class is the field name we are looking for in the bridge dataset, EQUALS is the inequality, and the field value is MSC_Concrete. For each bridge, MAEviz will retrieve the value in the class column and see if it exactly matches MSC_Concrete. If it does, then MAEviz will attempt to retrieve the fragility with ID 1 and apply it to the bridge. We could include more rules by adding additional <rule></rule> tags. For example, we could also specify that a bridge must have a certain number of spans to use this particular fragility. The rules are treated as AND statements so if any fail, MAEviz will move to the next <property-match> </property-match> tags that contain the next fragility curve and its rules to see if it has a match. If MAEviz fails to find a match, then it will skip the damage estimate for that bridge.
If you need to create a fragility mapping file that maps your fragilities to your bridge dataset, an expert will need to prepare a list of rules that maps a fragilitys to each bridge and save the rules in an XML file. After creating the file, you need to ingest it into MAEviz. Ingesting data into MAEviz will be detailed in the next sections. The mapping file above can be downloaded here.
Ingest Fragility Mapping
After downloading the bridge fragility mapping file, follow the steps below to ingest it into MAEviz:
- Go to the File menu near the top of the application and select Import. This should bring up the dialog seen below.
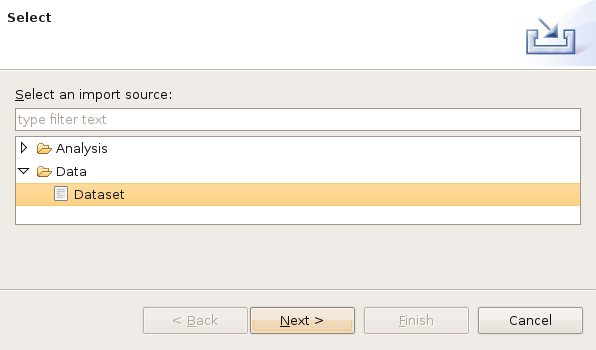
- From the dialog box, expand the Data selection and select Dataset and click Next. You should see something similar to the image below.
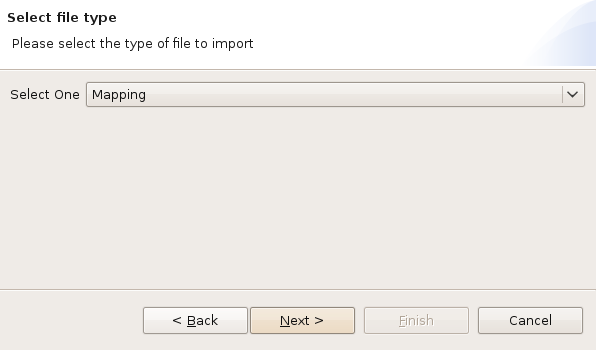
- From the dialog drop down menu, select Mapping and click Next. You should see a dialog similar to the one in the image below.

- From the dialog, click the Browse button and select the bridge fragility mapping you want to ingest and click the Next button. You should see a dialog similar to the one below.

- From the dialog drop down menu, select Bridge Fragility Mapping and click Next. You should see a dialog similar to the one below.

- From this dialog you can select the repository to ingest the dataset to, provide a descriptive name for the dataset (e.g. Sample Bridge Fragility Mapping), and a version number (e.g. 1.0). After entering the required information, click the Finish button.