Overview
This document will help new developers setup their Eclipse development environment to get started working with Cyberintegrator and eAIRS.
Development Environment
The development environment will consist of Eclipse and some plug-ins we will need to add to the default installation (e.g. Maven for dependency management).
Software
In this section, we will outline
- Installing Eclipse
- Installing Graphical Editing Framework / Zest Library
- Installing GWT
- Adding Git repositories and Importing the projects from Git into a workspace
- Updating Plug-in Classpath
- Building spring-libraries project
- Building eairs-cfd-tools project
Installing Eclipse:
- First, download Eclipse Juno (4.2) here. Download Eclipse for RCP and RAP Developers.
- Unzip the Eclipse download somewhere on your development machine, (e.g. C:\Eclipse)
- Launch Eclipse. When Eclipse first launches, it will ask you to specify a workspace (e.g. C:\Users(user-name)\workspaces\kisti). After specifying a workspace, you can check the box "Use this as the default and do not ask again" box so that eclipse will not ask you to specify the workspace again.
- After Eclipse loads for the first time, you will need to select the Workbench button located on the middle of the welcome screen. The icon looks like an arrow and when highlighted it will display some text that says Go to the workbench.
Installing Graphical Editing Framework / Zest Library
- Next we need to install the Zest library that it used for displaying the workflow graphs. This will be downloaded and installed from the Eclipse Update Site. While in Eclipse, go to Help-> Install New Software. From the Drop down menu next to "Work with:" select Juno - http://download.eclipse.org/releases/juno
- Expand "Modeling" and select "Graphical Editing Framework Zest Visualization Toolkit SDK". Click Next. Click Next again. Accept the license agreement and click Finish. Once the installation finishes you will need to restart eclipse.
- After restarting Eclipse, you might need to press the Go to the workbench button again to bring the workbench back up.
Installing GWT
In order to build and run the Edison CFD web application you will need to download the latest GWT Eclipse plugin. The latest GWT Eclipse plugin can be found here. Follow the instructions for your version of Eclipse.
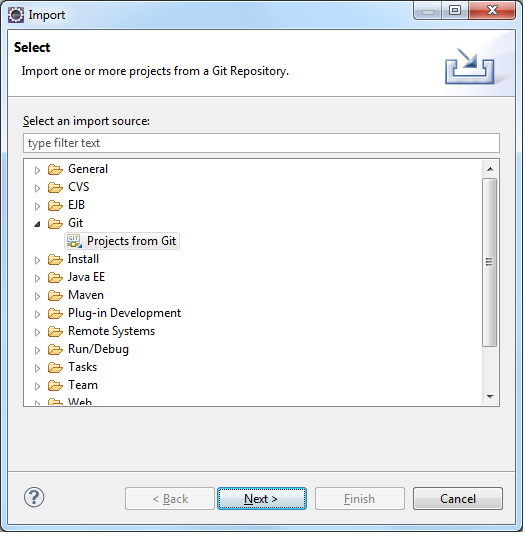
Adding Git repositories and Importing the projects from Git into a workspace
To obtain the source code for Cyberintegrator, PAW and Edison, there are 4 Git repositories that we will need to connect to. This section will describe how to check out each repository to your workspace.
- First, we will import ncsa-common.git. To do this, go to File > Import > Git > Projects from Git. Click Next.
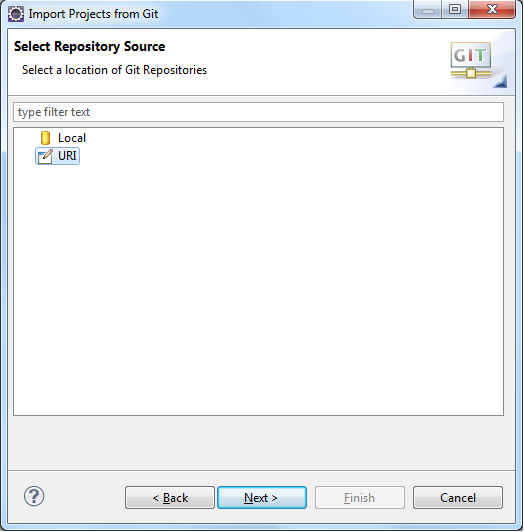
- Select URI and click Next. See image below:
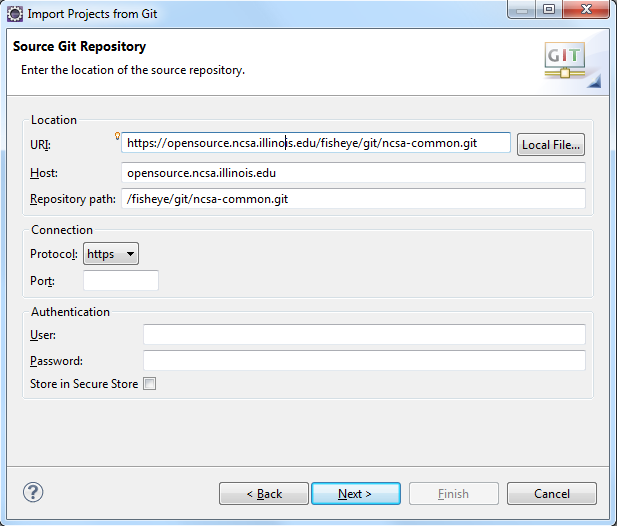
- Copy and Paste https://opensource.ncsa.illinois.edu/stash/scm/CBI/ncsa-common.git into the URI field and it will auto-complete the rest. Click Next. See image below:
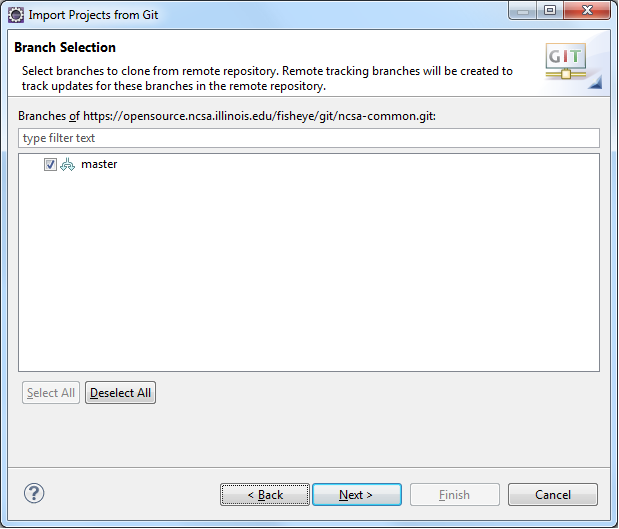
- Make sure master is checked and click Next. See image below:
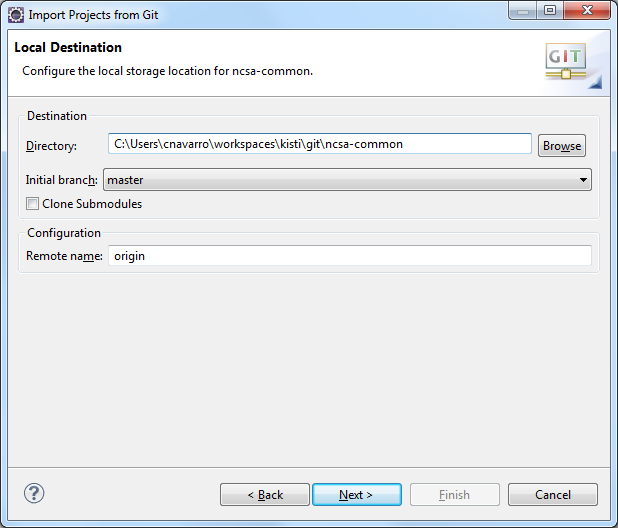
- It is suggested that you change the destination of the checked out project to be inside the workspace so in the future you could work with multiple versions in different workspaces. It keeps checked out projects more organized so you know the workspace that the project belongs to. If you created your workspace in the previous steps at C:\Users(user-name)\workspaces\kisti then we suggest you make the destination: C:\Users(user-name)\workspaces\kisti\git\ncsa-common. See the image below for my settings. Everything else can be left as the default. Click Next.
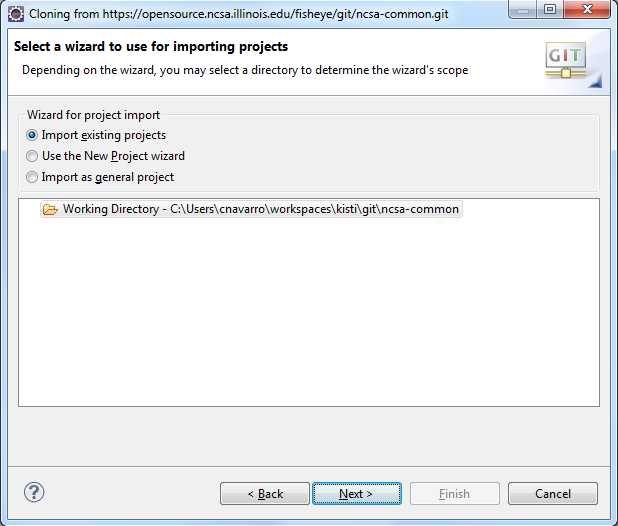
- You can leave the defaults. Yours should look similar to the image below. Click Next.
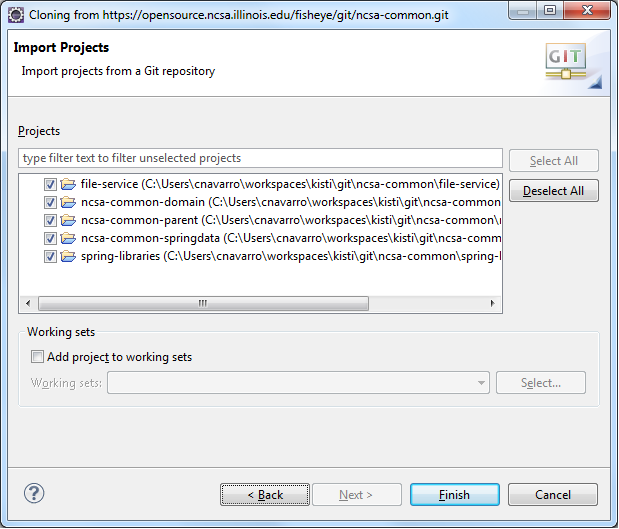
- Make sure all projects are selected (similar to the image below) and click Finish.
After you checkout the first repository, your project may take some time to checkout Maven dependencies and attempt to build the workspace. Once this is finishes, you can proceed with the next repository. The only differences will be in step 3 (the repository URI) and in step 5 (where you put the repository projects).
- The next repository to checkout is cyberintegrator.git. To check it out, go back to File > Import > Git > Projects from Git. Click Next.
- Select URI and click Next.
- Copy and Paste https://opensource.ncsa.illinois.edu/stash/scm/CBI/cyberintegrator.git into the URI field and it will auto-complete the rest. Click Next.
- Make sure master is checked and click Next.
- As with the previous project, we want to change the destination of the project to be inside the workspace. Make the destination for this repository as: C:\Users(user-name)\workspaces\kisti\git\cyberintegrator. All other settings are the same as the previous step 5 image. Click Next.
- You can leave the defaults as they are. Click Next.
- Make sure all projects are selected except for dataset-rcp and click Finish.
As with the previous, this will take some time to checkout and build since it will begin downloading maven dependencies. Let this process finish and then move on to the final repository.
- The last repository to checkout is paw.git. To check it out, go back to File > Import > Git > Projects from Git. Click Next.
- Select URI and click Next.
- Copy and Paste https://opensource.ncsa.illinois.edu/stash/scm/CBI/paw.git into the URI field and it will auto-complete the rest. Click Next.
- Make sure master is checked and click Next.
- As with the previous project, we want to change the destination of the project to be inside the workspace. Make the destination for this repository as: C:\Users(user-name)\workspaces\kisti\git\paw. All other settings are the same as the previous step 5 image. Click Next.
- You can leave the defaults as they are. Click Next.
- Make sure all projects are selected and click Finish.
As with the previous two repositories, let the the workspace download it's maven dependencies and finish building before moving on to the next repository.
- The last repository to checkout is edison-cfd.git. To check it out, go back to File > Import > Git > Projects from Git. Click Next.
- Select URI and click Next.
- Copy and Paste https://opensource.ncsa.illinois.edu/stash/scm/KNSG/edison-cfd.git into the URI field and it will auto-complete the rest. However, unlike the previous repositories, you will need to use your username/password for the repository. Enter that information and click Next.
- Make sure master is checked and click Next.
- As with the previous project, we want to change the destination of the project to be inside the workspace. Make the destination for this repository as: C:\Users(user-name)\workspaces\kisti\git\edison-cfd. All other settings are the same as the previous step 5 image. Click Next.
- You can leave the defaults as they are. Click Next.
- Make sure all projects are selected and click Finish.
As with the previous repositories, let the the workspace download it's maven dependencies and finish building before moving onto the next section. You can ignore any errors in the edison-cfd project since we are only interested in the eairs-cfd-tools.
Updating Plug-in Classpath
If you see an error in cyberintegrator-rcp ImportDatasetWizard.java saying that it cannot find the Logger class, you will need to fix the .classpath of the spring-libraries project. It is a known issue when combining Eclipse and Maven where both try to manage the classpath. To fix the issue, do the following:
- Right click on spring-libraries and select Plug-in Tools > Update Classpath...
If you ever have to perform a Maven > Update Project or Run as > Maven Install on spring-libraries, then you will need to fix the classpath by performing the action Plug-in Tools > Update Classpath.
Building spring-libraries project
The first time you check out the source code, you will need to build the spring-libraries project. To do this, right click on it and select Run as > Maven Install. After doing this, if you have the error mentioned in the above section, perform the update classpath operation. If not, you can proceed to the next section.
Building eairs-cfd-tools project
If this is the first time building everything, you will most likely first need to build two parent projects before we can build the eairs-cfd tools project. To determine if you need to build additional projects, do the following:
- Right click on eairs-cfd-tools and select Runs as > Maven Install
If it builds successfully, then you should see Build Success in the console. However, if this it the first time building everything, you will most likely get errors since you need to build the dependent projects. A convenient way to build everything is to build the parent pom.xml file that is in the top level of the ncsa-commom and cyberintegrator repositories. To build them, you will need to have Maven installed on your machine so you can run Maven commands at the command line. To build those pom files at the command line, do the following:
- Locate the directory where you checked out the ncsa-common git repository (e.g. C:\Users(user-name)\workspaces\kisti\git\ncsa-common). Inside that directory, you should see a pom.xml file. To build the projects, run the command: mvn install.
- After that builds, locate the directory where you checked out the cyberintegrator git repository (e.g. C:\Users(user-name)\workspaces\kisti\git\cyberintegrator). Inside that directory, you should also see pom.xml file. To build the projects, run the command: mvn install.
After that is finished, return to your Eclipse workspace and perform the action Run as > Maven Install on the eairs-cfd-tools project and it should build properly.
This will put the jar files in your maven repository. If you are on Windows, then your maven repository will be in C:\Users\user-name\.m2\respository\edu\illinois\ncsa. You should see a folder called eairs-cfd-tools that contains the jar we built. In the next section we'll discuss how to run Cyberintegrator and import those tools into your repository.
Running Cyberintegrator
This section will cover how to launch the Cyberintegrator application and import tools.
Running Cyberintegrator and Importing Tools
In this section, we will outline:
- Launching Cyberintegrator
- Importing eAIRS Java tools into Cyberintegrator
- Importing eAIRS HPC Tool into Cyberintegrator
- Build a New Workflow
Launching Cyberintegrator
To launch Cyberintegrator, do the following:
- Expand the project cyberintegrator-rcp
- Double click on Cyberintegrator.product to open the Product view
- Under the Testing section, click the link Launch an Eclipse Application
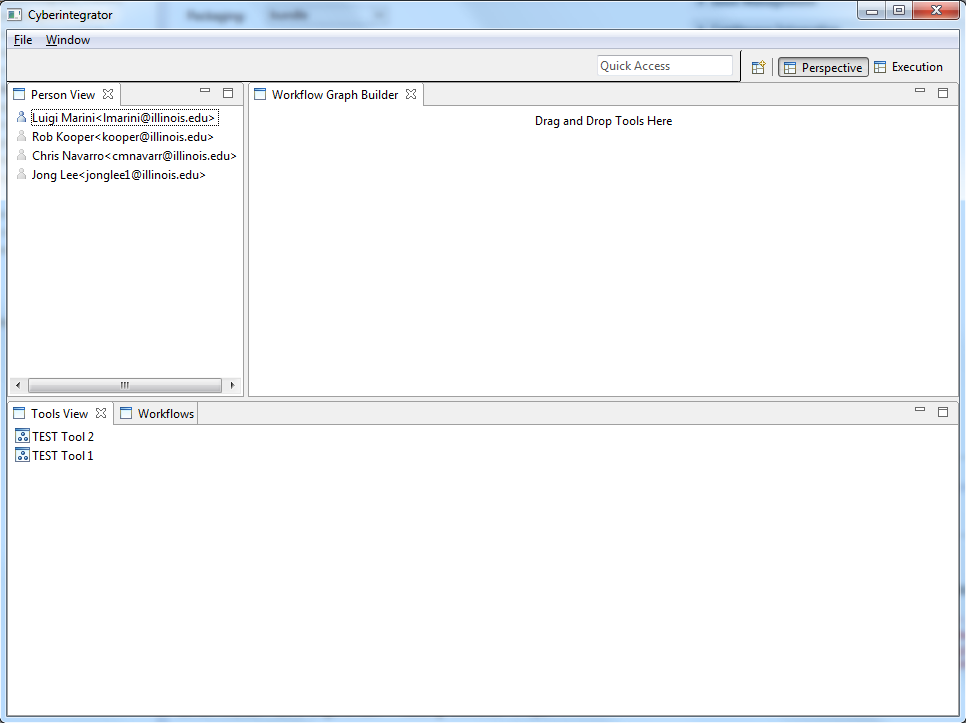
When Cyberintegrator finishes launching, you should see an image similar to the one below:
Importing eAIRS Java tools into Cyberintegrator
To import the Java tools we need, do the following:
- Go to File > New > Other > Java Tool and click Next.

- Click the Add button and find the following jar files in your .m2 maven repository. Once you finish this, your wizard should look similar to the one below. Click Next.
- eairs-cfd-tools.jar at C:\Users\user-name\.m2\repository\edu\illinois\ncsa\eairs-cfd-tools\0.0.1-SNAPSHOT
- cyberintegrator-executor-hpc.jar at C:\Users\user-name\.m2\repository\edu\illinois\ncsa\cyberintegrator-executor-hpc\3.0.0-SNAPSHOT
- jsch-0.1.48.jar at C:\Users\user-name\.m2\repository\com\jcraft\jsch\0.1.48
- slf4j-api-1.6.4.jar at C:\Users\user-name\.m2\repository\org\slf4j\sl4j-api\1.6.4
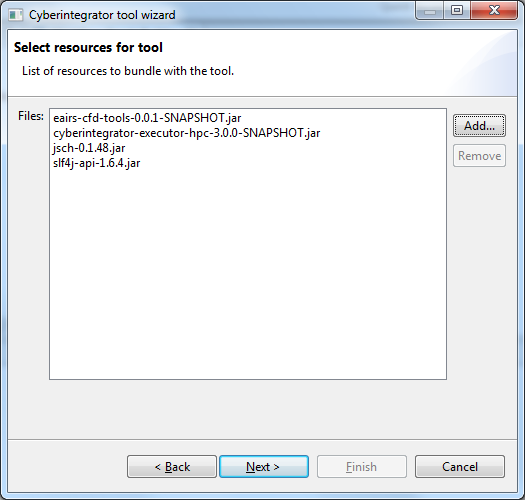
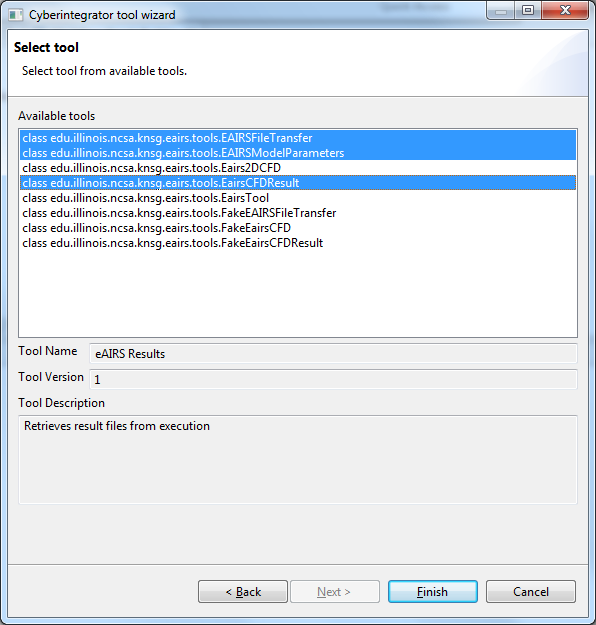
- You will see quite a few tools since some were created for testing. The Java tools we are interested in are EAIRSModelParameters, EAIRSFileTransfer and EairsCFDResult. Select them and click Finish. Your wizard should look similar to the one below before clicking Finish.
You should now see three new tools in your Tools View. To add them to the workspace, click and hold the mouse down and drag them to the Workflow Graph Builder. Currently, there is no remove option and the only way to remove a tool is to create a new workflow. To import the HPC tool, go to the next section.
Importing eAIRS HPC Tool into Cyberintegrator
To import the eAIRS hpc tool, do the following:
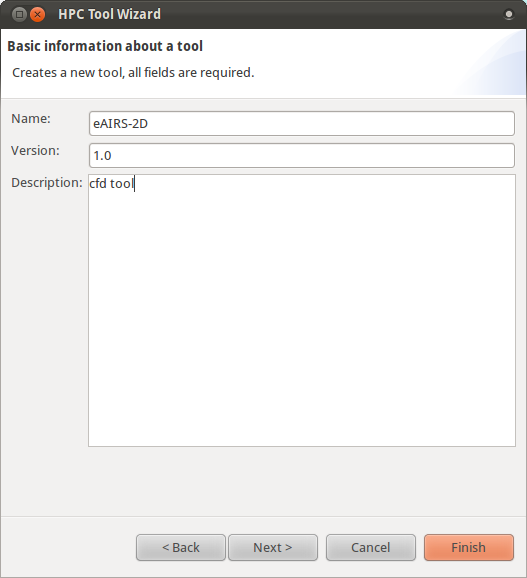
- Go to File > New > Other > HPC Tool and click Next.
- On this page, you can specify some basic information such as the name of the tool, the version and a brief description of what operation the tool performs. After doing this, click Next.
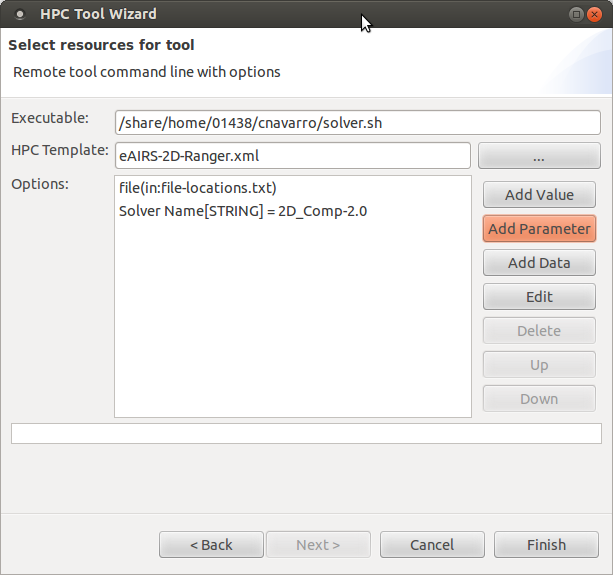
- On this page, the primary fields are Executable, HPC Template, and Options. The executable is what we want to execute on the remote machine.
- In the case of eAIRS, we have a shell script, solver.sh, which takes in parameters to determine what to execute. Enter the complete path to the file on the remote machine in the text field. For example: */home/username/solver.sh*ssh
- For HPC Template, browse for the xml file that describes the machine that will be executing the tool.
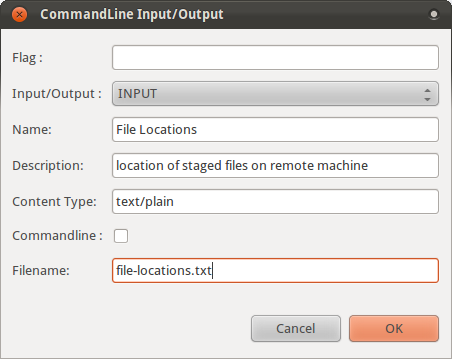
- For Options, there are two options we need to pass in. The first is a dataset describing the location of the staged files and the second is a parameter (string) containing the name of the solver we want to execute. To add the dataset, click the Add Data button and enter the information seen in the image below to the dialog box that opens and click OK.
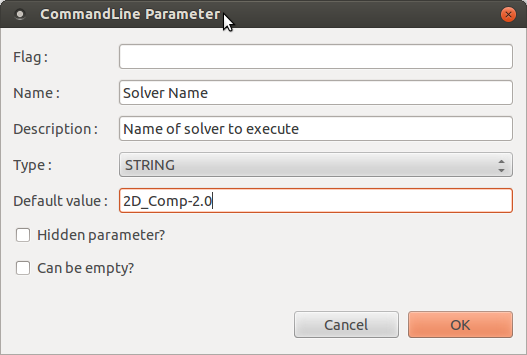
- To add a parameter, click the Add Parameter button and enter the information seen in the image below to the dialog box that opens and Click OK when done.
- After entering the tool information, your wizard page should look similar to the image below. Click Finish to add the tool
You should now see a tool with the name you provided in the Tools view.
Building a New Workflow
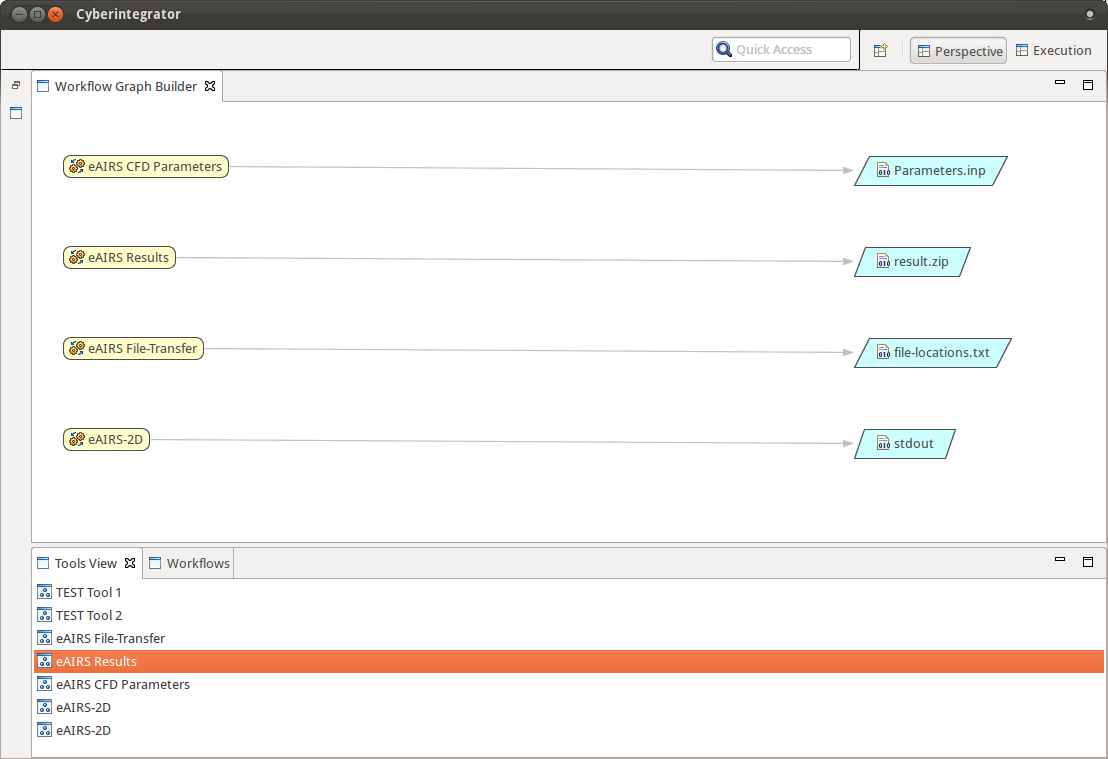
This section will take you through the steps of building a new workflow using the eAIRS tools as an example. In order to run most of the workflow, you will need to create ssh keys and add them as trusted on the remote host. Before connecting the workflow steps, we will first add all 4 tools that are required: eAIRS CFD Parameters, eAIRS File-Transfer, eAIRS-2D, eAIRS Results.
- First, go to File > New > Workflow. In the dialog that opens, enter a title for the new workflow and click Finish.
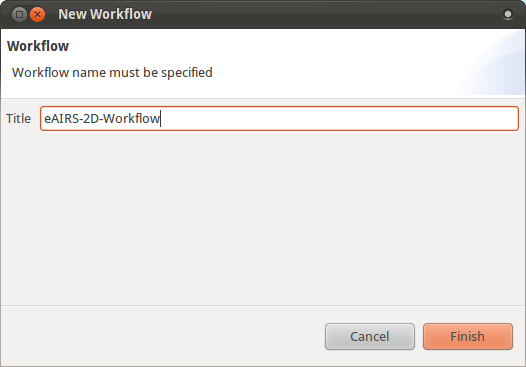
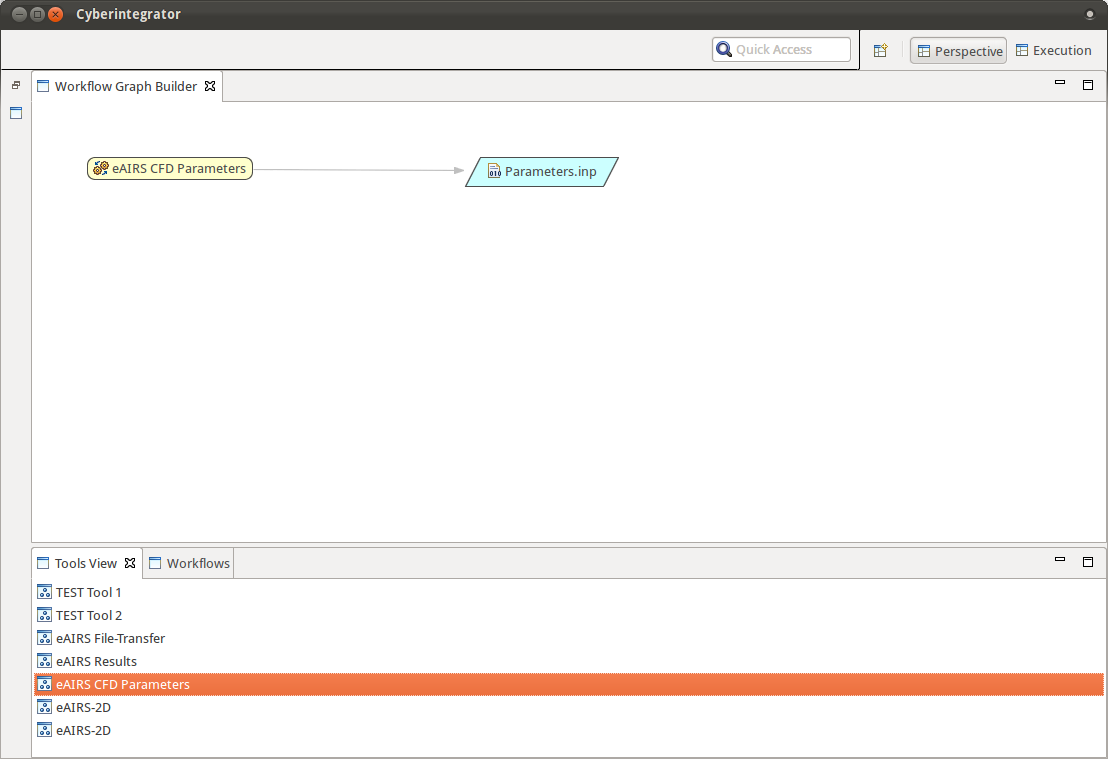
This will clear any content that is in the Workflow Graph Builder view and prepare it for building a new workflow. The first tool we will add is the eAIRS CFD Parameters tool.
- To add the eAIRS CFD Parameters tool, left click with your mouse on it in the Tools view and while continuing to hold the mouse down, drag the tool onto the Workflow Graph Builder view and drop it. When you drag the tool over the view, you should see a small plus symbol next to your cursor that indicates you can add the tool. Your view should now look similar to the one below:
- To add the eAIRS File-Transfer tool, follow the same procedure as the previous tool. This tool will stage the data to the remote machine for execution.
- Next, add the eAIRS-2D tool. This tool will execute the executable on the remote machine.
- Finally, add the eAIRS Results tool. This tool will transfer the result files back to the Cyberintegrator repository.
Your view should now look similar to the one below:
Next, we need to connect the tools together and specify any datasets that will come from external sources (e.g. a provided dataset not generated as an output from another Cyberintegrator tool).
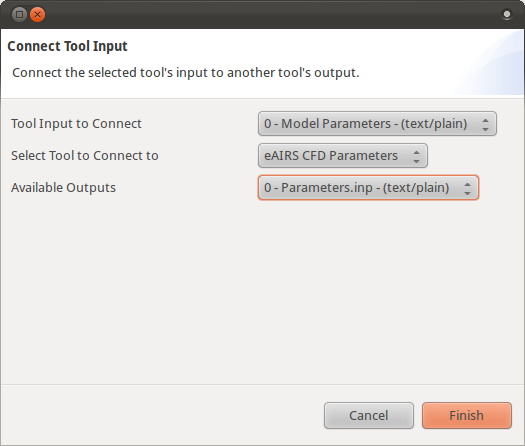
- First, we will connect eAIRS CFD Parameters to eAIRS File-Transfer since we want it to stage the parameter file to the remote machine. To do this, right click on eAIRS File-Transfer and select Connect > Tool Input. This should bring up a dialog box.
- For the field Tool Input to Connect, select 0 - Model Parameter - (text/plain)
- For the field Select Tool to Connect to select eAIRS CFD Parameters
- For the field Available Outputs select 0 - Parameters.inp - (text/plain). Your wizard should look similar to the one below. After doing this, click Finish.
- Next, we need to specify that the other input for eAIRS File-Transfer, the mesh input, will be provided as an external dataset. To do this, right click on eAIRS File-Transfer and select Connect > Dataset.
- For the field Tool Input to Connect, select 1 - Mesh - (text/plain). Click Finish.
- The next tool we will connect is eAIRS File-Transfer to eAIRS-2D since the CFD tool needs to know where the staged date is located. To do this, right click on eAIRS-2D and select Connect > Tool Input.
- For the field Tool Input to Connect, select 0 - File Locations - (text/plain)
- For the field Select Tool to Connect to select eAIRS File-Transfer
- For the field Available Outputs select 0 - file-locations.txt - (text/plain). Your wizard should look similar to the one below. After doing this, click Finish.
![]()
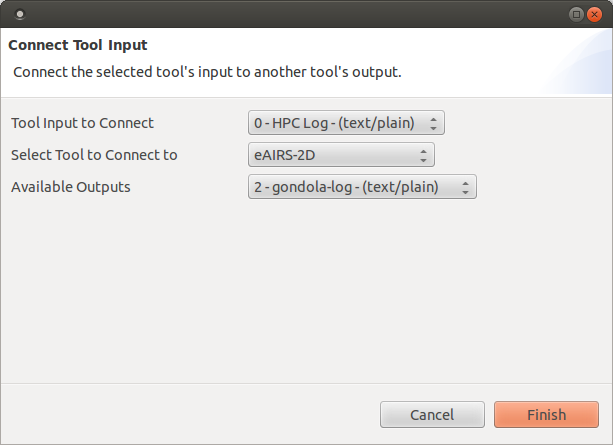
- The last tool we will connect is eAIRS-2D to eAIRS Results since the results tool will transfer the results of the analysis back to the Cyberintegrator Repository. To do this, right click on eAIRS Results and select Connect > Tool Input.
- For the field Tool Input to Connect, select 0 - HPC Log - (text/plain)
- For the field Select Tool to Connect to select eAIRS-2D
- For the field Available Outputs select 2 - gondola-log - (text/plain). Your wizard should look similar to the one below. After doing this, click Finish.
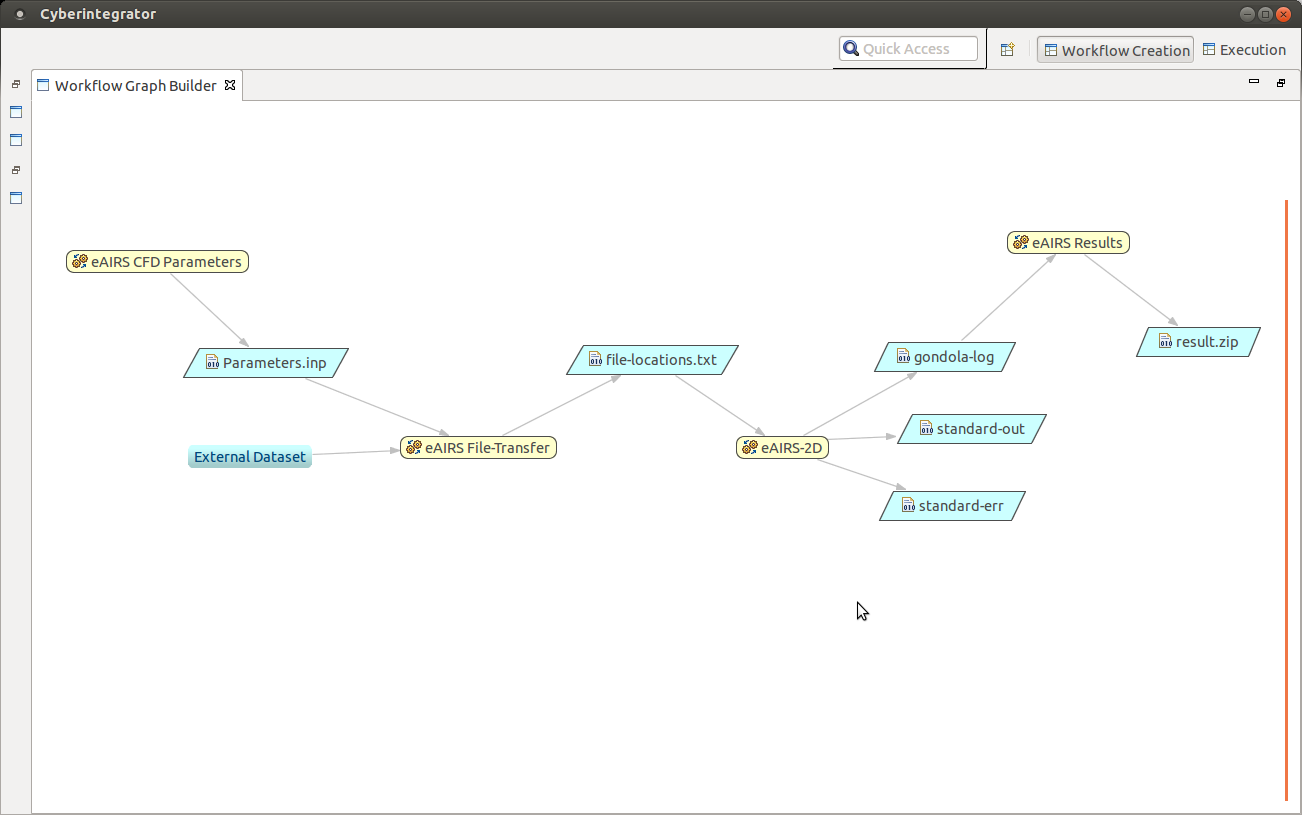
You Workflow Graph Builder view should look similar to the one below:
To run the workflow, we need to open the Execution perspective and fill in any required parameters and dataset inputs. To switch to the Execution perspective, go to Window > Open Perspective > Other > Execution and click *OK.
Once the view opens, click the Refresh(  ) icon to build the view. This will make sure the view is for the latest version of the workflow that is open. Your workflow steps may appear in a different order (this is expected) so I will indicate the step name when filling in parameters.
- For the eAIRS CFD Parameters step, fill in the following parameters
- Mach Number 0.75
- Reynolds Number 100000.0
- Angle of Attach 2.0
- Error Tolerance 1.0E-5
- CFL 3.0
- Flow Type -1.0
- Write File Interval 200.0
- Total Iteration 10000.0
- Steadiness 0.0
- Flux Scheme 6.0
- Limiter 4.0
- Time Integration 3.0
- For the eAIRS File-Transfer step, fill in the following parameters
- Username your username on the remote machine
- Remote Path the location you want to stage the data on the remote machine
- Target SSH the ssh URI for the remote machine, including port (e.g. ssh://ranger.tacc.teragrid.org:22)
- For the Mesh field, we will need to import a mesh. To do this, go to File > Import > Dataset and click Next. Browse for your mesh file and click Finish. After adding your mesh dataset to the repository, click on the Browse... button for the Mesh field and select your dataset.
- For the eAIRS-2D step, fill in the following:
- Solver Name The name of the solver you want to execute, (e.g. 2D_Comp-2.0)
- Target Username your username on the remote machine
- Target Userhome your home directory on the remote machine
- Target SSH the ssh URI for the remote machine, including port (e.g. ssh://ranger.tacc.teragrid.org:22)
- For the eAIRS Results step, fill in the following parameters
- Username your username on the remote machine
- Target SSH the ssh URI for the remote machine, including port (e.g. ssh://ranger.tacc.teragrid.org:22)
After all that information is entered, click the Execute button to launch the workflow. Since the desktop User Interface is still in development, there currently is no indication of the workflow status in the Desktop client. You will need to check the console view of Eclipse to see when each step finishes. Shortly after the job has finished on the remote machine, the result dataset should transfer to the Cyberintegrator Desktop. However, because of a bug in the system, you will need to manually refresh the Data view get the new dataset. This will be fixed shortly.