| Wiki Markup |
|---|
{toc:outline=true|maxLevel=4|style=none|indent=20px}

h1. Introduction

This tutorial assumes that you have looked over the [Analysis Framework Developer's Guide|Analysis Framework Developer's Guide] and have followed the [MAEviz development environment] tutorial for setting up a development environment. If not, please look at those two documents because this tutorial assumes you have setup your MAEviz development environment and are ready to create a new analysis plug-in so you can begin extending MAEviz.

h2. Building Analysis

The analysis we are going to perform is to check if a building is not on soft soil (0) or on soft soil (1). For simplicity, the analysis will randomly generate this number. Below you will find the steps to create this new analysis.

h3. New Plug-in Project

The first step is to create a new plug-in to contain our new analysis. To do this, do the following:

# Go to *File > New > Project* and select *Plug-in Project* and click Next.
!New-Plugin-Project-1.png|border=0!
# Where it says *Project name:* enter * |
| Table of Contents | ||||||||
|---|---|---|---|---|---|---|---|---|
|
Introduction
This tutorial assumes that you have looked over the Analysis Framework Developer's Guide and have followed the MAEviz development environment tutorial for setting up a development environment. If not, please look at those two documents because this tutorial assumes you have setup your MAEviz development environment and are ready to create a new analysis plug-in so you can begin extending MAEviz.
Building Analysis
The analysis we are going to perform is to check if a building is not on soft soil (0) or on soft soil (1). For simplicity, the analysis will randomly generate this number. Below you will find the steps to create this new analysis.
New Plug-in Project
The first step is to create a new plug-in to contain our new analysis. To do this, do the following:
...
ncsa.maeviz.building.example* or whatever you prefer and click |
...
Now that we have a new plug-in, we can move on to adding the required plug-ins for our new project.
Add Required Plug-ins
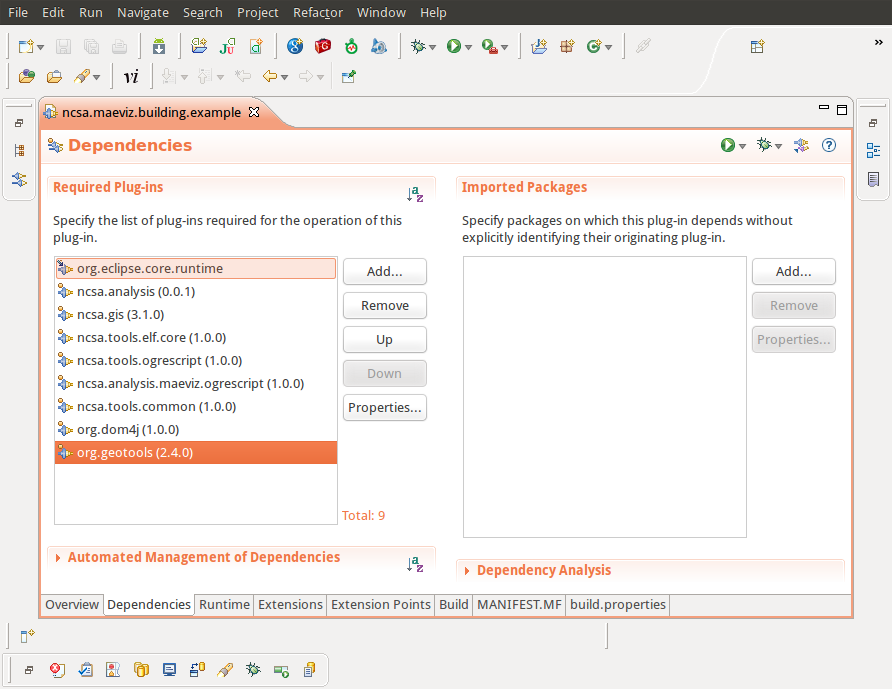
We will need to add a few required plug-ins. To do this, do the following:
...
Next. !New-Plugin-Project-2.png|border=0! # Nothing needs to change on this page. Make sure wizard page looks like the one below and click Finish. If the box *This plug-in will make contributions to the UI* is checked, uncheck it. !New-Plugin-Project-3.png|border=0! Now that we have a new plug-in, we can move on to adding the required plug-ins for our new project. h3. Add Required Plug-ins We will need to add a few required plug-ins. To do this, do the following: # Open up the *MANIFEST.MF* file associated with our plug-in and click on the *Dependencies* tab # Where it says *Required Plug-ins*, click the *Add...* button and add the following plug-ins #* ncsa.analysis #* ncsa.gis #* ncsa.tools.elf.core |
...
#* ncsa.tools.ogrescript |
...
#* ncsa.analysis.maeviz.ogrescript |
...
#* ncsa.tools.common |
...
#* org.dom4j |
...
#* org.geotools |
...
Your Dependency list should look like the one in the screenshot below: |
...
The next steps are to add a New Analysis, a Task, and a result schema that tells the analysis how to create our result.
New Analysis
Analysis Description
To create a new analysis, open the Manifest.MF if it isn't already open and do the following
...
!add-dependencies.png! The next steps are to add a New Analysis, a Task, and a result schema that tells the analysis how to create our result. h3. New Analysis h4. Analysis Description To create a new analysis, open the *Manifest.MF* if it isn't already open and do the following # Click on the *Extensions* tab and click the *Add...* button # In the *New Extension* wizard that opens, search for *ncsa.analysis.newAnalyses*, select it and click Finish. !New-Extension-1.png|border=1! # After adding the extension point, if Eclipse did not add blank new analysis element, right click on the extension point and select *New > analysis* # The next step is to fill in the required parts for the new analysis. Enter the following information #* *id: ncsa.maeviz.building.example.analysis.buildingSoilAnalysis |
...
* #* *name: Building Soil |
...
Analysis* #* *tag: |
...
buildingSoilAnalysis* #* *category: My-Buildings |
...
* # The final requirement is a descriptor. I recommend creating a new folder inside your plug-in called descriptions and adding a new file called BuildingSoilAnalysis.xml that we will fill in later. After creating this file, you will need to specify it in the *descriptor* field of your new analysis. You should now have a something similar to the image below: |
...
Analysis Task
The next step is to create a new analysis task. This is the Java code that will be executed by the new analysis to produce our building soil analysis output. To create a new task, do the following:
...
!Analysis-Description-1.png! h4. Analysis Task The next step is to create a new analysis task. This is the Java code that will be executed by the new analysis to produce our building soil analysis output. To create a new task, do the following: # Click on the *Extensions* tab and click the *Add...* button # In the *New Extension* wizard that opens, search for *ncsa.tools.ogrescript.ogreTasks*, select it and click Finish. |
...
# After adding the extension point, if it did not add a blank task element, right click on the extension point and select *New > ogreTasks*. |
...
# For the new analysis task, enter the following details |
...
#* *id: ncsa.maeviz.building.example.task.BuildingSoilTask |
...
* #* *name: Building Soil |
...
Task* #* *tag: |
...
buildingSoilAnalysis* #* *class: ncsa.maeviz.building.example.task.BuildingSoilTask |
...
It is critical that the tag for the Task be identical to the tag for the analysis since this is how MAEviz determines which task goes with which analysis. After entering the text for the class field, if you click on the class, a source file will be generated for you. Where it says Superclass locate the class called SimpleFeatureTask and click Finish. You should see a wizard similar to the one below:

Analysis Result Type
The next step is to create a result type schema to specify the new fields created by our analysis. This tutorial will not go into detail about the schema file since it is behind the scope of this tutorial.
...
* !Analysis-Task-Description.png! It is critical that the *tag* for the Task be identical to the *tag* for the analysis since this is how MAEviz determines which task goes with which analysis. After entering the text for the *class* field, if you click on the *class*, a source file will be generated for you. Where it says *Superclass* locate the class called SimpleFeatureTask and click Finish. You should see a wizard similar to the one below: !Analysis-Task.png! Now that you have your class file, add the missing lines of code from the example below: {codetitle=BuildingSoilTask extends SimpleFeatureTask} @Override protected void handleFeature( IProgressMonitor monitor ) throws ScriptExecutionException { resultMap.put( "soiltype", isSoftSoil() ); } private int isSoftSoil() { Random rand = new Random(); return rand.nextInt( 1 ); } {code} h4. Analysis Result Type The next step is to create a result type schema to specify the new fields created by our analysis. This tutorial will not go into detail about the schema file since it is behind the scope of this tutorial. # Click on the *Extensions* tab again and click the *Add...* button # In the *New Extension* wizard that opens, search for *ncsa.gis.gisSchemas*, select it and click Finish. # After adding the extension point, if it did not add a blank schema element, right click on the extension point and select *New > gisSchema*. # For the new result type, enter the following details #* *id: ncsa.maeviz.building.example.schemas.buildingSoilResults.v1.0 |
...
* #* *name: Building Soil |
...
Results* #* *version: 1.0 |
...
* #* *type: |
...
buildingSoilAnalysis* #* \*description: |
...
* #* *file: gisSchemas/buildingSoilResults_1.0.xsd |
...
* #* *format: |
...
shapefile* #* *requiredFields: |
...
soiltype* #* *mapLayer: 10 |
...
* For the schema file *buildingSoilResults_1.0.xsd*, please enter the following information: |
...
{code | ||
:xml | xml | } <?xml version="1.0" encoding="UTF-8"?> <xsd:schema xmlns:gml="http://www.opengis.net/gml" xmlns:xsd="http://www.w3.org/2001/XMLSchema" targetNamespace="http://www.ionicsoft.com/wfs" xmlns:xlink="http://www.w3.org/1999/xlink" xmlns:iwfs="http://www.ionicsoft.com/wfs" targetNamespaceOptionnal="true" xmlns="http://www.ionicsoft.com/wfs" elementFormDefault="qualified"> <xsd:import namespace="http://www.opengis.net/gml" schemaLocation="http://schemas.opengis.net/gml/2.1.2/feature.xsd"/> <xsd:element name="building-soil-analysis" substitutionGroup="gml:_Feature" type="iwfs:building-soil-analysis"/> <xsd:complexType name="building-soil-analysis"> <xsd:complexContent> <xsd:extension base="gml:AbstractFeatureType"> <xsd:sequence> <xsd:element name="maeviz.soiltype" minOccurs="0" nillable="true" type="xsd:integer"/> </xsd:sequence> </xsd:extension> </xsd:complexContent> </xsd:complexType> </xsd:schema> |
...
{code} h3. Example Plug-in |
...
You can download the example plug-in that contains everything in the tutorial by doing the following: |