| Table of Contents |
|---|
Introduction for C3 Data Integration
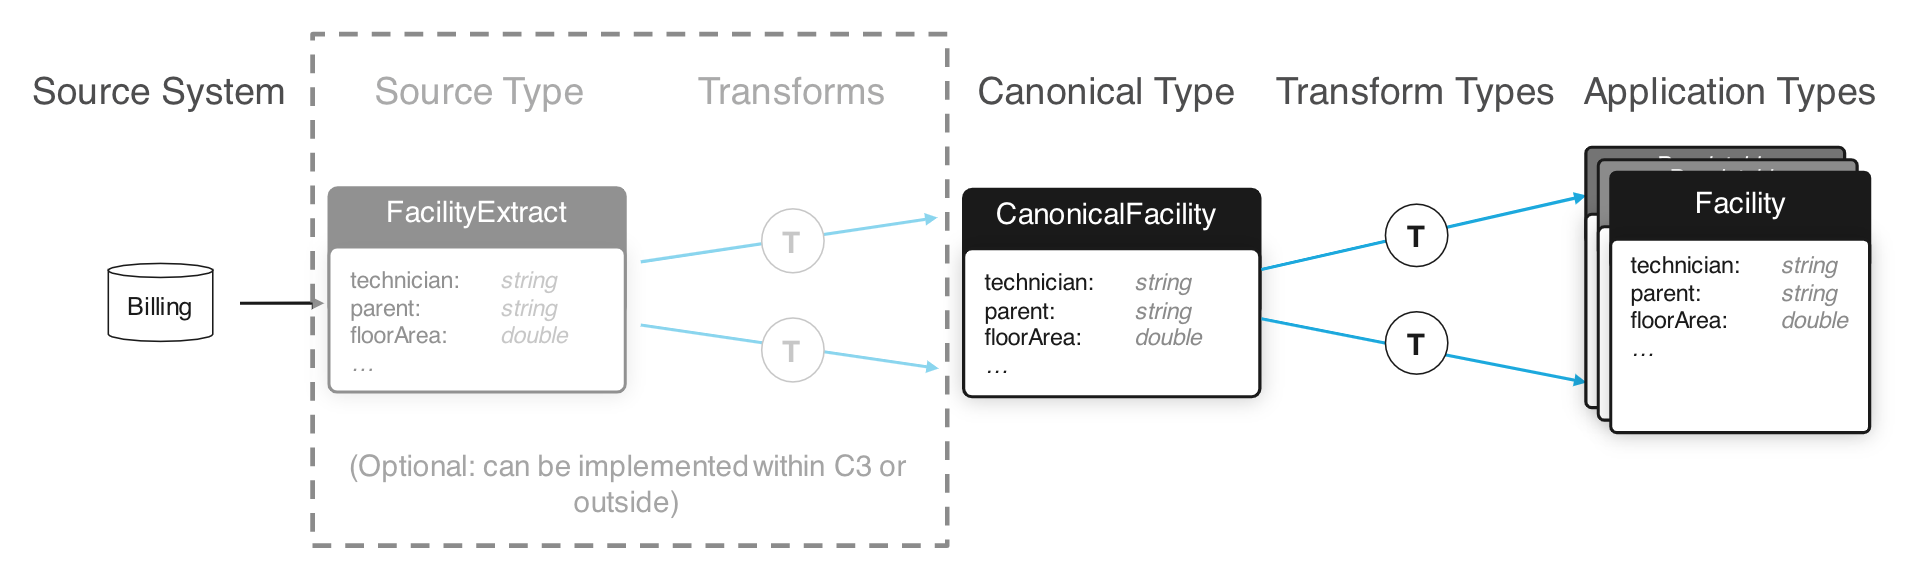
Ultimately, we want to connect our C3 cluster to a source of data. This is done through the process of Data Integration. Generally, data flow from a source file or system into a Canonical Type. This Canonical Type is meant to mirror directly the data source. Next, a Canonical Transform is defined which connects the Canonical Type to another C3 Type which is part of your final data model. A general diagram of this flow follows:
Additional Resources
- Developer Documentation
- C3.ai Academy Videos
- Learning Module: Data Integration
- Data Integration Overview
- Learning Module: Data Integration
- DTI Data Integration Video
Specialized Types
First, we'll discuss the specialized Types which are used throughout the Data Integration system, and then discuss what happens once the data enters the C3 AI Suite. Things within the C3 AI Suite are a little cleaner to think about first. Once we've established how things work inside the C3 AI Suite, we'll follow with how we can get the data into the first step of the C3 AI Suite's Data Integration System.
Canonical Types
A Canonical Type is the entry point of data into the C3 AI Suite. It is a special Type which mixes in the Canonical Type. Mixing in the Canonical Type tells the C3 AI Suite to add some capabilities such as a RESTFUL API endpoint to ingest data, the ability to grab data from a seed data directory, and the ability to kick off the Data Integration pipeline when new data arrives. Conventionally, a Canonical Type should start with the word 'Canonical'. Its fields should match the names of fields in the intended source, and the fields should be primitive Types.
...
Generally speaking, you need to define a new Canonical Type for each type of data source.
Additional Resources
- Developer Documentation
- C3.ai Academy Videos
- Learning module: Data Integration
- Canonicals
- Learning module: Data Integration
Transform Types
With a Canonical Type defined to receive new data into the C3 AI Suite, we need to move this data into the data model. Transform Types define this operation. First, a Transform Type mixes the destination Type and then uses the `transforms` keyword followed by the source canonical Type to indicate where it should take data from. Secondly, Transform Types support a special syntax for their fields. This syntax defines an expression for each field which takes data from the source Type and produces a result to be stored in the target Type in the given field.
...
Once you've defined a transform, when data arrives in a Canonical Type the appropriate transform will be called to populate the data model. You can actually define multiple transforms for the same Canonical Type, so you can populate multiple data model Types from the same Canonical Types.
Additional Resources
- Developer Documentation
- C3.ai Academy Videos
- Learning module: Data Integration
- Transforms
- Learning module: Data Integration
Application Types
Finally, we should mention application Types. There is no special syntax, however, any data you wish to store and later retrieve must end up in a persistable Type. These Types start with the `entity` keyword. Together your defined Types build a data model against which you can easily make complex queries that previously would've required complex multi-database queries.
For instance, for the SmartBulb Types, we can see that the SmartBulb Type includes several other Types, like 'Manufacturer' mentioned earlier. This allows us to select SmartBulbs based on Manufacturer.
Basic Data Sources
Now that we know what the C3 AI Suite does with data once it enters through a Canonical Type, we can explore how to get data to this entry point.
CSV Files
Probably the easiest method is through a CSV file. Simply define a .csv file with appropriate column names, create a Canonical Type whose fields match those names, and C3 AI Suite can use this data to create Canonical Types. Consider the SmartBulb.csv seed data (we'll get into seed data below) located in the lightbulbAD package at 'seed/CanonicalSmartBulb/SmartBulb.csv':
...
If this file is placed or sent to the right place the C3 AI Suite will 'ingest' it, which will start the Data Integration system described above.
JSON Files
Data can also be sent in the JSON format. Generally, the JSON format can have two formats:
...
| Code Block |
|---|
[
  {
    "status": 1,
    "end": "2012-10-23T12:00:00.000-07:00",
    "temperature": 121,
    "power": 63,
    "lumens": 14,
    "start": "2012-10-23T11:00:00.000-07:00",
    "parent": {
      "id": "SBMS_serialNo_SMBLB74"
    },
    "voltage": 944.6,
    "type": "SmartBulbMeasurement",
    "id": "SBMS_serialNo_SMBLB74#BJ"
  },
  {
    "status": 1,
    "end": "2013-09-12T22:00:00.000-07:00",
    "temperature": 13,
    "power": 58,
    "lumens": 919.1,
    "start": "2013-09-12T21:00:00.000-07:00",
    "parent": {
      "id": "SBMS_serialNo_SMBLB74"
    },
    "voltage": 120,
    "type": "SmartBulbMeasurement",
    "id": "SBMS_serialNo_SMBLB74#V"
}, |
Seed Data
Now that we've discussed some basic data formats, we can talk about where to put the data. The first place is the 'seed' directory in your package. Place your seed data file in a subdirectory of the 'seed' folder with the same name as the canonical Type the data is destined for. For example:
...
One negative to this method is it's primarily for small amounts of data. Any data you send in this method will bloat your package and, if you choose to use the browser provisioner, this data will be loaded into browser memory which can be quite limiting. We'll now discuss another method to send data to your C3 Cluster which can work with practically unlimited amounts of data.
Sending Data via POST and RESTful API
C3 AI Suite creates a REST API endpoint for each Canonical Type. This is accessible through the path: 'https://<vanity_url>/import/1/<tenant>/<tag>/<CanonicalType>/<FileName>', where:
...
This import API endpoint acts to essentially copy a file from your local file system into the C3 Cluster. C3 AI Suite will associate this file to your tenant/tag and Canonical Type, and it will remember the <FileName> in case you try to send it again.
Helper Scripts and Tools
There are a couple of tools you can use to execute these HTTP PUT commands.
send-file.py: DTI Developed helper script
If you download the git repository available here:
...
- <vanity_url>: Your Vanity URL.
- <tenant>: Your tenant.
- <tag>: Your tag.
- <endpoint>: The 'location' you want to copy the file to, after 'https://<vanity_url>/import/1/<tenant>/<tag>/'. This is usually '<CanonicalType>/<FileName>'.
- <path_to_file>: The path to the file you want to upload on your local file system.
- <auth_token>: An authorization token generated by '
Authenticator.generateC3AuthToken()'.
curl
You can form an appropriate PUT command with curl. Please follow the detailed instructions in the C3 AI official documentation.
Postman
Postman is a GUI tool dedicated to this type of custom POST/PUT command creation. Please see the C3 AI documentation on how to use Postman here.
Monitoring Data Integration
Source Systems and Source Collections
See the official C3 AI documentation here.
SourceFile
See the official C3 AI documentation here.
Complex Data Sources
Custom External Database
It is also possible to 'add' an external database into C3 AI Suite as well. Through the SqlSourceSystem, SqlSourceCollection, and External Types, you can define a 'persistable' Type whose storage exists on the external database. When you execute fetch commands on this Type, instead of querying an internal database as the C3 AI Suite normally does, it will call out to this external database to perform the appropriate query. Please see the detailed C3 AI developer documentation describing how this works here.
C3 AI Supported Database Technologies
C3 AI supports numerous connectors to existing databases. Please see the detailed C3 AI developer documentation on what's available and how to use them here.
Other Data Formats
Support for other data formats will need to be visited on a case-by-case basis. Contact the DTI at help@c3dti.ai for help determining the right way to ingest your custom data format.