NCSA wiki will be offline Friday, Apr 19, 2024, from 1700 hours until Sun, Apr 21, 2024 in order to upgrade Confluence.
This tutorial will cover the basic setup and use of Eclipse with forge.ncsa.illinois.edu. At the end of the tutorial, you should be comfortable with the following tasks:
- start eclipse and view the forge resource manager for your preferred version of MPI
- submit a batch job to forge via eclipse
- build code with eclipse and the c/c++ perspective (we'll ignore fortran for this tutorial, but can show you the perspective for it)
- use TAU to profile a basic GPU code
- use Eclipse to drive TAU performance analysis
Contents.
| Table of Contents |
|---|
eclipse on forge startup, environment, and forge resource manager setup
To start eclipse on forge ?( locally ), add eclipse (and tau) to your $HOME/.modules setup. This is also the place where you'd select an alternate MPI implementation if you want to stray from the pack and create confusion in this tutorial from the very beginning (openmpi users step forward) . The modules on forge are displayed with the "module avail" command. The prerequisite for running eclipse on forge is X-windows support and ssh X11 forwarding in your ssh client (ssh -Y or ssh -X for linux clients ). Now is the time to find a linux or Mac user with X-windows and ssh (working in pairs) if you don't have that capability on your windows PC:
| Code Block |
|---|
[arnoldg@forge ~]$ echo "module load tau eclipse" >> $HOME/.modules [arnoldg@forge ~]$ grep -v '^#' .modules module load tau eclipse [arnoldg@forge ~]$ eclipse -Xms512m -Xmx512m -XX:PermSize=256m -XX:MaxPermSize=512m & |
When eclipse first starts, it prompts for a workspace location. It's ok to accept the default of $HOME/workspace/ if you don't have a directory with that name, or you may select an alternate location.

The first time entering a new workspace, eclipse loads a default screen. To get right into eclipse and skip all the tutorials and help (which you'll come back to next time ? ), select the workbench icon. 
add the PTP Contributed Resource Manager Definitions
First, you'll add the resource managers plugin from http://download.eclipse.org/tools/ptp/updates/indigo_5.0.4 . Copy the URL into your clipboard and then in eclipse navigate as follows to add the plugin: Help -> Install New Software -> Add (button) , then fill in the boxes with the URL. It should look like this:
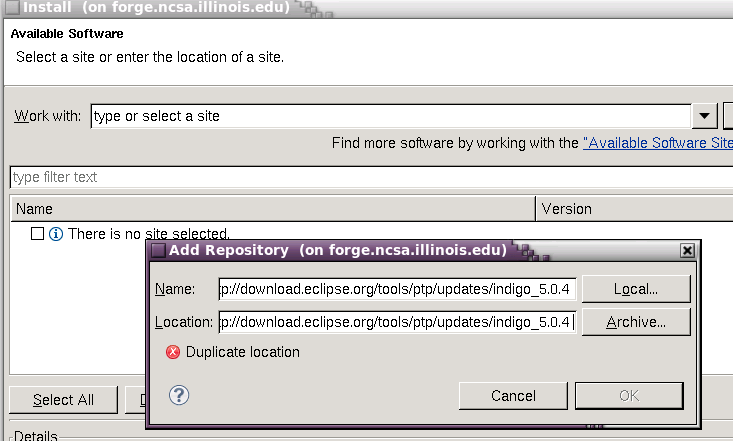
Click OK and select the item you want to install.

Press Next, and follow the install prompts, then allow eclipse to restart when finished. If the dialog boxes indicate the software is already installed, you don't need to restart eclipse.
open System Monitoring perspective and select the forge mvapich2 definition
Under Window -> Open Perspective menu, select the System Monitoring perspective (under Other...) to get started setting up a resource manager to use with forge. The steps that follow will allow you to monitor the system, queues, and submit jobs to forge all from within eclipse. It's beautiful, colorful, powerful, and sometimes runs for hours without crashing. You'll like it. 
Right click in the Resource Managers area background , select "Add Resource Managers", and add the entry for forge mvapich2.

Since we're running locally on forge, leave the Remote Service Provide and Connection Name set to "local". Accept the defaults for the rest of the forge resource manager setup. Normally, you'd setup new ssh connections via remote tools here, but by running locally on forge, that's not necessary. There should now be a forge resource added to the resource managers view.
start the forge resource manager locally and impress your friends and neighbors
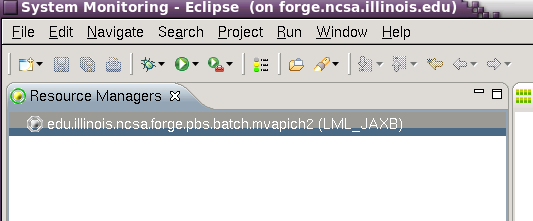
Right click on the forge.pbs.batch.mvapich2 resource and start it. It should go from grey to green and bring up a display like:

You can begin exploring the wonderful world of eclipse resource managers from here. Use the Run Configurations under the Run menu if you have an application or job script ready to run on forge.
| Code Block |
|---|
[jlong@forge ~]$ qsub -I -l nodes=2:ppn=4,flags=ADVRES:eclipse # sample qsub command line showing access to the tutorial reservation |
CUDA code with eclipse
Import the code below into a new c++ project (rt click in the open area under c/c++ perspective's Project Explorer pane. Name your project and select the Makefile and Empty Project for it's type, then when the project appears in the pane right click on your project and : Import->General->Filesystem) and bring in the vecadd/ code from your $HOME. Then follow the steps in the 2nd bullet link (or attached PDF) below.
Code Block cp -R ~arnoldg/vecadd/ $HOME ; ls $HOME/vecadd/
- cdt and cuda makefile projects
- build the project with eclipse ( Project -> Build , or use the hammer icon )
TAU profiling with eclipse
CUDA profiling with TAU is not yet in eclipse, use the command line...
This URL describes using TAU with cuda code:
http://www.ncsa.illinois.edu/UserInfo/Resources/Software/Tools/TAU/#gpusupport
| Code Block |
|---|
$ cd $HOME/vecadd $ tau_exec -T serial -XrunTAU-cupti-icpc -cuda ./vectorAdd $ # press return to exit the vectorAdd program $ paraprof & $ less /usr/apps/tools/tau/README.gpu # experiment with TAU_METRICS set in your environment |

Note for the bored: the dev/ directory contains trial1.cvp created by computeprof--the Nvidia-CUDA profiler that ships with CUDA. You can visualize it with the computeprof command on forge.
Paraprof setup on forge
- start paraprof from the ssh command line (not in Eclipse )
- File -> Database Configuration -> accept defaults , confirm new perfdmf database/schema and "Save Configuration"
- Exit paraprof (important because there can not be 2 paraprof processes trying to access your database at the same time...Eclipse will be starting one in the steps that follow)
TAU with mpi compute pi example
A requirement for using TAU with eclipse locally is to setup the following directory and symbolic link to work around an Eclipse bug with TAU:
| Code Block |
|---|
$ cd $HOME $ mkdir -p ./uf/ncsa $ ln -s $HOME ./uf/ncsa/$USER # workaround to handle Eclipse/TAU trying to submit jobs with $HOME/$HOME in pathname |
Create a new project in eclipse by right clicking in the Project Explorer pane of the c/c++ perspective and choosing the MPI PI C example project with the gcc toolchain. This should create a new project with source files in the src/ directory.
The project will probably need the mpi.h include directory defined and added to all languages/configurations. Build the application when you're done with this step. A Debug/ directory should appear in your project which we'll need later when filling out the Profile Configurations -> Application tab:

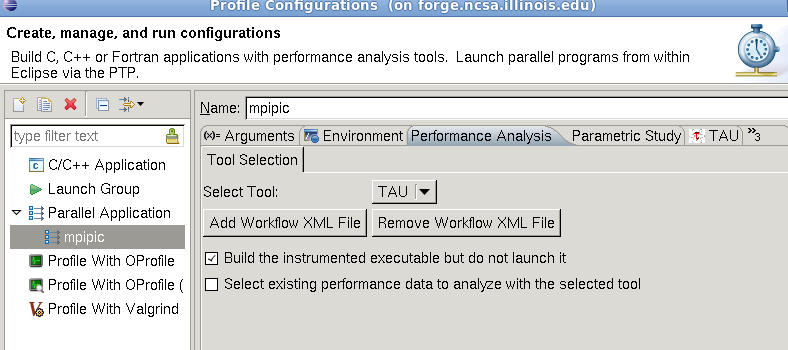
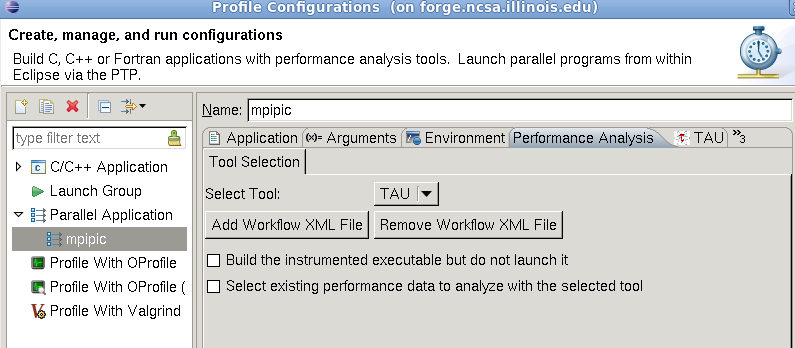
To profile with TAU, there are a couple steps to follow in the c/c++ perspective. First fill out the TAU settings under the TAU tab for the Profile Configurations. For the first TAU trial use the default settings.

Set the Performance Analysis tab to build-only without launch, then Apply and Profile the application which will build a new TAU instrumented version of the code.
While building, watch the console in eclipse for the TAU compile and link commands. These can be useful later if you run TAU outside of Eclipse (or in your larger Makefile to define the compiler and linker commands ):
| Code Block |
|---|
**** Build of configuration Debug__tau-icpc-mpi for project mpipic **** make all Building file: ../src/mpipic.c Invoking: GCC C Compiler /usr/apps/tools/tau/2.20.3-forge/x86_64/bin/tau_cc.sh -tau_options='-optCompInst ' -tau_makefile=/usr/apps/tools/tau/2.20.3-forge/x86_64/lib/Makefile.tau-icpc-mpi -I/usr/local/mpi/mvapich2/mvapich2-1.7rc1-intel-12.0.4/include -O0 -g3 -Wall -c -fmessage-length=0 -MMD -MP -MF"src/mpipic.d" -MT"src/mpipic.d" -o "src/mpipic.o" "../src/mpipic.c" Finished building: ../src/mpipic.c Building target: mpipic Invoking: GCC C Linker /usr/apps/tools/tau/2.20.3-forge/x86_64/bin/tau_cc.sh -tau_options='-optCompInst ' -tau_makefile=/usr/apps/tools/tau/2.20.3-forge/x86_64/lib/Makefile.tau-icpc-mpi -o "mpipic" ./src/mpipic.o Finished building target: mpipic **** Build Finished **** |
Building will create a new directory named similar to the TAU makefile from the TAU tab options. Once the instrumented application is built, then fill out the Profile Configuration tabs for the Application and Arguments to point to that executable and directory:
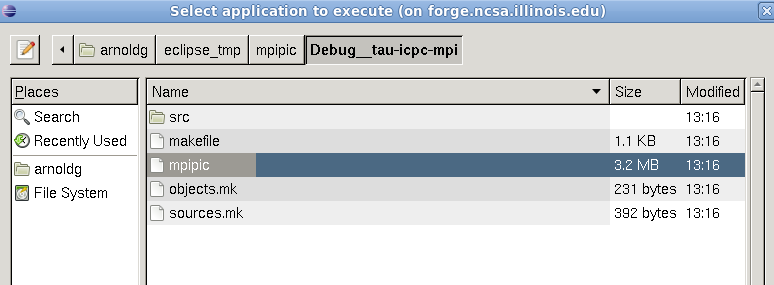
The Arguments tab should be adjusted to point to that directory (deselect the default directory box and browse the path ).

Then in the Performance Analysis tab, allow TAU to profile for this run by deselecting the build-only box:
You will need to fill out the Resources tab to describe the job you want to run. Select a queue (debug), Number of Nodes (1:ppn=4,flags=ADVRES:eclipse) , Mpirun command (mpirun_rsh), Number of cores (should be nodes*ppn or 4), and wall time (ten minutes = 00:10:00 ).
Finally, once the program runs, use TAU. Allow TAU to run in the background if the dialog box persists while the job is submitted.

Homework questions.
How could you use Eclipse with TAU and a Makefile project ?
Can you manipulate jobs (cancel ) in the Systems Monitoring perspective ?
Does the Systems Monitoring perspective support more than one running resource manager ?