NCSA wiki will be offline Friday, Apr 19, 2024, from 1700 hours until Sun, Apr 21, 2024 in order to upgrade Confluence.
The Radiant documentation has moved to a new platform. You will be redirected to the new Creating New Instances page in https://docs.ncsa.illinois.edu/systems/radiant/.
Please bookmark the new URL. Click on the link above if you are not automatically redirected in 7 seconds.
This guide explains how to create a virtual machine (VM) using Radiant's OpenStack Dashboard (Horizon). There is also a description of how to access your new VM and how to mount persistent storage volumes.
Quick highlights:
- If your VM uses a volume (default) it will count against your flash quota
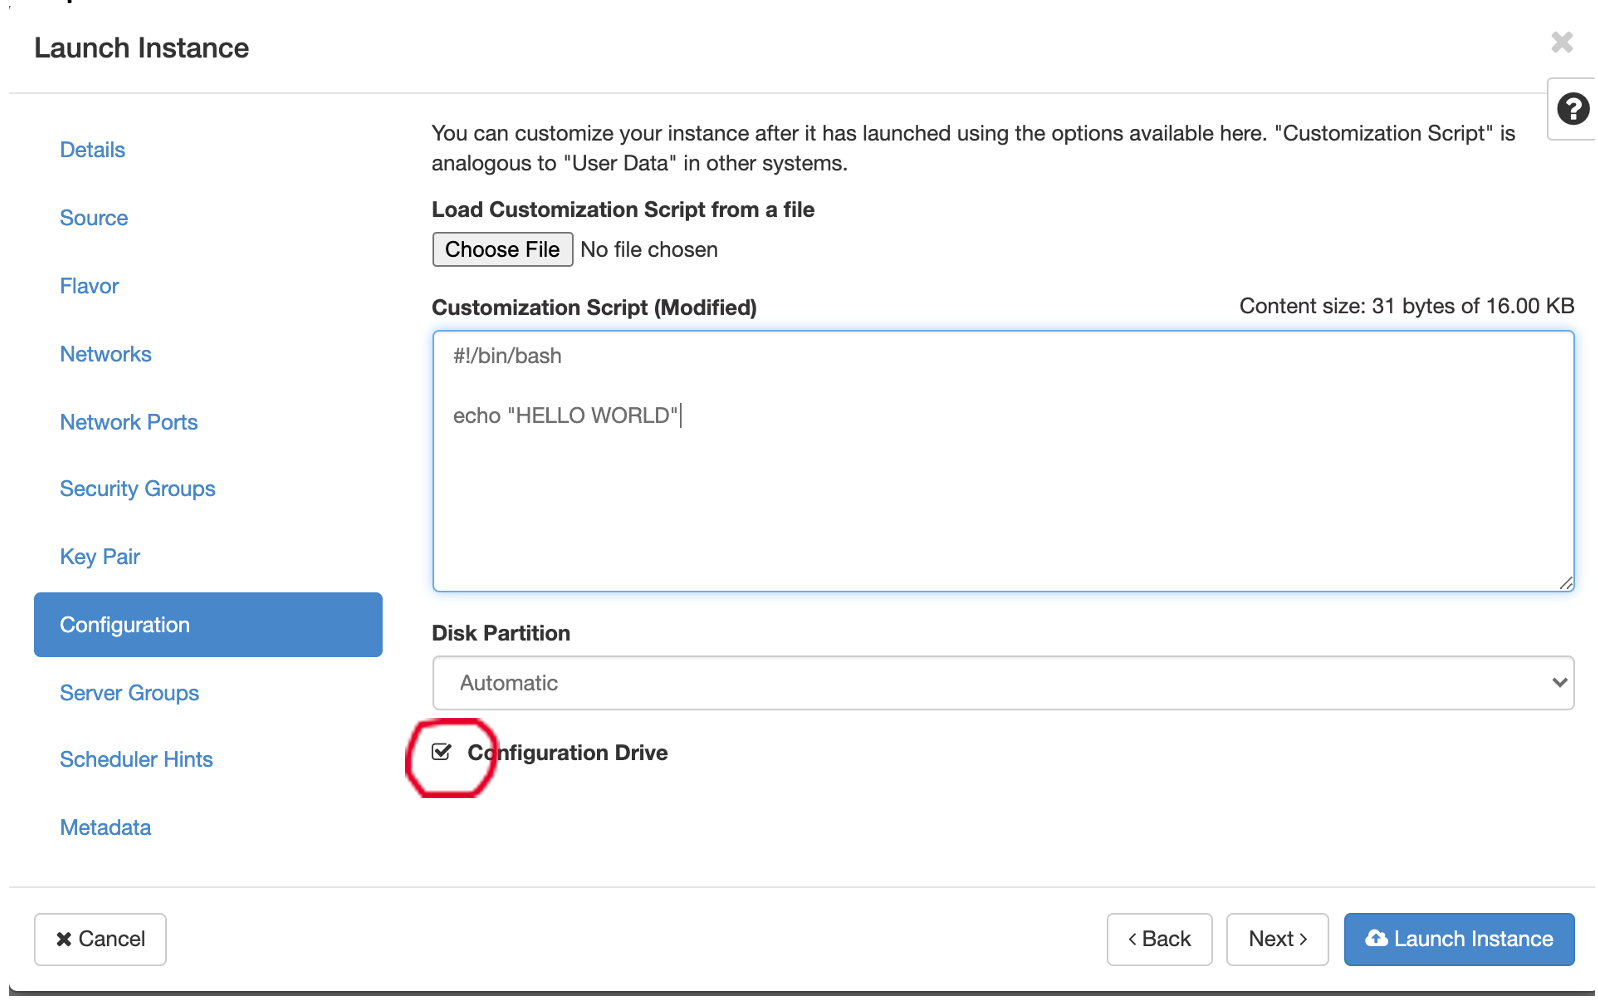
- You need to select Configuration Drive in the configuration tab
Table of contents
VM Creation
Defaults
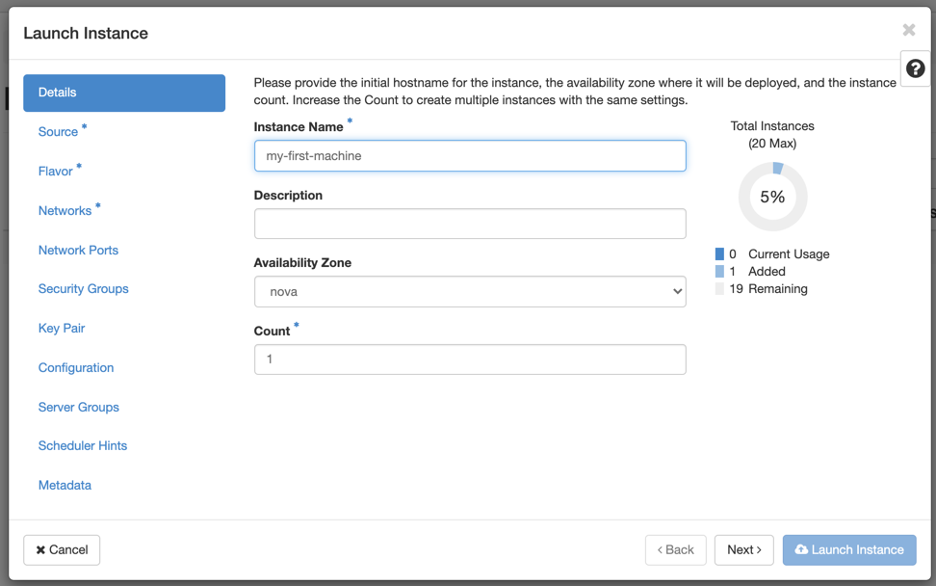
Name your instance
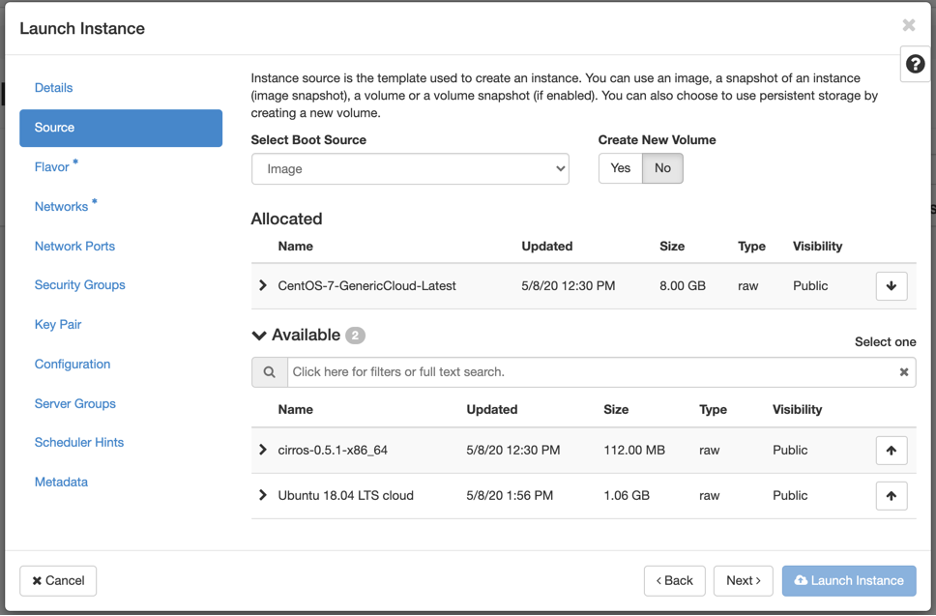
Source
Select base OS and where to run. The default is to create a new volume. This will count against your flash storage quota as well as take up one of your volumes. This is good if you want your data to persist after you tell openstack to delete your instance. If you want to create an instance that can be rebooted (maybe migrated), you can select “No” for this. If you create a new volume you can pick the size of the volume, if you selected no, it will use the default size for the Flavor (see point 3). You will also need to select the base image you start with. This list might change over time.
Flavor
Next you select the flavor (again this list might change over time). If you select a flavor that would use to many resources you will see a yellow exclamation sign next to it. If you selected No for the volume create in the source screen, the volume will be the same size as the root disk.

Networks
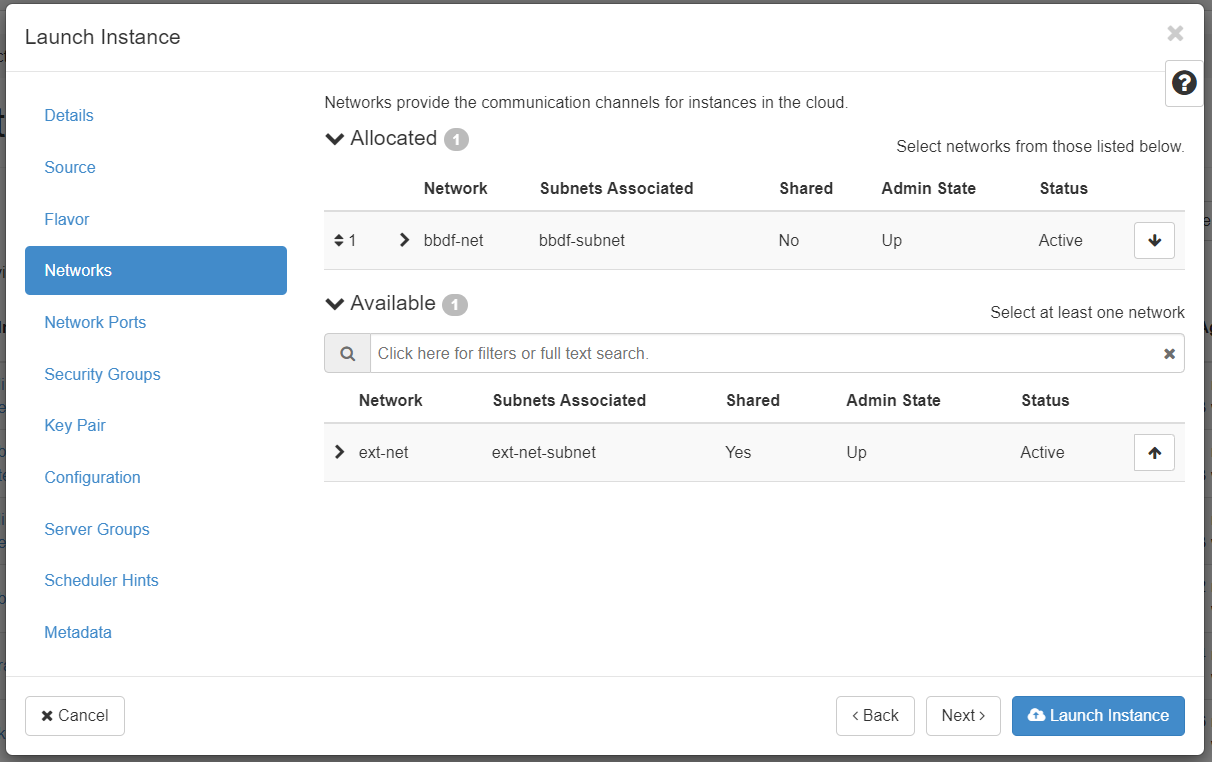
Next we select the network. You may see a few network options to choose from here. Look for a network that is <projectname>-net, for example bbdf-net, where bbdf is the name of your project. Do NOT pick ext-net on this page, if you do your instance will fail to be created. By default the <projectname>-net network does not allow for external connections. Only other hosts on that same network will be able to reach this machine. This is fine for a host that only needs to be reachable from other hosts within your network. If you need to setup a host that is reachable from outside your network, you will need to associate a floating IP address to your instance. This is setup after an instance is created (see below).
Network Ports
Can be ignored
Security Groups
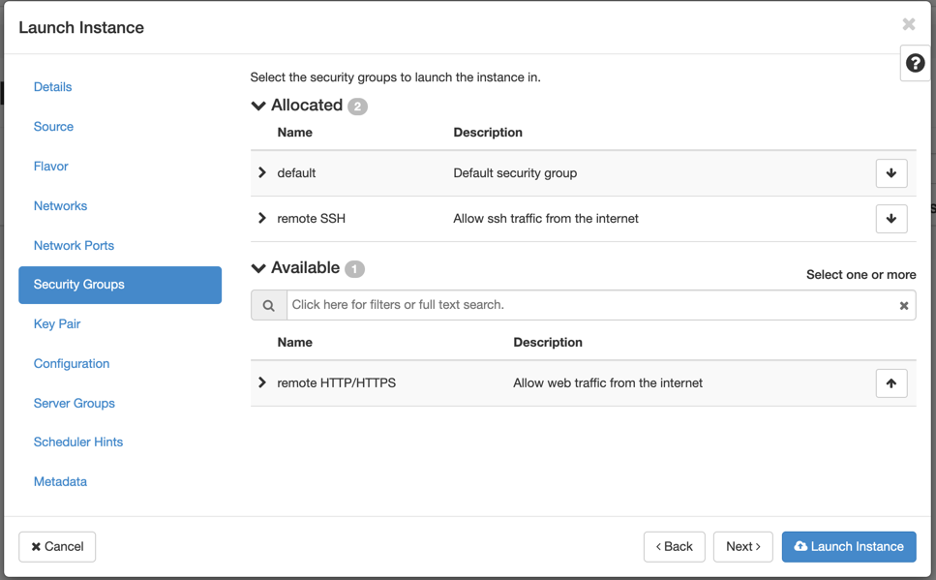
Security Groups will allow you to add additional security groups. It is good to add remote SSH to allow you to ssh to the host. If a port is not opened in the security group, you will not be able to reach that host on that port. This is basically a firewall that blocks all incoming traffic by default.
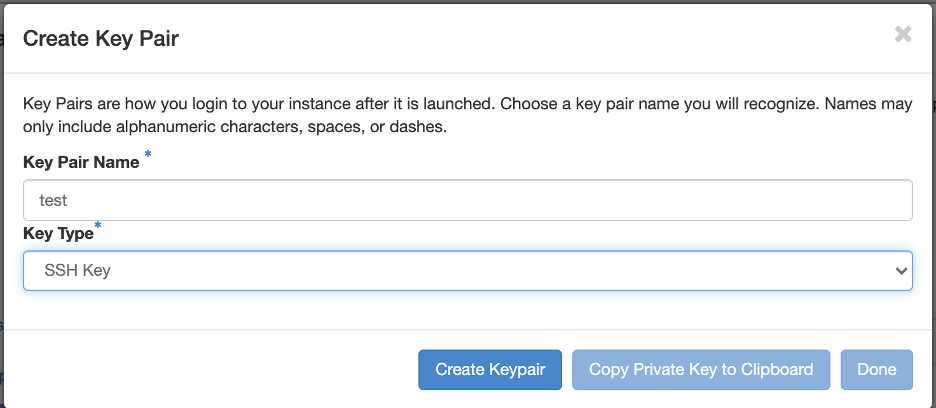
Key Pair
Next you need to either select an existing key pair or create a new one. If you do not select a key pair, you will not be able to SSH into this machine. The default behavior is for most base images to not have a user with a password. See the end for some common usernames for each image. If you create a new key, make sure to copy the private key and save it to disk. It's best to save it as .pem file on your workstation/laptop, as your OS won't attempt to be helpful and add extra formatting if you give it a different extension. Save it in a path where you will have easy access for your later ssh sessions. DO NOT lose this file, or you will have to start your VM instance again from scratch!

Configuration
The next screen allows you to configure the new machine on boot. You can use this to install programs, or do anything else on first boot. YOU NEED TO SELECT CONFIGURATION DRIVE HERE. The default is for it to be unchecked. If you leave it unchecked your key, and/or startup script will not work!
Server Groups / Scheduler Hints / Metadata
You can leave these 3 sections as is. And you can now launch your instance. It should be ready in a few minutes, you can see it listed in the dashboard under Instances.
Assigning a Floating IP to your Instance (Optional)
If your instance needs to be reachable from the internet, you need to assign a floating IP address to it. If that is not needed on your instance you can skip this section.
Locate your instance in the list and click the down arrow button in the 'actions' column. From the drop down list select 'Associate Floating IP'. From the 'IP Address' selection box, pick an available IP from the list, this will be the floating IP for your instance. For 'Port to be associated' you can usually leave the default, but if you have multiple interfaces you can select the appropriate port. Then click the 'Associate' button.
Accessing your instance
Once the instance is Active and Running you should be able to SSH to it. You'll just need the IP address, the username, and the key (you did save it right?)
You would ssh to your instance using: ssh -i test.pem centos@IP_ADDRESS, where
- IP_ADDRESS is the IP address assigned to your instance. If you assigned a floating IP you'd want to use that address when SSHing from an external host, if you are SSHing from a host on your project's own network you can use the IP assigned on the project interface
- test.pem is the key you saved
- centos is the username, depending on the OS you picked this may be different, see that table in the 'Troubleshooting' section below for some common alternatives
If you might get an error that the permissions are too open you can change them using chmod 600 key.
Running in the system
First thing to do is make sure you mount in Taiga bulk storage if you want to use more diskspace. Each instance only has a little storage (40GB) that is primarily used for the OS. You can mount additional Taiga Bulk storage via NFS using:
mount -t nfs taiga-nfs.ncsa.illinois.edu:/taiga/ncsa/radiant/bbXX /mnt/point
Where bbXX is your unique Radiant project code and /mnt/point is the target mount path.
This will make your bulk storage space available on your machine. It will take a few minutes from when your machine boots, until the space can be mounted.
Change your root password
Once you're able to log in remotely as root, be sure to change the root password on your instance. This allows you to access your instance's console via the web interface if you can't ssh in later for some reason.
# Ensure that you create a secure password and that you save it in an appropriate password manager
sudo passwd
Troubleshooting
Trouble accessing systems.
- Did you add Remote SSH as a security group? If not you can edit the security groups and add the group to the instance.
Does the ssh attempt claim that the key is an "invalid format"? the .pem file must contain no extra characters or line breaks in a text editor, it should look like this:
-----BEGIN RSA PRIVATE KEY-----

MIIEowIBAAKCAQEAmN7qws0+gxKKczyFkkngz+uoAzmcHm5HTLvuOz8OatQhAlG1

EzqjI9IDKTZtM7lhvj+6lwCeieLqn8J6Y5/T25k8nLb8pufJvXgtfl8b4gv/Y/KX

ULfHhVNE+qzl95FmkaJwxe5TFtWvlpDRxdOgCfKrLvgaWI+vrUXfhfmsl6YRHHLb

UrnH/vyo3/m6T1rspNdFgCwXy4elLBEVuAqj4uxqkBNDKGeeAuBJ5dBxMJaD+aWZ

dz3GejoXWJ1MvGAjmZ/oQghgvmz18grpw6OeVx1CTlQ2KoRyaOUW8cCum5BYQv9v

zX2KDw1PCHdZKZeAZq9Qia98mlvEPdpaN+0dIQIDAQABAoIBAQCKOg62hBWBOTOd

TV1N0KWJ/ADYoa/ryDWKSef5BGRJ7nPGgBEmSQAYtJ4NFtyZR4f9Gezi+zlfXqJe

QOCf0nYje6TV45QCa1X8j307Zk51D/om6sUtxG+Ru6CEte/e8kd3ahVks8HHxQJX

N62mnlt4g0eMWeSgrZPhLmwV3ZPVLntCUIqiEVYmfSMAmuSruNXKTt3JEYCy7wbo

e0+HBHem16l1v+ADf8vKs3wfQ6L7jSXK9ihN4EFFbb+MxQXZCFCWMZMfWkpV7qZw

UiYjjnLz97fF1d38IJCgZJ/qJTHuIoAxbA2pckXQCT+ttrFdjMo6lsKC5iZ7xcBO

ryHN97ZtAoGBAMiPWLUWMfn9+kXKTYXBmm8gRqRQsHB0KIgQmo1oZW1lQMRsc4Ys

WiWWRYfkup8x+cp+S8TUxfe7LWsjWa718q9QE8g9wLvLypm16WkxnQsCTz/yW7QG

HP33G8zq+FLrncdXN7/77gYNAQJ56ZksOjMl9NQgHP4roOazmQ1ltWrHAoGBAMMg

1smbuORi/8M+vT4EJx5oXYgz/eun+/lpv9xE7oZmubw5wzuGY5sjREWVnxnNFkIV

rfHNorI0jc6JeeG4WivcJ7fDE3bTiNKz8JJbcavAIxNpjNQO9QkxCWjtt6k0TE8K

gvasYxrQb8pSR3nSqis31WY2mg+W/u5nTeHW/BDXAoGAAl5fB9R5RqCPQh+/hqLg

tgtFik9BpjJZADJiAOWIvSADAc7eFmmTrvn1XEOBSLwIXTHcpzh0Fhbp1GgYeQ6C

jTt+4FCKZC1l+SbC2PEzD5w5X2H3X0rrMLyoYWUtBZ2uwVnwWJ4bE4s3xdW2wo5Z

KZ17JL40WXQedFsOpa/b0qUCgYAVtH9v6ayFayW8GCyAy4F2dnGBBxeFsSfsNIEt

BVXrCV47u8klw+sshJ3Bh8Us341MSJESxqcEX6gug0hVfWY6XsDkRgTSQPGFTpLC

FP3t9u9v51vM8uT64sODMn4tii261RaATeiwQONOhByDRpW7PPi15/j3Jvqwljkp

l/pt/QKBgFTlbV9jkl7Pke4NC+yCrhe79qTvJrLJ8hFJwnw+zGdrlG2tyWK6J7Ar

lSPGPMYLo7ExA2J4JxsNes1PVHpXiXIelHUsiQQDaz/RBzMJgpds3M1MU5Nl0HtW

r9M2paxYkiUqsM5ojDktjB0IpxNG4mWzL07D4MW4YzxCbRWU/kA6

-----END RSA PRIVATE KEY-----
Did you use the right username? The following is a list of known usernames:
OS username CentOS centos
Ubuntu ubuntu CoreOS core RedHat cloud-user
Rocky rocky/cloud-user
Trouble in the system
- I’m out of diskspace. Make sure to mount storage condo for all your data. You only have a small amount of root storage.
1 Comment
Jeff Terstriep
For those using RedHat, the username is cloud-user.