NCSA wiki will be offline Friday, Apr 19, 2024, from 1700 hours until Sun, Apr 21, 2024 in order to upgrade Confluence.
What is the C3 IDS?
C3 AI Integrated Development Studio (IDS) is a low-code/no-code environment for developing, deploying, and operating enterprise AI applications. C3 AI IDS provides data ingestion, data modeling, machine learning feature engineering and model lifecycle management, and a metadata-driven UI development tool. C3 AI IDS allows developers and data scientists to focus on solving business problems by providing an integrated environment that abstracts routine and complex application development tasks.
This is a specific task oriented demo/example for Data Integration on C3 IDS. If you are looking for more detailed guidebook, please visit C3 IDS Documentation.
How to integrate Kaggle Diamond CSV Dataset into the C3 AI Suite using C3 IDS (Step by Step)?
Step 0: Getting an account and space from DTI DevOps Team
Step 1: Creating an Application on IDS
(If you already have an application on IDS, you can skip this step)
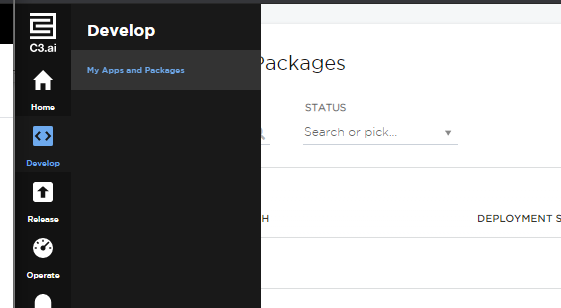
First, go to the IDS Develop section and click "My Apps and Packages".
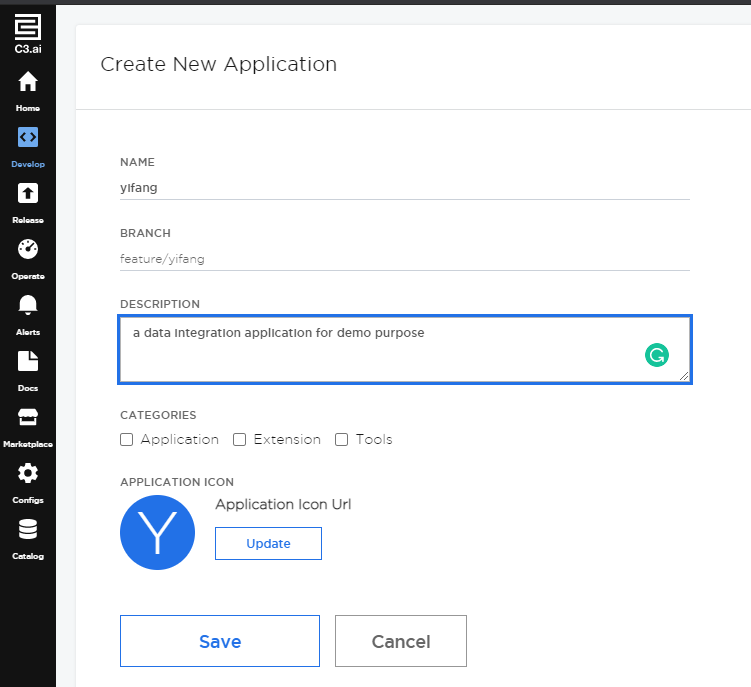
Second, on the right top, click "Create Application".
Third, enter your name, and description, then hit "Save" Button, it will take a while to create the application.
Then, you will be able to see our application showing under the screenshot:

Finally, click on the "feature/yifang" branch, you will be going to next Step.
Step 2: Create a New C3 Type for Dataset
In this step, you are going to create a new C3 Type for your dataset. For more details on C3 Type, feel free to check out the C3 Type training page.
In order to import a new Dataset in, C3 IDS suggested two major methods of importing a new Data Source: Importing using Databases or importing using CSV data files.
Step 2.1: Create an Empty C3 Type "diamond"
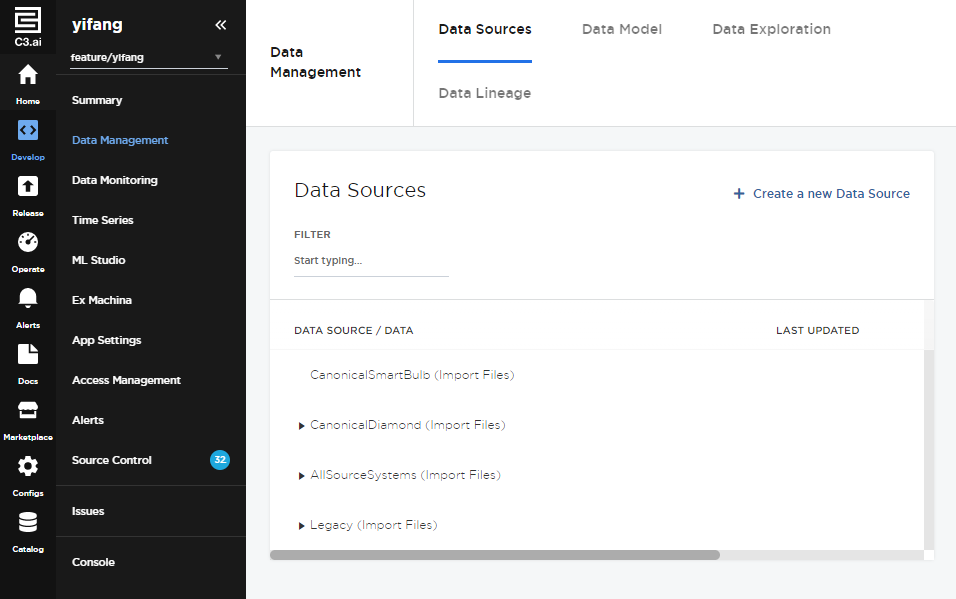
First, we need to go to the "Home" → "Data Management" tab:
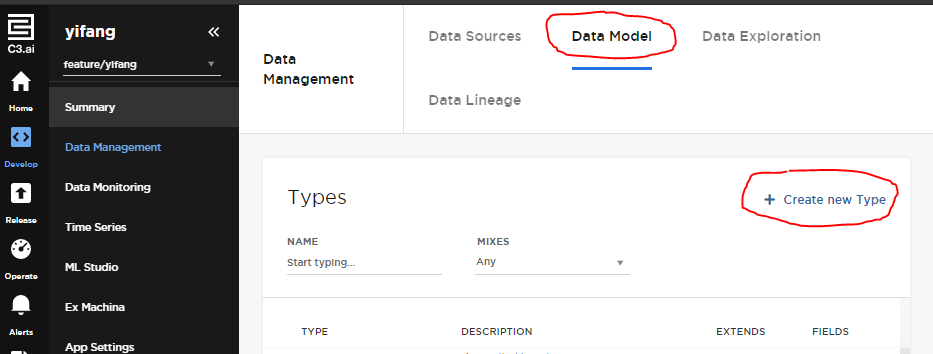
Then, we need to create a new C3 Type for our data in the "Data Model" section.
In our case, we will be creating a "diamond" C3 Type, along with all the fields showing in the CSV file.
Therefore, we will go to "Data Model" on the top, then click "Create new Type":
You will see the Creating a new C3 Type Page after clicking the button.
You will need to have some basic understanding of C3 Type (feel free to check out the C3 Type training page). In our case, we will need to fill in the initial step to create an empty C3 Type:
- NAME of the C3 Type
- DESCRIPTION of the C3 Type (optinal)
- SCHEMA NAME of the C3 Type
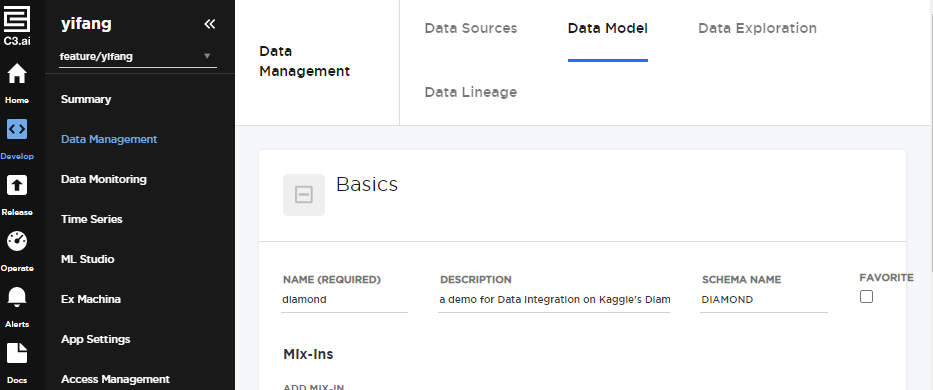
Then, hit "Save" button at the end of the page. This will create the basics of the C3 type "diamond".
Step 2.2: Adding Mix-ins into the "diamond"
However, this is an empty C3 Type, we will need to add several properties into this "diamond" C3 type.
There is a mixed-in "Persistable" we will need to add into every permanent C3 type, which basically tells the platform to write this type into the database and store it permanently. And when we perform it, we will need to find this Mixed-in and mix itself into the database:
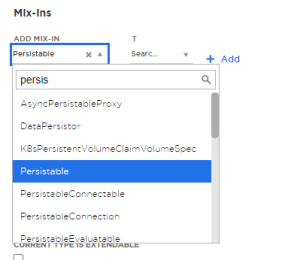
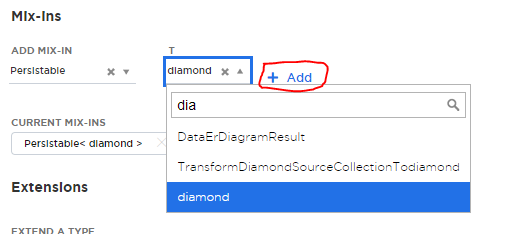
After you finished all steps above, DO NOT forget to click "+ Add", it will have the "CURRENT MIX-INS" section to show you on the right image above.
Step 2.3: Adding Fields into the "diamond"
Then, you will need to add all those fields from CSV file into the "diamond" C3 type in the "Field List" section by clicking "+ Add Field".

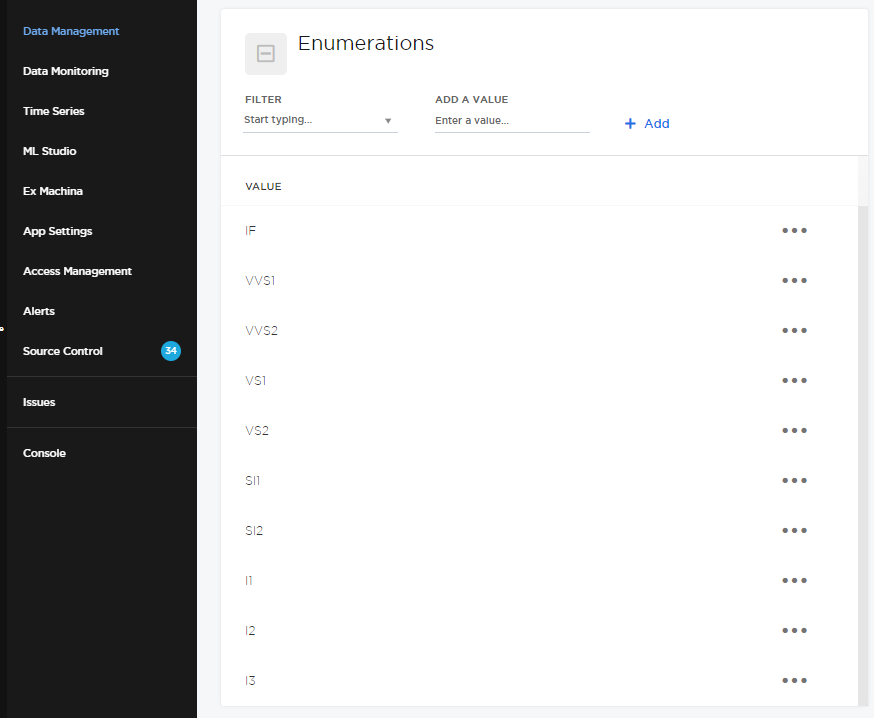
Most of the fields should be no problem, but there is a special field type you may want to use "Enumerations", such as field "clarity":
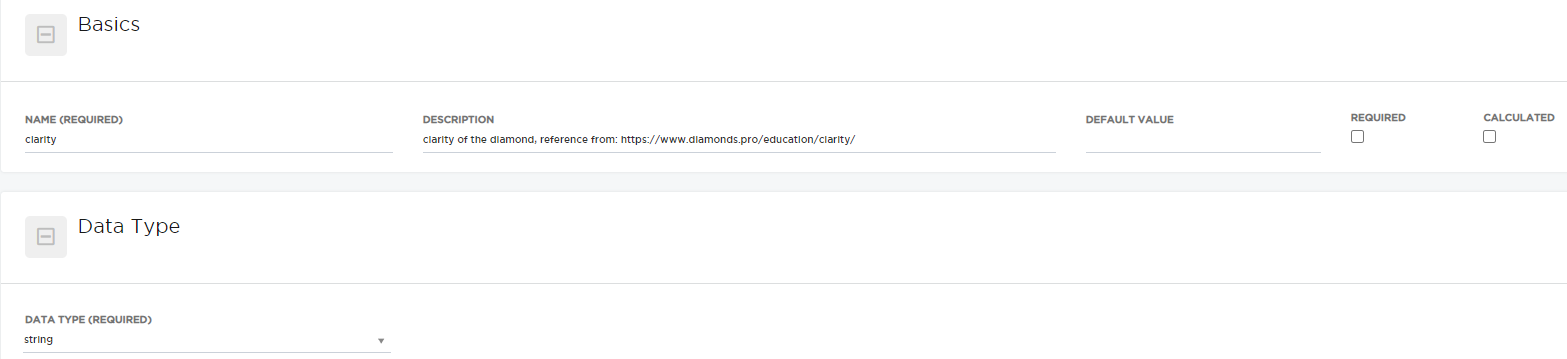
For this field "clarity", there are only a limited amount of string values will be existing in this field based on the reference from website (link). Therefore, its data are Enumerated by the following:
After you have entered all fields, you should be good to go to the next step, but DO NOT FORGET to hit "Save" button in the fields, and "Save" button in the "diamond" Type:

If you still have questions on this part, feel free to check the video recording section of this page, we have an video demo as well.
Step 3: Importing Data Into C3 Platform
Going back to the "Data Sources" section under the "Data Management" Section. Then, click on the "Create a new Data Source" on the right top of the screen.

Method 1: Importing using Databases
To be updated
Method 2: Importing using CSV data files
If you are following up on the current page, you might want to edit something in the raw file before process into the next step. In the raw file, the ID was not having a field name on the first row on the first column, you can add "ID" in that row in order to keep the integrity of the data for "the first line is the header of the file".
First, you will need to go to "Data Source Type", change it from "External Data Store" into "Import Files".
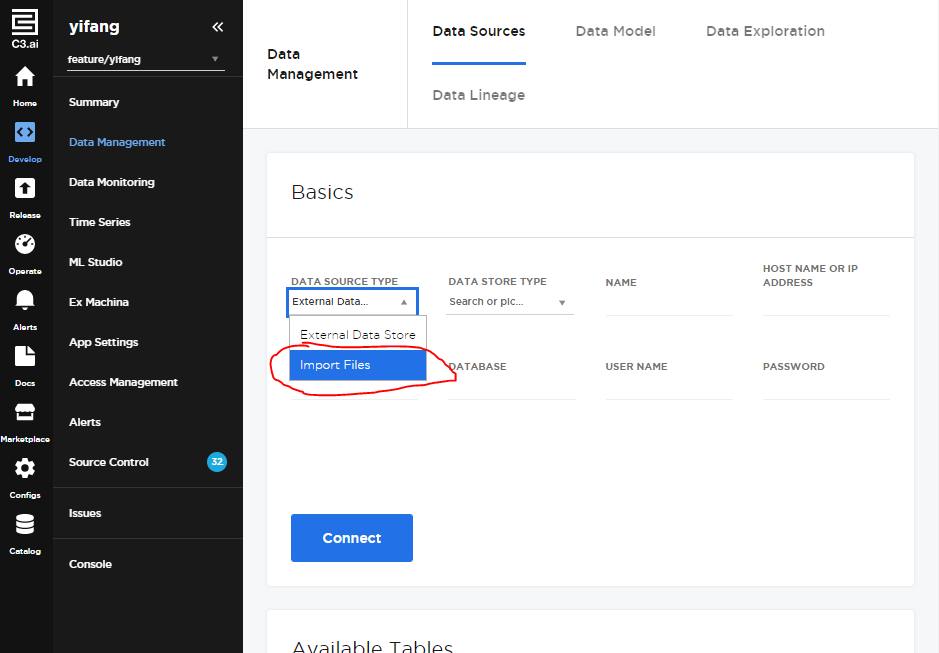
Then, you will see the importing data page, the data we are using is a public diamond quality dataset from Kaggle (Dataset Link). It is about 2.68 MB CSV formated file. We are going to use this dataset as an example for data integration demo.
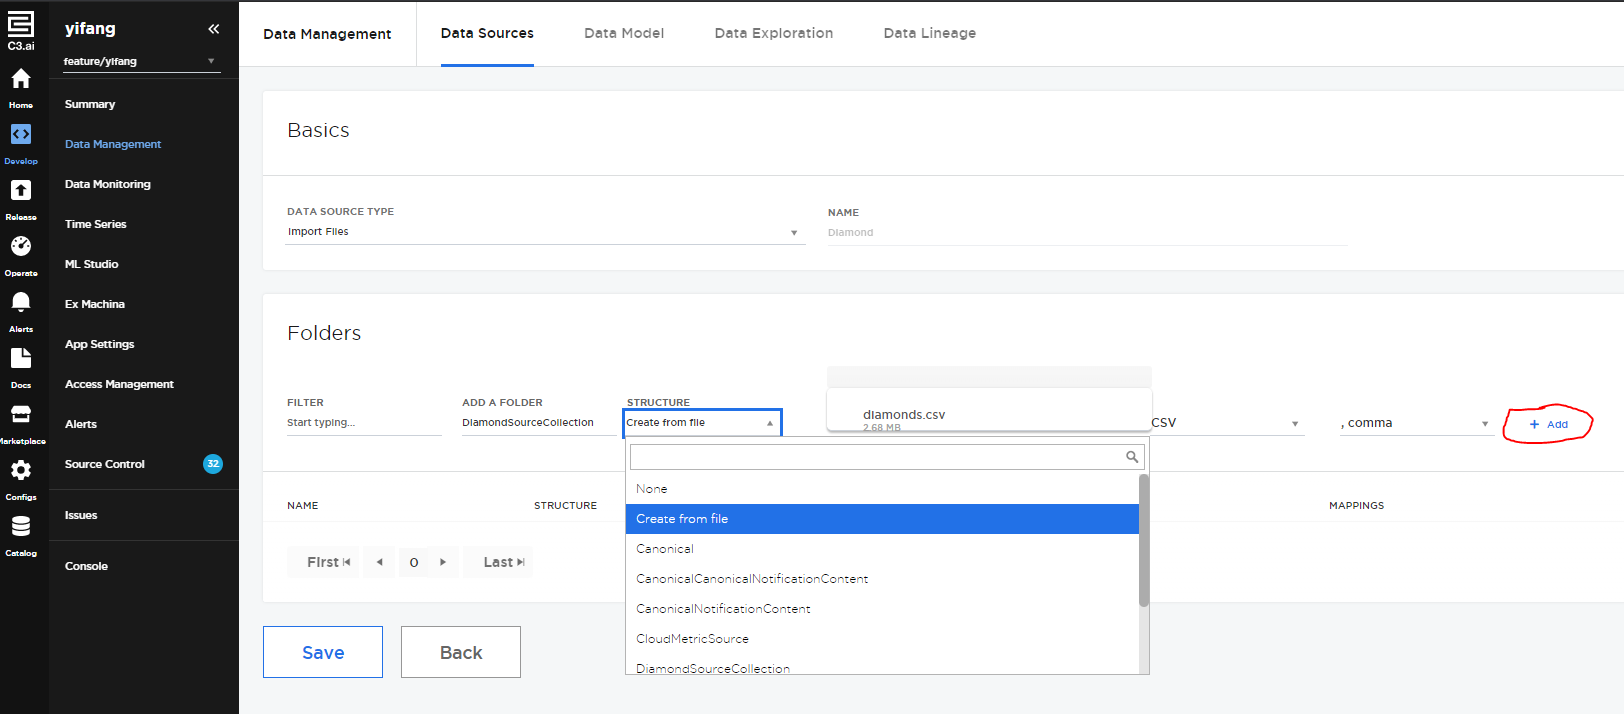
There are several places you will need to fill in:
- Making sure you provided a folder name which is located below the "ADD A FOLDER" section.
- Making sure you selected the "Create from file" option in the "STRUCTURE" section.
- Making sure you have uploaded the file at the "Click to select a sample data file" right after the "STRUCTURE" section.
- Making sure you have fill in the "Comma" or other delimiters for your CSV file.
- Making sure after you fill them all out, you have clicked the "+ Add" button (which circled in the attached image above).
The uploading will take a while depending on your data size, you will need to click the "Save" button (on the left bottom) to save your progress.
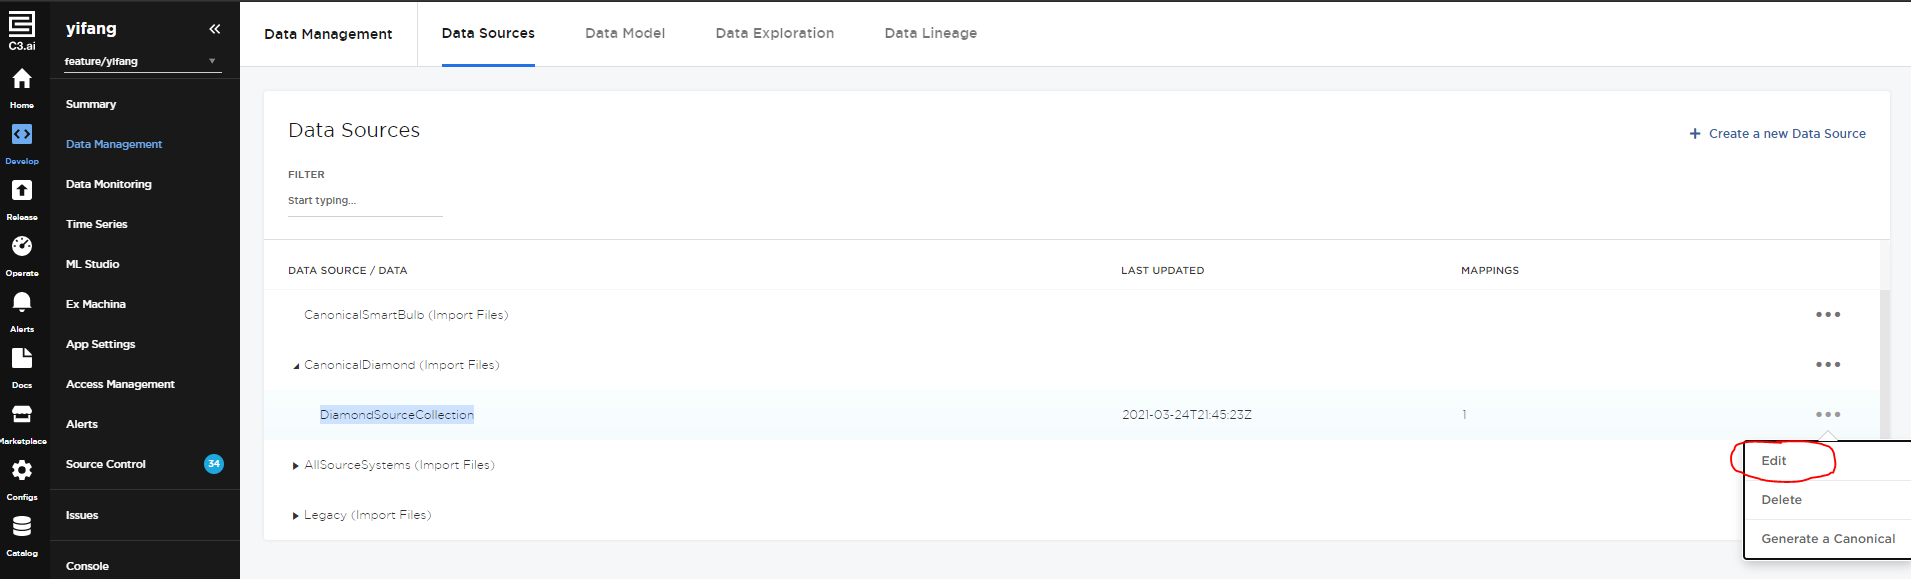
Step 4: Using the "DiamondSourceCollection" Transform the Raw Data into "diamond" C3 Type
Go edit on "DiamondSourceCollection" in Data Source:
Then, you can scroll into the Mapping Section to click "+ Manage Mappings".
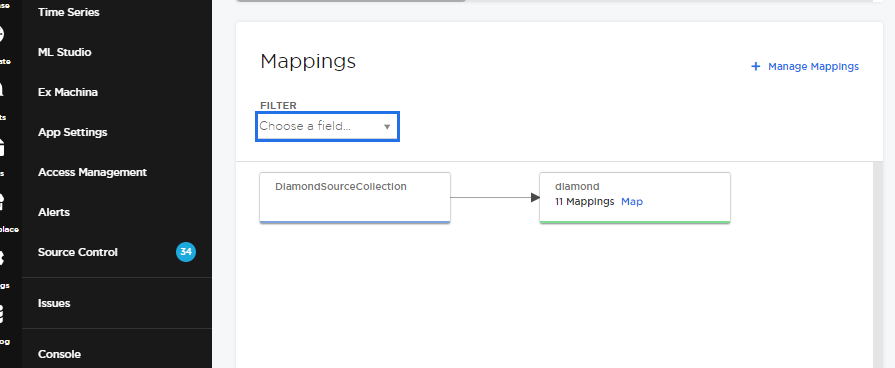
In the Mapping Section, you can filter out the "diamond" C3 Type to start the Transformation:

Then, you will see this small section "Map" after you saved out and exit back to the "DiamondSourceCollection" Page:
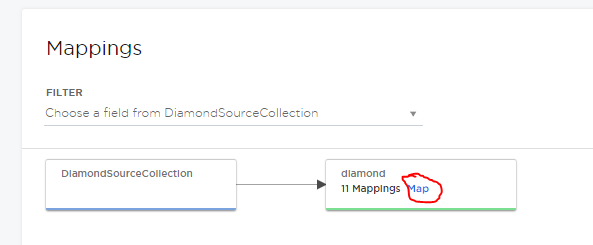
You will need to click it and you will see the Transformation page.
In our condition, since all field names are matching to the raw CSV data file, we can use "+ AutoMap". But when you are actually doing it on your dataset, you may use Transformation Conditions or other options there. For more details, feel free to check C3.ai Offical Notebook (Link).
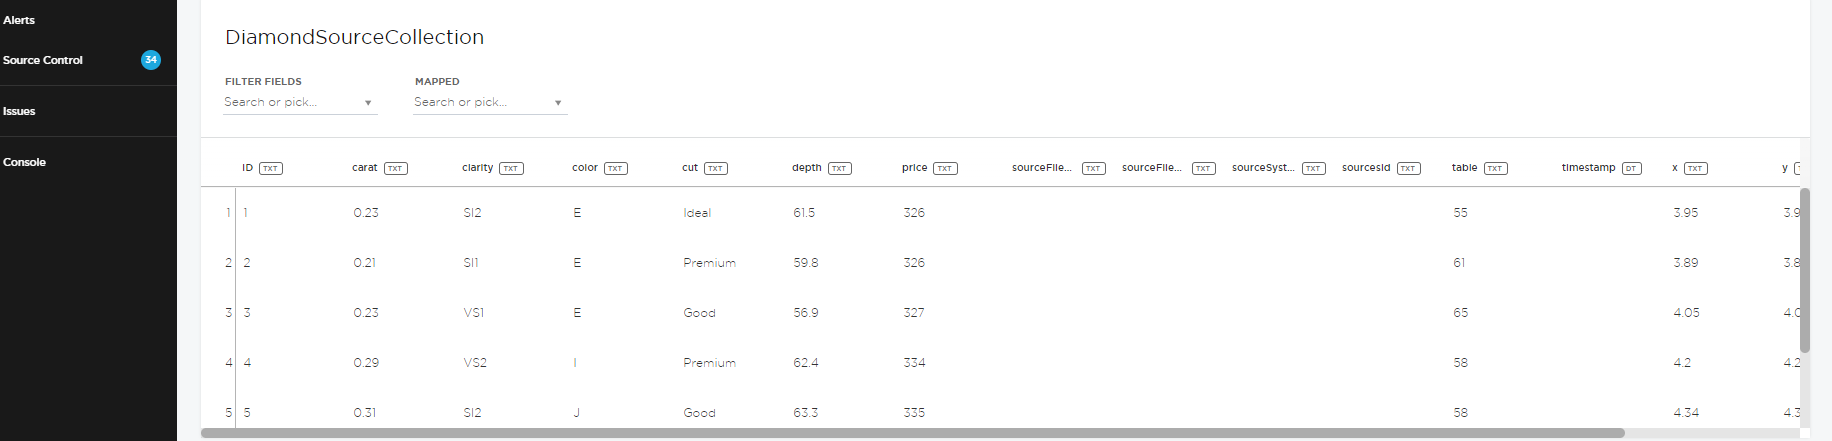
If your automap successes, you will see the data showing below.

After all those above, you need to save all progress and go back to the "DiamondSourceCollection" Page.
You will see the "diamonds.csv" file is imported into your "Data Files", and now you need to actually process the CSV into your "diamond" C3 type.
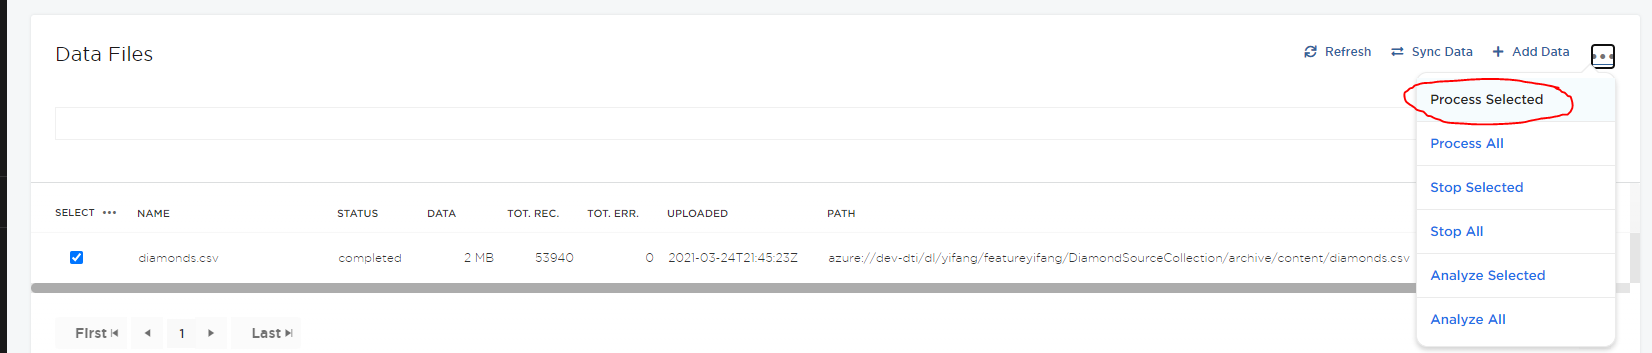
And after you see the status becomes "completed" (like showing above), your "diamond" dataset should be totally safe in the C3 AFTER you hit the "Save" button.
Congratulations, you have uploaded your CSV file into the C3 AI Suite! You can check it in the console by using "c3Grid(diamond.fetch())" command.
3 Comments
Yifang Zhang
Yifang Zhang
CSV ID → DiamondID
Yifang Zhang
Gitbook will be migrated to C3.ai Dev:
https://c3ai.gitbook.io/integrated-development-studio/-M7d9XR2p6j-tlKAXBTN/develop/data-management/creating-types
C3 Dev Doc newest version:
https://developer.c3.ai/docs/7.19.0/guide/guide-implementation/adm-introduction